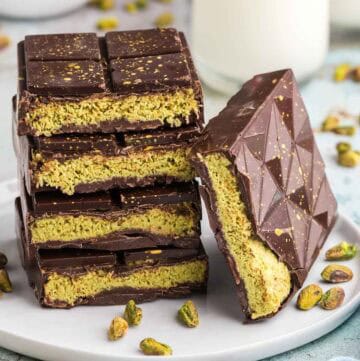
Dubai Chocolate Bar
If you love chocolate I'm sure you will be an instant convert to the Dubai chocolate bar on first bite. These bars are pure indulgence, with their yummy smooth chocolate and irresistible crunchy-yet-creamy pistachio filling. Its the Middle Eastern sweet you didn't know you needed - until now.
Equipment
- Microwave
- Microwave Safe Plastic Bowl
- Chocolate Mold
Ingredients
- 3 tablespoons Salted butter
- 2⅓ cups Chopped kataifi (130g)
- 7.1 oz Pistachio cream 200g
- 1 tablespoon Tahini
- 12 oz Chocolate (see Pro Tips Tricks and Substitutions)
For Decoration
- Gold Luster (optional)
- 1 teaspoon Vodka (optional)
Instructions
- Two sets of instructions provided for if you want to use couverture chocolate and temper it for a glossy finish, sharp snap, and resistance to melting in your hands, or if you would prefer to keep things simple and just melt your favorite chocolate. The difference is explained in the blog post above.
Prepare Your Chocolate Mold - Same for both methods
- Make sure your chocolate mold is clean. A quick wipe with isopropyl alcohol helps to make it super clean by removing any smudges.
- If decorating with gold luster, dissolve a small small amount in a teaspoon of hard neutral alcohol like vodka. You can paint the gold luster onto the mold, or you can make droplets by flicking a small craft paintbrush of the "liquid luster" towards the bottom of the mold. Once you are happy with the amount of decorating, set the mold aside to allow the alcohol to evaporate.
- See Notes for an alternative decorating idea. Decorating the bars is totally optional, you can skip it if you like.
Making the Pistachio Filling - Same for both methods
- If using fresh kataifi like me, cut it into small pieces about ¼" long.
- Melt the butter in a frypan set over medium heat. Once melted add in the chopped kataifi and toss with a spatula. Don't walk away from the frypan as the toasting can happen quickly. Just keep moving and tossing the kataifi in the pan until it is a light toasty brown.
- Turn the heat off and stir in the pistachio cream and tahini until homogenous. Set aside to cool while you temper or melt your chocolate. If you want the pistachio cream center more soft and liquidy, just add a little more pistachio cream.
Melt and/or Temper Your Chocolate
- If you want to make your bars as professional looking as possible, use couverture chocolate and follow instructions under 1. Tempering Couverture Chocolate. But if you aren't worried about the bars having a glossy shine, sharp snap when broken, and a resistance to melting in your hands, you can follow Instructions 2. Melting Your Favorite Chocolate.
1. Tempering Couverture Chocolate
- I am using the microwave tempering method as I feel it is easiest and requires the least amount of equipment.
- If your chocolate is sold as a bar, chop it up into small bits. If it is sold as callets (looks like chocolate chips) you can just place them directly into a microwave safe plastic bowl.
- Place the bowl in the microwave for a 45 second burst. Remove and use a rubber spatula to stir the chocolate. The chocolate will show signs of softening but still not be very melty. If your microwave isn't as powerful as mine (1200W) your chocolate may still look the same but still give it a stir to see if you can squish the chocolate a bit and distribute the heat.
- Place the bowl back in the microwave for a 20 second burst. Remove and stir again.
- Do another 20 second burst and stir. You will have to decide how much time to give it in the microwave to get to the point where 80-90% of the chocolate is melted but the other 10-20% is not. Keep stirring to try to distribute the heat to melt the last bits of chocolate. If the last bits are really stubborn you can try 5-10 second bursts in the microwave with stirring between bursts.
- Once you melt all the last pieces of chocolate by stirring, you have tempered chocolate. To double check your temper place a small piece of parchment into the chocolate and remove so that there is a thin coating on it. Lay the parchment aside on the bench. You have a good temper if it sets up in 3-5 minutes, has a bit of a sheen, easily comes away from the parchment, and has a bit of a snap when you break it in two.
- Different couverture chocolates have different fluidities at this point. Some are easier to pour than others, if your chocolate is still a bit thick you can give it a burst or two in the microwave until it is easier to work with. This is where you run in to the danger of overheating it and melting away your βV crystals, so heat it slowly. If you do have an instant read thermometer it might be good to check the temperature to just make sure you don't go over the working temperature for the chocolate you are using. The working temperatures are discussed in the blog above.
- You are now ready to add it into the chocolate mold - move on to Assemble The Chocolate Bars.
2. Melting Your Favorite Chocolate
- Take about 12oz of your favorite plain chocolate (no nuts, fruits etc) and chop it up into tiny pieces and place in a plastic microwave safe bowl.
- Place the bowl in the microwave for a 45 second burst. Give it a good stir with a rubber spatula even if it doesn't look like anything has changed. It will help distribute the heat around the chocolate.
- Give the bowl a 30 second burst in the microwave. Again stir well. Continue with short bursts in the microwave (5-20 seconds) with stirring until all the chocolate has melted. You don't want to get the chocolate super hot at any point, but just want to give it enough heat to melt it and make it easy enough to work with. Once all melted you are ready to move to the "Assemble The Chocolate Bars" step.
Assemble The Chocolate Bars
- Once you have your melted tempered chocolate you can pour about half into your two chocolate molds. use a spoon or offset spatula to spread the chocolate around and up the sides of the mold. Its hard to be perfect but try to make all the edges an even thickness.
- Set aside to cool for about 15 minutes. I let it cool at room temperature but many people have success with 5-10 minutes in the fridge to help the chocolate set up.
- Once the first layer of chocolate is set you can add the pistachio cream-kataifi mixture. If this mixture is really solid you can give it a 10 second burst in the microwave to loosen it up, but you don't want it warm enough to melt the chocolate. Evenly distribute the pistachio mixture between the two molds and flatten out the top.
- You may have to re-heat the melted chocolate in the microwave a bit if it has started to solidify in the bowl. Again, just do it in short bursts with stirring until you can work with it. Pour the rest of the melted chocolate on top of the pistachio mixture and smooth out with a spoon or offset spatula.
- Set aside to cool for 15-20 minutes. Alternatively, you could pop it in the fridge for about 10 minutes.
- Once set, it is ready to eat. Break open and enjoy!
Notes
- Another common method for decorating the Dubai Chocolate Bar is to melt white chocolate and make a random "splashy" pattern by drizzling the white chocolate on to the chocolate mold first and allowing it to set up before adding the dark or milk chocolate. You can even add an oil based food coloring to give the white chocolate if you like.
- When it comes to homemade chocolate bars, couverture chocolate is the best choice. Thanks to its higher cocoa butter content, it can be tempered to give you that gorgeous shine, satisfying snap, and a bar that won’t melt too easily in your hands. But if tempering sounds like too much hassle, don’t worry - you can still use your favorite chocolate. Melt down Lindt bars, Dairy Milk (Cadbury), Jersey Milk (Nielsen) etc., and it’ll work just fine. Just keep in mind the bars might turn out a bit softer and won’t have the same glossy finish, but they will still be delicious. Some people even use brown candy melts from the craft store. I wouldn't recommend this because although it is made for melting and will look nice and professional, I can't imagine eating a bar of candy melts.
- Working with chocolate can be messy as it isn't the most fluid for pouring etc. unless you have copious amounts to work with and are fine having a lot leftover. So give yourself some grace if they don't turn out perfect looking the first time, we all get better with practice.
- If you can't find kataifi and don't want to order it online I think you could get away with adding slightly broken up rice krispies to the pistachio cream and tahini. It will give a crunch and won't alter the flavor very much. If you do use rice krispies, you don't need to toast them in butter, just use as is. That being said, a little heat can loosen up the pistachio cream and tahini making it easier to mix the rice krispies in.