
Sugar cookies are one of those classic recipes every home baker should have in their back pocket. Whether you’re baking heart-shaped cookies for Valentine’s Day, pastel treats for Easter, festive cutouts for Christmas, or simple rounds for an everyday sweet, this is the sugar cookie recipe that works for every occasion. Soft yet sturdy, lightly sweet, and easy to decorate, these cookies are designed to be endlessly adaptable, so once you master the base recipe, you’ll be ready to bake beautiful sugar cookies for any season, holiday, or celebration.

This is an exciting post for me, because sugar cookies are my absolute favorite cookie. They are simple, a little understated if not decorated, but they are just the right sweetness. I love that vanilla undertone that comes out in every bite. They haven’t always been my favorite cookie though. I don’t think I had ever tried one until I was 18 years old!
Yes, you read that right, 18. My mom baked a bit, but she never made sugar cookies. Maybe they weren’t her thing, but they just never made it into any of her baking endeavors. I finally got my first taste at a friend’s, it was love at first bite for me. I think my friend and her mom probably thought I was a bit strange making a big fuss about these cookies, but I couldn’t stop eating them. When asked what they were called her mom said “They’re just sugar cookies”.
I think the “just” in “they’re just sugar cookies” emphasizes how easy they are to make with very simple ingredients – which they are. But, sometimes simple and pure, outshines flashy, heavy, and, overly sweet. Which for me – these cookies do.
So needless to say, I have made my fair share of sugar cookies over the years. I love this recipe. It is easy, uses simple ingredients, and isn’t too sweet. I add a different amount of sugar depending on whether or not I will be decorating them. The addition of sprinkles and Royal Icing, adds sweetness to the cookie.
Sometimes I just want my sugar cookie fix, and I don’t care what shape they are, and I don’t bother icing them. My kids like them best this way. Maybe because they get to eat them sooner. But I do like going the extra mile for holidays to make them a little more festive and pretty by decorating them. This post is all about the recipe for making the cookie, but I will have links to all sorts of ways to decorate them. I hope you enjoy these sugar cookies as much as I do.
If you are in the mood for more cookie recipes, check out my Brookies Recipe (brownie collides with chocolate chip cookie), Chocolate Chipless Cookies (for those of you who pick out the chocolate chips), Red velvet cake cookies, Raspberry thumbprint cookies, or Chocolate chocolate chip cookie bars.
Why You Will Love These Easy Sugar Cookies
- Perfect for every occasion – One reliable recipe that works for holidays, birthdays, showers, and everyday baking
- Easy to make with simple ingredients – No fancy tools or hard-to-find ingredients required
- Soft yet sturdy texture – Tender to eat but strong enough for rolling, cutting, and decorating
- Holds its shape beautifully – Cut-out cookies bake up clean and defined, without spreading
- Lightly sweet and perfectly balanced – Delicious on their own or paired with icing and sprinkles
- Great for decorating – Ideal for royal icing, buttercream, or a simple glaze
- Make-ahead friendly – Dough and baked cookies can be prepared in advance
- Freezer-friendly – Freeze dough or baked cookies for stress-free holiday baking
- Kid-friendly and fun to bake together – A great recipe for family baking days, kids love cutting out the shapes and the doing the decorating.
- Endlessly customizable – Adapt the same base recipe for Valentine’s Day, Easter, Christmas, and more
Equipment Needed
Disclosure: as an Amazon affiliate, I receive a small amount of compensation from qualifying purchases at no expense to you. This helps support my work and allows me to bring more yummy recipes your way.
- Stand Mixer with mixing bowls or hand mixer with a large mixing bowl.
- Measuring Cups
- Measuring Spoons
- Rubber Spatula
- Rolling Pin
- Baking Sheet
- Cookie Cutters (optional if you want to make certain shapes)
- Parchment Paper optional, but it does make clean up easier.
- Cooling Rack
Ingredients Needed For Sugar Cookies
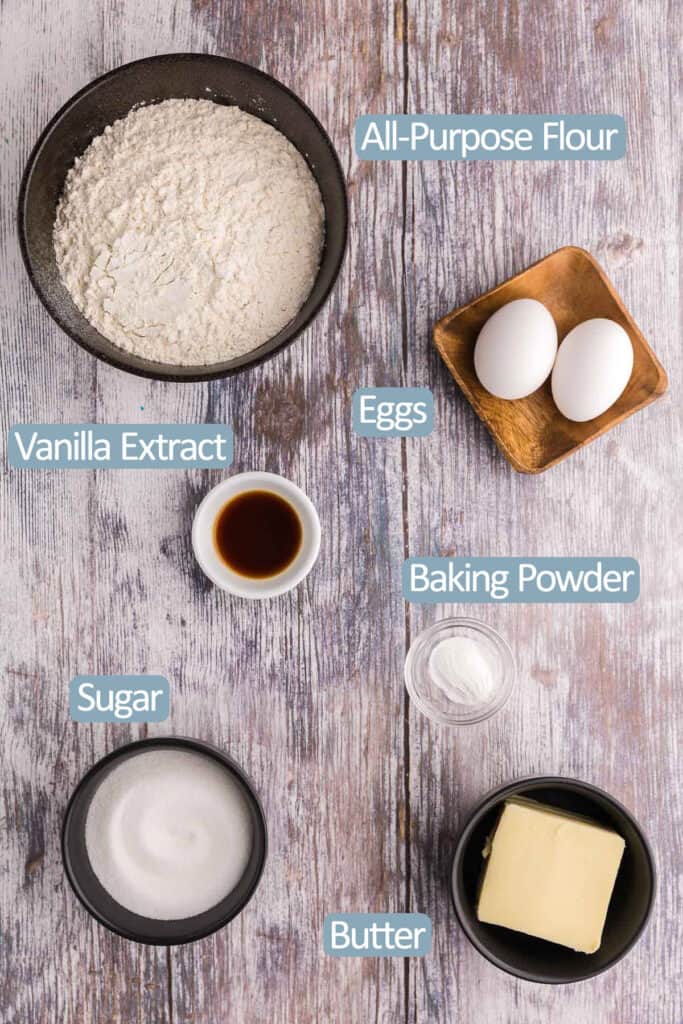
Butter – Adds rich flavor and creates a tender, soft texture
Sugar – Sweetens the cookies and helps create lightly crisp edges
Eggs – Bind the ingredients together and add structure and moisture
Vanilla Extract – Enhances the overall flavor and adds warmth and depth
All-Purpose Flour – Provides structure so the cookies hold their shape
Baking Powder – Gives the cookies a light lift and prevents them from being too dense
Why Creaming Butter and Sugar Matters in Sugar Cookies
When you cream butter and sugar, you’re doing more than just mixing. You are incorporating air, the sugar crystals cut tiny air pockets into the butter. All the trapped air expands in the oven and works with the baking powder to give the cookies a gentle lift. Proper creaming also ensures some of the sugar dissolves evenly, giving you a uniform dough and a smoother cookie surface. A properly executed dough will spread and bake more predictably, which is especially important for cut-out sugar cookies.
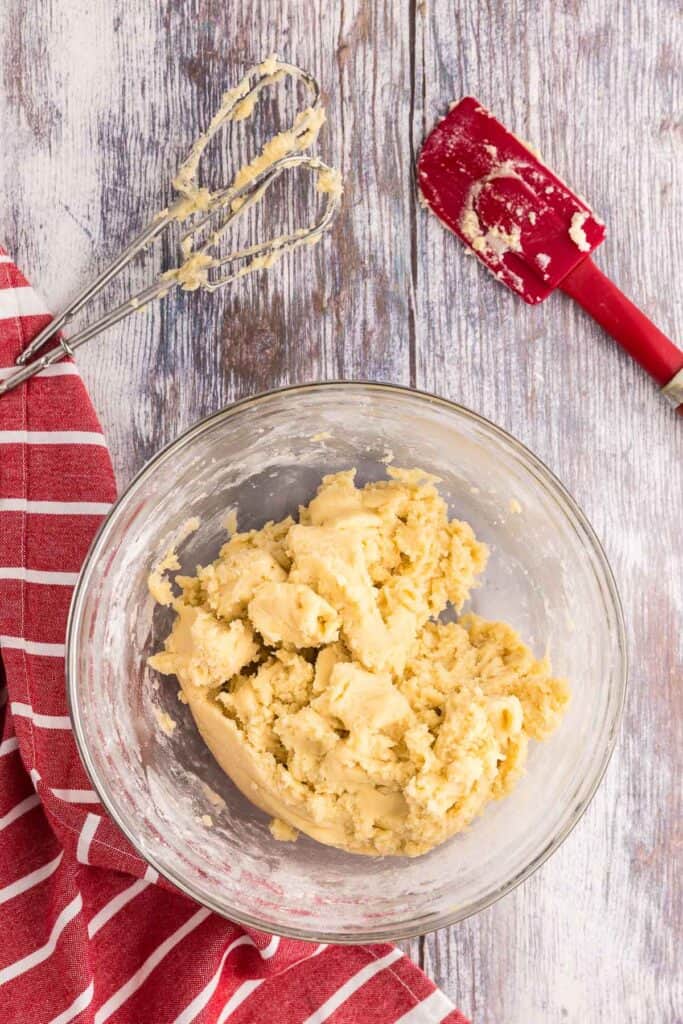
How To Tell When Your Sugar Cookie Dough Has Enough Flour
Visually
- The dough should pull away from the sides of the bowl and form a soft mass
- It should look smooth and cohesive, not wet or glossy
- You shouldn’t see streaks of loose flour, but it also shouldn’t look shiny or oily
By Touch
- The dough should feel soft and pliable, not sticky or stiff
- It should feel similar to soft play dough
When Handling
- You should be able to roll the dough without it sticking to the rolling pin or surface with only light flouring
- Cut-out shapes should lift cleanly without stretching or tearing
Signs You Need a Little More Flour
- Dough sticks heavily to your fingers or the bowl
- It spreads too much when rolled
- Cut-out shapes lose definition
Signs you’ve added too much flour
- Dough feels dry, crumbly, or stiff
- Cracks around the edges when rolled (a little cracking due to the dough being cold is OK)
- Baked cookies turn out dense or chalky instead of tender
Best practice
- Add flour gradually, especially near the end.
- Stop mixing as soon as the dough comes together – overmixing after the flour is added can make cookies tough
- Remember: humidity, butter softness, and egg size can all slightly affect how much flour you need
Does Sugar Cookie Dough Need to Be Chilled?
This is a hot topic of discussion amongst bakers. Some people chill their dough before rolling it out, then again after the cookie shapes have been cut out. So, do you need to? The answer is yes, and no. It’s sort of a choose your own adventure. Both ways work, but the outcomes are slightly different. I tested this to see what the difference really was.
Traditionally, you chill the dough before rolling. This hardens up the butter and allows the cookie cutter to cut a very sharp edge. This sets you up for sharper edges in the end product. Then you take the cut cookie shapes and chill them in the fridge again before baking. This is to help prevent the cookie from spreading too much during baking which again helps maintain a sharp edge. But in the end it really comes down to how much time you want to spend chilling your dough (an hour or so each time) and how much of a tradeoff you are willing to sacrifice in sharp edges with the least amount of spread.

Cookie Dough Chilling Experiment
The following four pictures are from my sugar cookie experiment:
- Test 1 – make the dough, immediately cut out cookies and bake them
- Test 2 – make the dough, immediately cut out cookies, chill the cut outs for 1 hour, then bake them.
- Test 3 – make the dough, chill for 1 hour, cut out cookies and immediately bake them
- Test 4 – make the dough, chill for 1 hour, cut out cookies, chill for 1 hour, bake them
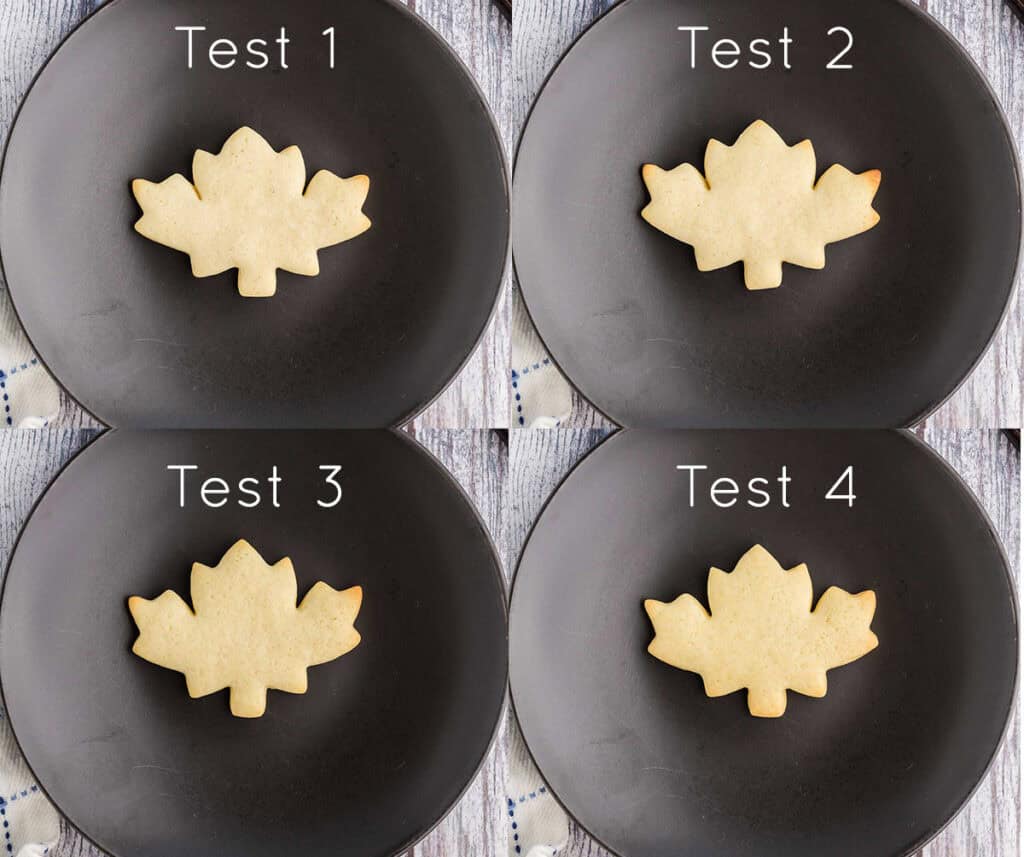
As you can see from the final baked cookies, the sharpest edges come from test 4 where the dough is chilled before rolling out, and chilled after the cookies have been cut out. Yes, this does make the best cookie, but if you look at the other cookies, they are not bad by any means. So you can decide for yourself how much quality in the final cookie shape you are willing to sacrifice. For me, when I’m just making them because I want sugar cookies and I’m not going to decorate them, I usually just cut out round shapes and I don’t bother with the chilling, as in test 1. Other times, when I’m decorating them, I usually chill the dough, but I don’t bother chilling the cut-out cookie shapes (test 3).
How to Make Sugar Cookies
Full recipe details including measurements are included in the recipe card at the bottom.
In a large bowl combine 2 ¾ cups of all-purpose flour and baking powder. Set aside.
Combining The Wet Ingredients
To the bowl of a stand mixer or hand mixer, add the room temperature butter and sugar. Beat together until creamy – at least two minutes, but 3-4 minutes is better. Scrape down the sides of the bowl with a rubber spatula as necessary.

Beat in 2 eggs and the vanilla extract for another minute to get a relatively homogenous mixture.
Adding The Dry Ingredients
Add the flour mixture to the butter mixture in three increments, incorporating the dry ingredients into the wet ingredients gently with the mixer each time. If the dough is still too sticky you can add a couple tablespoons of flour at a time until it is no longer sticky. The dough should pull away from the sides of the bowl and form a soft mass like super soft playdough. I find living in the Pacific Northwest with its high humidity I have to add the whole 3 cups to my recipe.
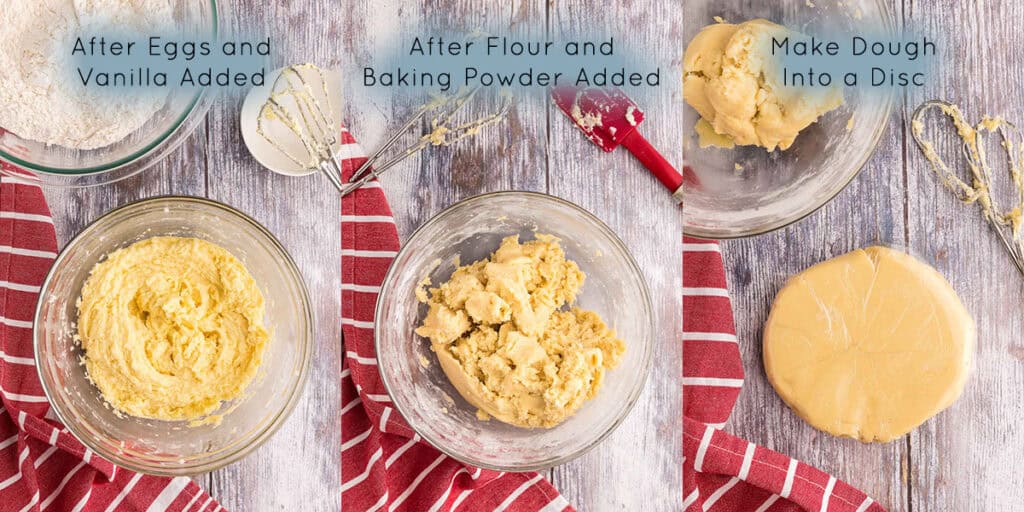
Divide the dough into two balls and then flatten each one into a disc about 2” thick. Wrap each disc with plastic wrap and place in the fridge to chill for 1 hour (or up to 3 days) (dough can also be frozen at this point). You can also speed up the chill time by placing the discs in the freezer for 30 minutes.
Preheat oven to 375 F.
Rolling Out the Sugar Cookie Dough
Bring out one disc of dough from the fridge at a time. Sprinkle your worksurface and rolling pin with a dusting of flour. Place the disc down on the floured surface. At this point, the dough is quite cold and difficult to manipulate. Begin by smacking the dough with the rolling pin (not a typical baking term I know, but you just need to bring the rolling pin down on the dough with a “smack”). I start in the middle and smack it all around. This helps to warm up the dough fairly quickly, and after about 20 or so smacks it will be easier to roll the dough out.
Roll the dough out to an even thickness of about ¼”.
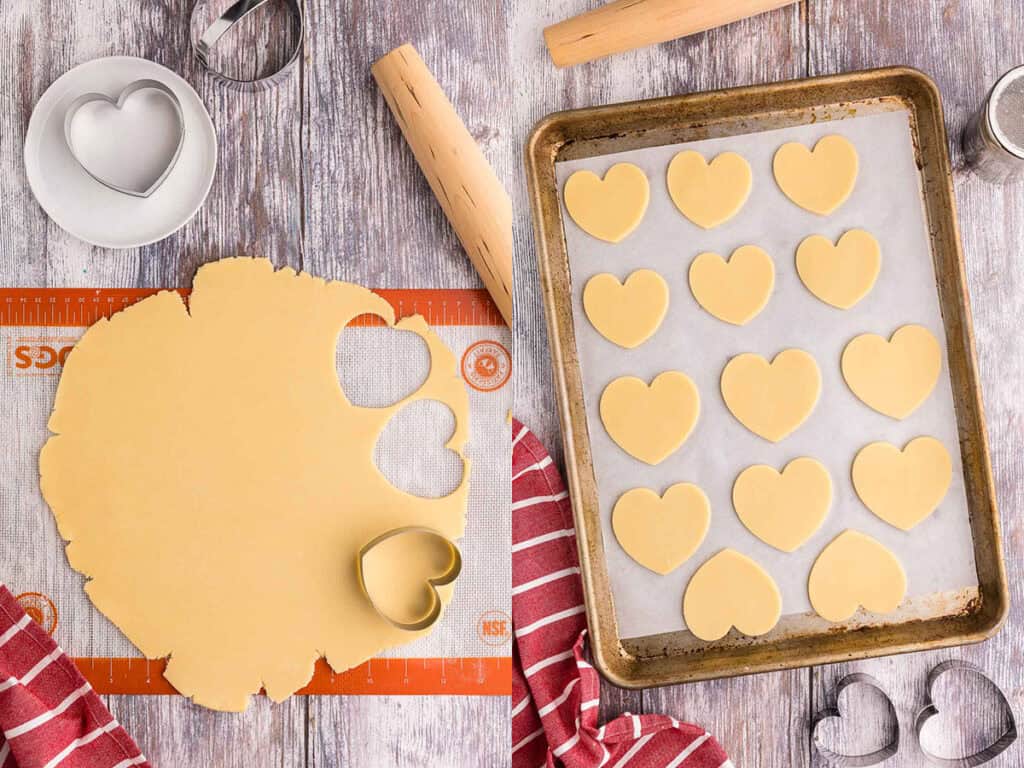
With cookie cutters, cut out the shapes you would like and transfer the shapes to a parchment-lined baking sheet, leaving about an inch of space between each cookie. You can recombine the scraps of cookie dough and roll out again to ¼” thick and cut out more shapes until all the dough is used up. If you don’t have cookie cutters you can use a drinking cup with a suitable diameter to cut out circles.
Baking The Sugar Cookies
This is optional but you can cover the baking sheet with plastic wrap and place back in the fridge to chill for an hour, or 30 minutes in the freezer. This will make the cleanest sharpest edges on the cookies, but the difference is not very noticeable.
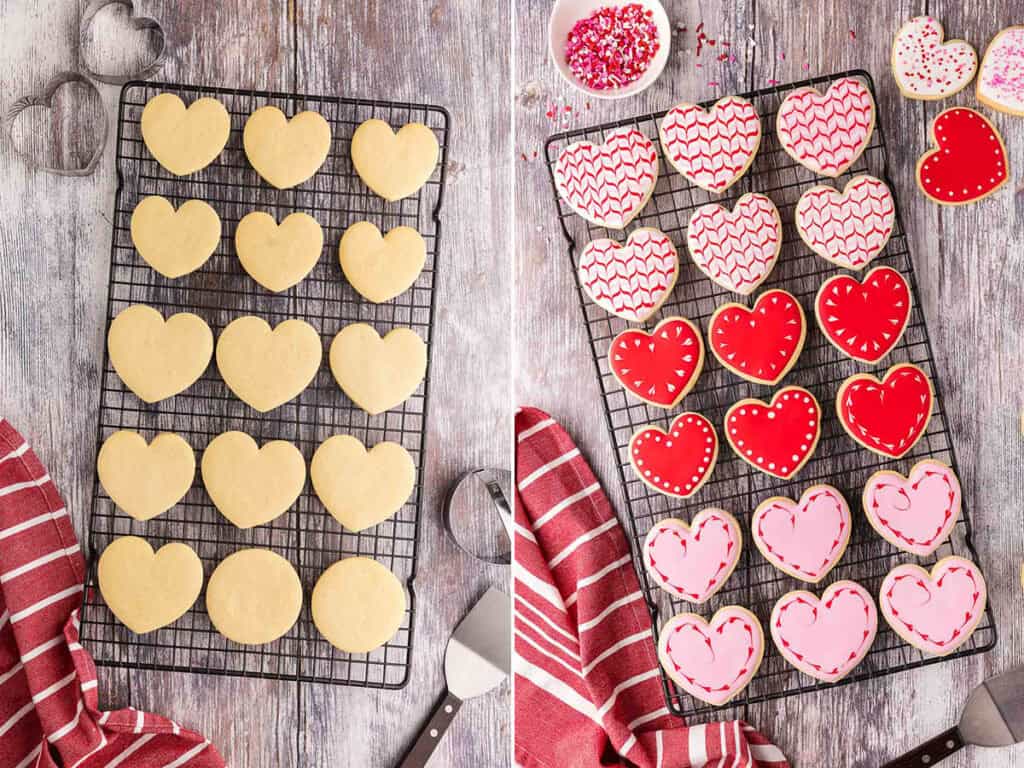
Place the baking tray in the oven to bake for 10-12 minutes, just until the edges begin to lightly brown. Let the cookies cool for about 5 minutes on the pan and then remove them with a spatula to finish cooling on a cooling rack. See Pro Tips to learn more about browning.
Cooled sugar cookies can be served as is or they can be decorated to your liking.
Check out my decorating ideas for Christmas Sugar Cookies, or Valentine’s Day Cookies. More decorating how to’s coming soon.
Pro Tips and Tricks for Sugar Cookies
- If you aren’t going to add any icing or sprinkles you may want to use 1 cup of granulated sugar in the cookie recipe. If you plan on decorating with icing and sprinkles then I recommend using less sugar in the cookie itself and only add 3/4 cups sugar.
- The amount of browning on your sugar cookies will depend on a few factors. The thicker your cookie, the longer it will take to brown, so it often does not look as brown as a thinner cookie. The color of your baking sheet will also have an impactt on the browning of the bottom of the cookie. When I use a silver sheet pan, my cookies have just the slightest browning, but if I use a darker sheet pan I get a lot more browning.
- Don’t put freshly cut-out cookie dough on a hot baking sheet – they will melt and spread out before they get a chance to bake and set.
- Make sure the cookies have completely cooled before you attempt to add icing/frosting, or the icing will melt and not hold it’s shape.
FAQs When Making Sugar Cookies
How do you prevent the cookie dough from sticking to the rolling pin or the counter? The best way to prevent sticking is to lightly flour your counter surface and the rolling pin. You may need to add more flour to the surface and the pin as you work as it will get used up into the dough. You just want to use what is necessary, using too much will dry the dough out and make a harder dense cookie.
Why are some sugar cookies more yellow than others? Your cookies can be more yellow if you use eggs with orange yolks, or deep yellow colored yolks. Some butters also have a stronger yellow hue in some countries, so don’t worry if your cookies are a little bit on the yellow side.
What is the best icing or frosting to use for sugar cookies? It will depend on what you want the final outcome to look like. The most common type of icing used on sugar cookies is probably royal icing. It is often made with meringue powder or egg whites and it can be used thick or thinned out to give you a variety of decorating options, from glazing to piped decorations. Some people also smear buttercream on as an easy frosting.
How to store sugar cookies? They can be stored on the counter in an airtight container for a week. Keeping them in the fridge will extend their life about another week. They can also be frozen in a zipper top bag for up to 3 months. Individual cookies thaw quickly at room temperature.
Follow Me On Social Media
If You Liked This Sugar Cookie Recipe…
If you liked this recipe, please consider rating the recipe and leaving a comment below – I love to hear how people get on with my recipes and I truly make an effort to respond to everyone who takes the time to comment.

The Best Sugar Cookie Recipe For Every Occasion
Equipment
- Stand mixer or hand held mixer
- Mixing bowl (if using a hand held mixer)
- Measuring Cups
- Measuring Spoons
- Rubber Spatula
- Baking Sheet
- Cookie cutters (optional)
- Parchment Paper (optional)
Ingredients
- 2 ¾ – 3 cups all-purpose flour more for dusting work surface
- 1 tsp baking powder
- ¾ cup butter room temperature
- ¾ – 1 cup granulated sugar See Notes for how much sugar to add
- 2 eggs
- 2 tsp vanilla extract
Decorating – optional
- Royal Icing
- Sprinkles
Instructions
- In a large bowl combine 2 ¾ cups of all-purpose flour and baking powder. Set aside.
- To the bowl of a stand mixer or hand mixer, add the room temperature butter and sugar. Beat together until creamy – at least two minutes, but 3-4 minutes is better. Scrape down the sides of the bowl with a rubber spatula as necessary.
- Beat in 2 eggs and the vanilla extract for another minute to get a relatively homogenous mixture.
- Add the flour mixture to the butter mixture in three increments, incorporating the dry ingredients into the wet ingredients gently with the mixer each time. If the dough is still too sticky you can add a couple tablespoons of flour at a time until it is no longer sticky. The dough should pull away from the sides of the bowl and form a soft mass like soft playdough.
- Divide the dough into two balls and then flatten each one into a disc about 2” thick. Wrap each disc with plastic wrap and place in the fridge to chill for 1 hour (or up to 3 days) (dough can also be frozen at this point). You can also speed up the chill time by placing the discs in the freezer for 30 minutes.
- Preheat oven to 375 F.
- Bring out one disc of dough from the fridge. Sprinkle your worksurface and rolling pin with a dusting of flour. Place the disc down on the floured surface. At this point, the dough is quite cold and difficult to manipulate. Begin by smacking the dough with the rolling pin (not a typical baking term I know, but you just need to bring the rolling pin down on the dough with a “smack”). I start in the middle and smack it all around. This helps to warm up the dough fairly quickly, and after about 20 or so smacks it will be easier to roll the dough out.
- Roll the dough out to an even thickness of about ¼”.
- With cookie cutters, cut out the shapes you would like and transfer the shapes to a parchment-lined baking sheet, leaving about an inch of space between each cookie. You can recombine the scraps of cookie dough and roll out again to ¼” thick and cut out more shapes until all the dough is used up. If you don't have cookie cutters, use a drinking cup with a suitable diameter to cut out circles.
- This is optional but you can cover the baking sheet with plastic wrap and place back in the fridge to chill for an hour, or 30 minutes in the freezer. This will make the cleanest sharpest edges on the cookies, but the difference is not very noticeable.
- Place cookies in the oven to bake for 10-12 minutes, just until the edges begin to lightly brown. Let the cookies cool for about 5 minutes on the pan and then remove them with a spatula to finish cooling on a cooling rack. See Notes to learn more about browning.
- Cookies can be served as is or they can be decorated to your liking.
Notes
- If you aren’t going to add any icing or sprinkles you may want to use 1 cup of granulated sugar in the cookie recipe. If you plan on decorating with icing and sprinkles then I recommend using less sugar in the cookie itself and only add 3/4 cups sugar.
- The amount of browning on your sugar cookies will depend on a few factors. The thicker your cookie, the longer it will take to brown, so it often does not look as brown as a thinner cookie. The color of your baking sheet will also have an impactt on the browning of the bottom of the cookie. When I use a silver sheet pan, my cookies have just the slightest browning, but if I use a darker sheet pan I get a lot more browning.
- Don’t put freshly cut-out cookie dough on a hot baking sheet – they will melt and spread out before they get a chance to bake and set.
- Make sure the cookies have completely cooled before you attempt to add icing/frosting, or the icing will melt and not hold it’s shape.
FAQs When Making Sugar Cookies
How do you prevent the cookie dough from sticking to the rolling pin or the counter? The best way to prevent sticking is to lightly flour your counter surface and the rolling pin. You may need to add more flour to the surface and the pin as you work as it will get used up into the dough. You just want to use what is necessary, using too much will dry the dough out and make a harder dense cookie. Why are some sugar cookies more yellow than others? Your cookies can be more yellow if you use eggs with orange yolks, or deep yellow colored yolks. Some butters also have a stronger yellow hue in some countries, so don’t worry if your cookies are a little bit on the yellow side. What is the best icing or frosting to use for sugar cookies? It will depend on what you want the final outcome to look like. The most common type of icing used on sugar cookies is probably royal icing. It is often made with meringue powder or egg whites and it can be used thick or thinned out to give you a variety of decorating options, from glazing to piped decorations. Some people also smear buttercream on as an easy frosting. How come my sugar cookies are spreading out and losing their sharp form? For best results you want to chill the dough before you roll it out and cut out shapes. It also helps to chill the cut-out shapes before baking. Use a chill time of 1 hour in the fridge or 30 minutes in the freezer. Also, do not place the cut-out cookie dough pieces onto a warm baking sheet. Make sure it has fully cooled. How to store sugar cookies? They can be stored on the counter in an airtight container for a week. Keeping them in the fridge will extend their life about another week. They can also be frozen in a zipper top bag for up to 3 months. Individual cookies thaw quickly at room temperature.
Love the thorough recipe instructions and tips for these cookies — made it so easy without and second-guessing! Looking forward to making these delicious cookies for other holidays, too.
I love that sugar cookies seem to fit for pretty much any holiday!