
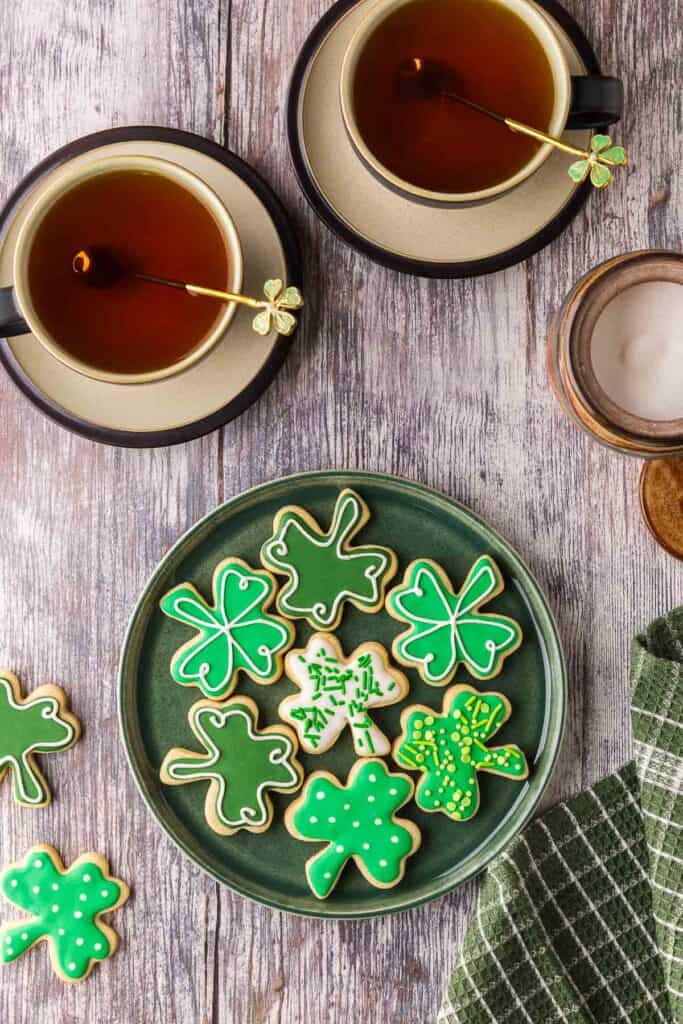
These St. Patrick’s Day Cookies are the perfect excuse to get playful with decorating. Shamrock-shaped sugar cookies turn into tiny edible canvases, finished with royal icing in a variety of easy, festive designs. Keep it simple with a single color, add some sprinkles, or try a slightly more detailed piped pattern without making it complicated. Whether you prefer clean, classic greens or more intricate decorative touches, this recipe is all about fun ways to dress up shamrock cookies for a sweet St. Patrick’s Day celebration. And if you don’t have cookie cutters, I show a method that uses circular cookies too.
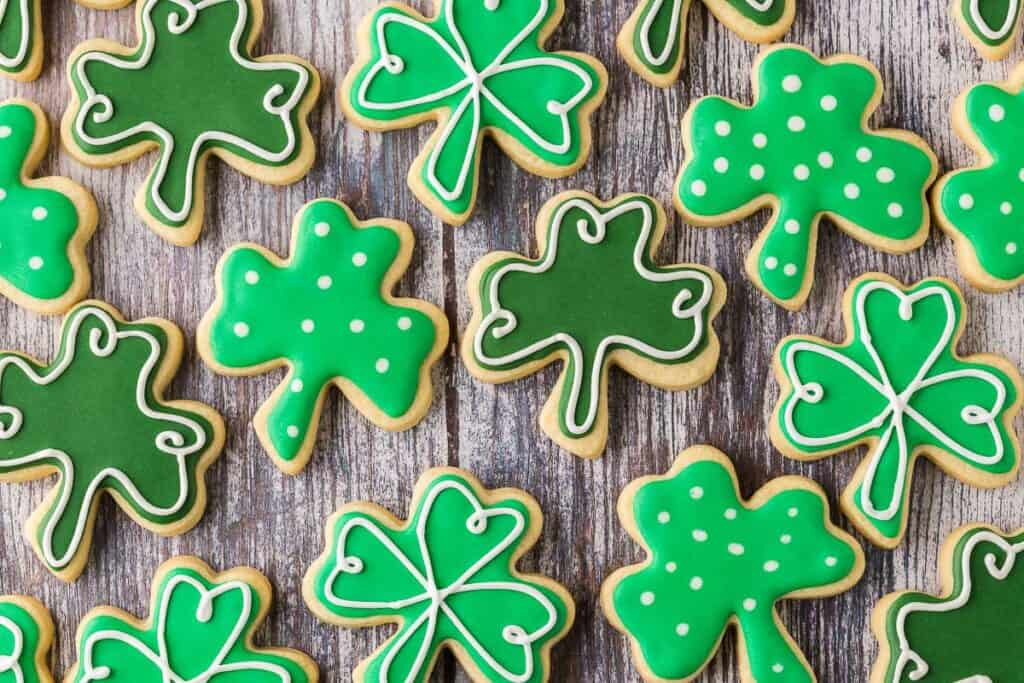
If you read my post on The Best Sugar Cookies for any Occasion you know that sugar cookies are my absolute favorite cookie. Not only do I love the flavor and texture, but I love that they can be cut out in any shape and decorated for any occasion you can think of. This post focuses on a few ways you can decorate a shamrock shaped sugar cookie for St. Patrick’s Day. I also show you how you can make a festive St. Patrick’s Day Cookie even if you don’t have cookie cutters – you can use a cup to cut out round shapes…or a small bowl, or anything round really.
If you are interested in cookies, you might want to also check out my
Why You Will Love These St. Patrick’s Day Cookie Decorating Ideas
- Easy decorating ideas for all skill levels – from simple icing to slightly more detailed designs
- Fun and festive shamrock shapes – perfect for St. Patrick’s Day celebrations
- Customizable designs – so you can mix colors, sprinkles, and patterns
- Great for decorating with kids or friends – as a hands-on holiday activity
- No special tools required – you can even use a cup if you don’t have cookie cutters
- Perfect for parties, gifts, or dessert tables
- Make-ahead friendly – easy to store or transport
- Classic sugar cookie flavor that everyone loves
Equipment Needed
Disclosure: as an Amazon affiliate, I receive a small amount of compensation from qualifying purchases at no expense to you. This helps support my work and allows me to bring more yummy recipes your way.
This recipe uses basic baking tools, and a few optional specialty items.
- Measuring Spoons
- Measuring Cups
- Stand Mixer with mixing bowls or hand mixer with a large mixing bowl.
- Cooling Rack
- Plastic Wrap
- Rolling Pin
- Parchment Paper optional
- Baking Sheet
- Shamrock-shaped Cookie Cutters
- Piping Bags (optional)
- Scribe tool (optional) – can use a toothpick
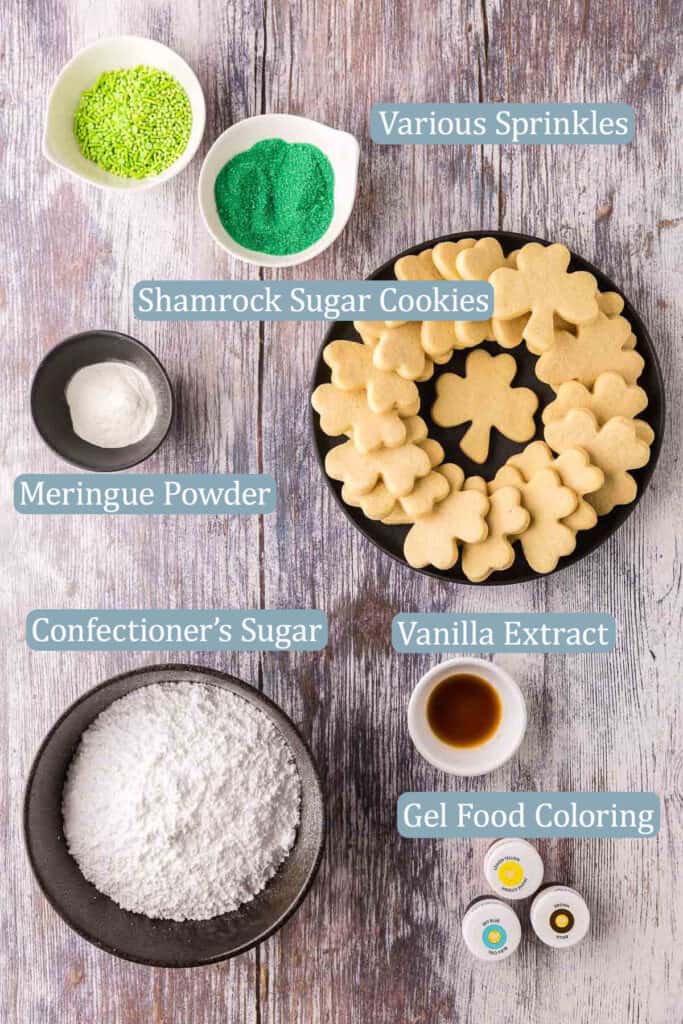
Ingredients for St. Patrick’s Day Cookies
- A batch of The Best Sugar Cookies cut into Shamrock shapes (or any shape you want)
- Various St. Patrick’s Day colored sprinkles
- Meringue powder
- Confectioner’s Sugar
- Vanilla Extract
- Gel Food Coloring
The Best Sugar Cookies – my recipe for sugar cookies that can be used for any occasion. In this case, cut them into shamrock shapes for celebrating March 17th.
Confectioners sugar – also known as icing sugar, gives the icing its sweetness and structure.
Meringue powder – improves consistency and provides structure and stability for piping. It also helps the icing to dry and harden. Can be found in craft stores or on amazon.
Water – the liquid that turns the sugar and meringue powder into a smooth workable icing.
Vanilla extract – used to add flavor.
Food coloring (optional) – if you want to color your royal icing. Gel food coloring is best as it gives the strongest colors and is super concentrated so it doesn’t thin out your icing. Pick two different green colors, or you can use blue and yellow to make your greens. Black can be added to darken the green color.
Sprinkles – used to add a festive touch.
How To Decorate St. Patrick’s Day Cookies
Make the Royal Icing With Meringue Powder
Follow my recipe to make Royal Icing with Meringue Powder. You want to make a piping and flooding consistency of about 8-12 seconds (the post goes into detail on this). Royal icing hardens quickly so best to keep it covered with plastic wrap whenever it is not being used.
Once you have the right consistency, separate the icing into smaller bowls. How many bowls depends on how many colors you plan to use. In my case, I used three bowls. One for dark green, one for light green, and one for white.
Add a couple of drops of gel food coloring to your bowl and mix it in. Add a drop at a time until you reach the desired color. I used a blue and yellow food coloring and then added a few drops of black to make the darker green.
Transfer dyed royal icing into piping bags and seal off the end with a clip. If you don’t have piping bags, I find small ziploc bags do the trick. When you are ready to begin, slice the tip off with scissors. Best to start with a small cut, you can always go bigger if the icing doesn’t come out fast enough.
One Solid Flooded Color
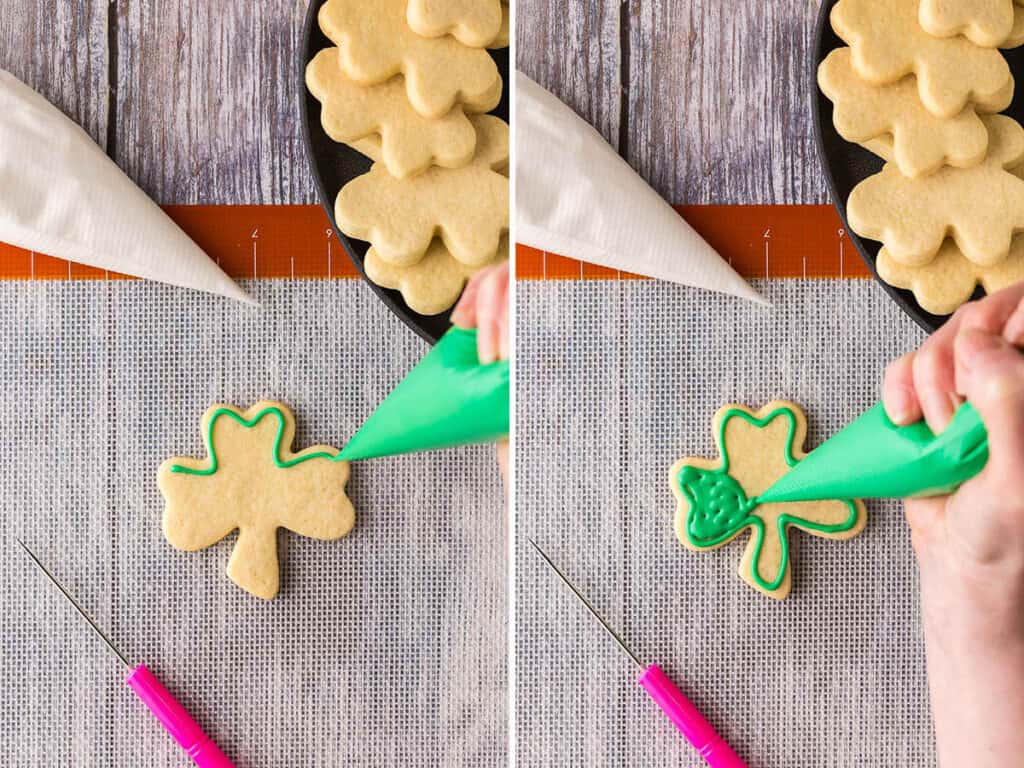
The easiest cookie in this series will be just a solid color of royal icing piped and flooded on to the cookie.
With the color of your choosing, pipe a line all around the edge of the cookie following the cookie shape. You want to be close to the edge, but not so close that your piped edge slides down the edge of the cookie. This piped line acts like a dam to keep the icing inside and on top of the cookie.
Fill inside this piped shape with more icing. This is called “flooding”. You want to have little to no gaps of icing on the surface.
Once you have flooded the cookie, you can use a scribe tool or a toothpick to squiggle the icing around filling in any gaps and smoothing it all out. Once done, give the bottom of the cookie a gentle tap on the surface of the counter, this helps to smooth out the top too.
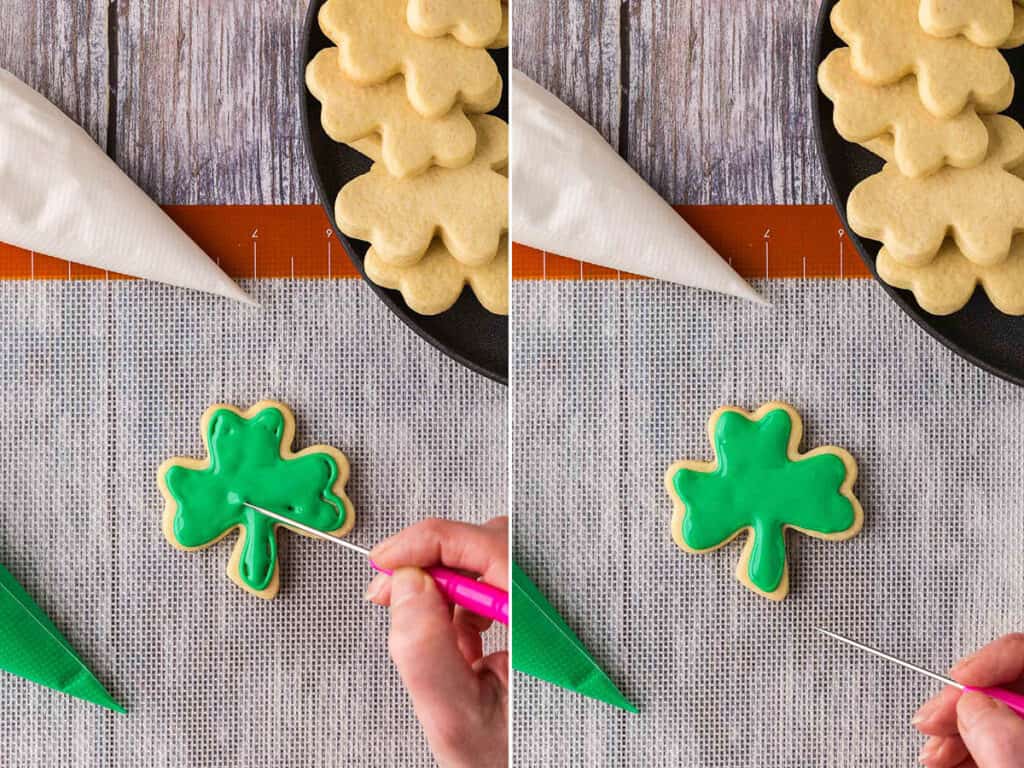
If you have sprinkles you can add them while the icing is still wet so they will stick to the icing when it hardens up. If using sanding sugar, I recommend letting the icing dry for about 10-15 minutes so the sugar doesn’t just dissolve into the wet icing causing the color to bleed.
Now you have a solid color decorated cookie. Set aside for 2 hours to allow the icing to harden up.

Polka Dot Shamrock
To make the polka dot shamrock, follow the steps above to pipe and flood the cookie. Immediately after the cookie has been flooded and the surface smoothed out, pipe small dots of another color on top of the wet icing. The dots will sink into the wet icing, forming a dot on the same level as the original icing.
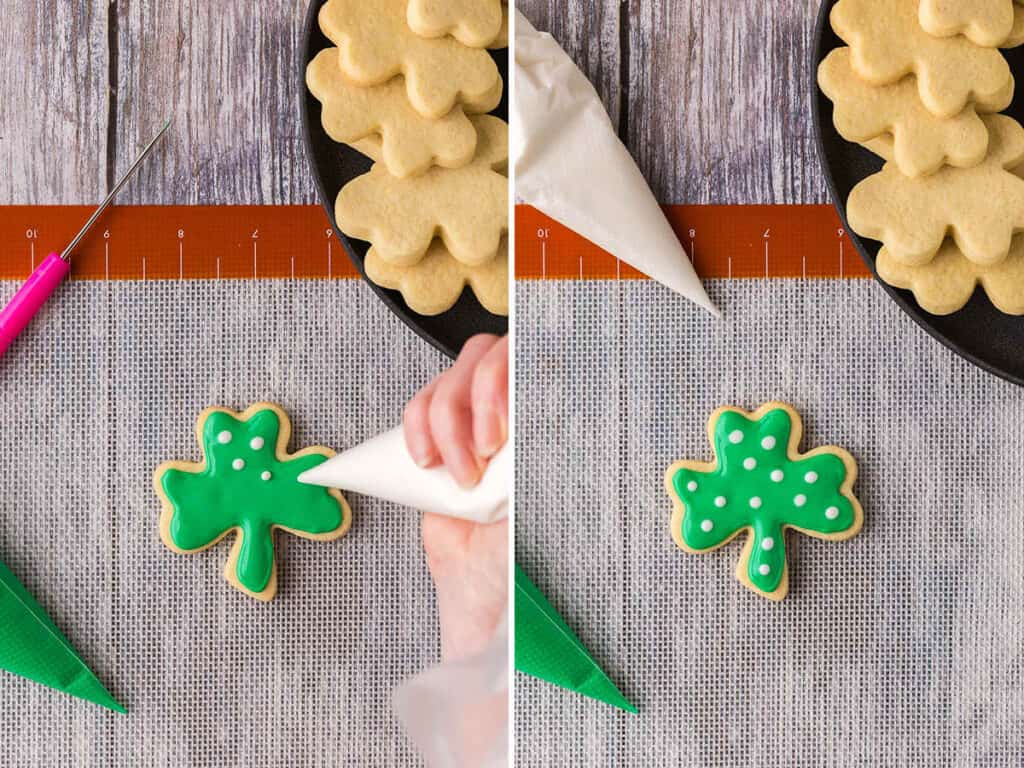
Set aside to harden for at least 2 hours.
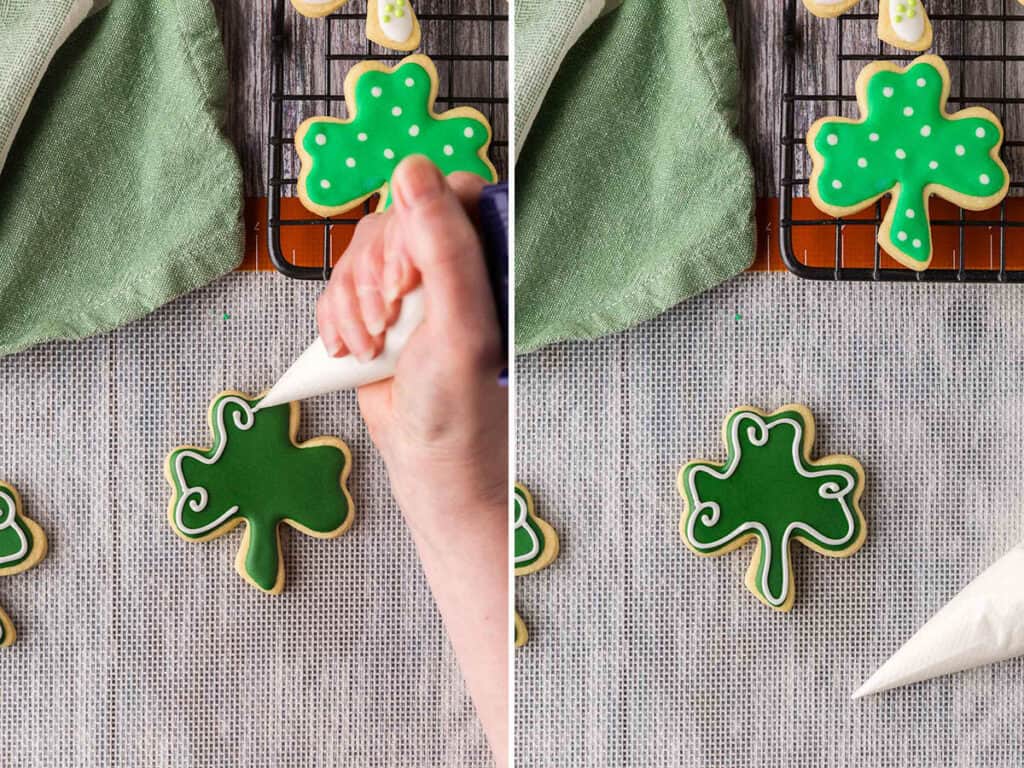
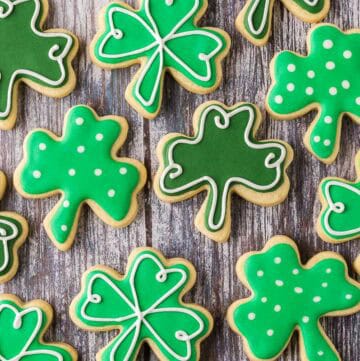
Swirly Outline A
To pipe an outline on top of the flooded icing, you first have to wait two hours to let the flooded icing set up and dry. Once hardened you can use another color of icing to pipe lines on the surface of the first.
For outline A, I piped white around the edge of the green cookie and did a little swirl in the middle of each shamrock leaf. Then starting again right next to where I made the swirl and continuing on, until the outline was complete. You could always add more swirls into the middle of the cookie too if you wanted.
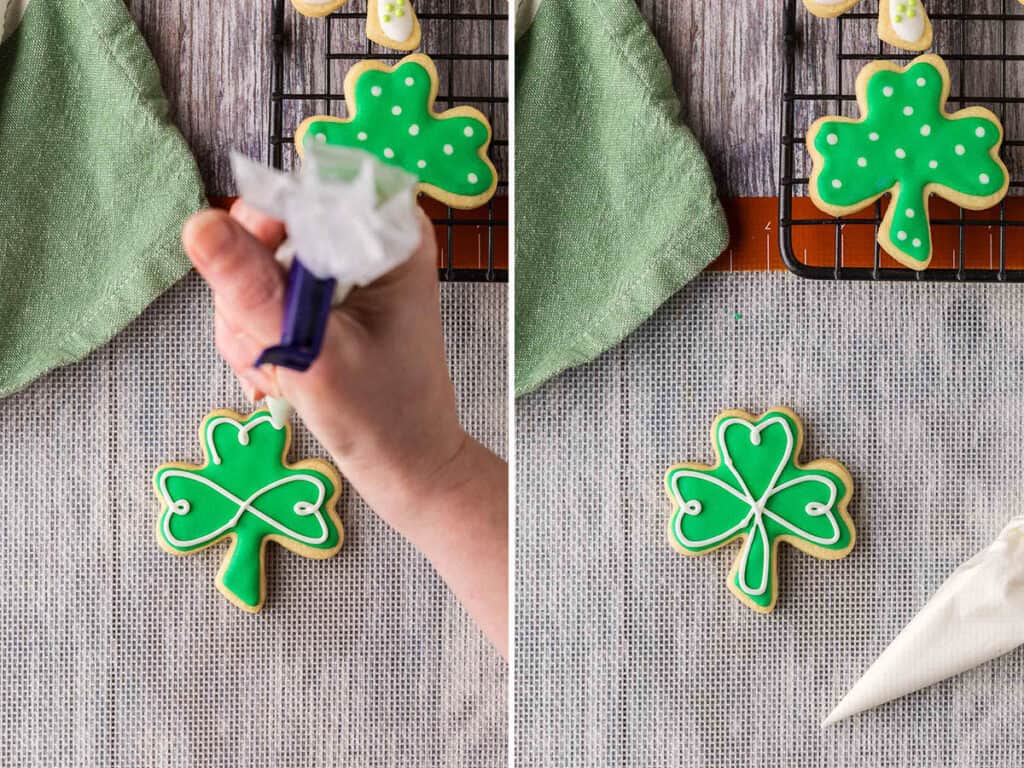
Swirly Outline B
Again, wait for the flooding icing to dry, about two hours.
Start on one of the shamrock leaves on the side to begin piping. When you are at the middle of the leaf do a little loop then continue on to the rest of the leaf. At the far edge of the leaf I make a straight line towards the opposite edge of the leaf on the other side of the cookie. Try to go through the middle of the cookie on your way.
Once at the opposite leaf, pipe the outline of this leaf making a loop in the middle of the leaf then continuing on. Once the leaf is complete, again make a straight line back towards the first leaf you piped, going through the middle of the cookie again, and connecting to where you first started piping. Now you can stop piping and take a break. Rotate the cookie if you need to.
Now doing the vertical section of the shamrock, start on one side of the vertical leaf and begin piping around the edge of the leaf, making a loop in the middle then continuing on to the rest of the leaf. Once the vertical leaf is completed make a straight line towards the opposite side of the stem, going through the middle of the cookie. Pipe around the stem, then come back straight through the middle of the cookie and connect your piping line to where you started. You are done!
Circular Cookies
If you don’t have St. Patrick’s Day Cookie Cutter shapes, you can still make cookies that are fit for the occasion. You can use an inverted glass to cut out your cookies into round shapes, or you could use a small tin or tupperware to make square shapes. Flood your cookies with green royal icing and people will know these are for St. Patrick’s Day. Or up the anti by adding green sprinkles.
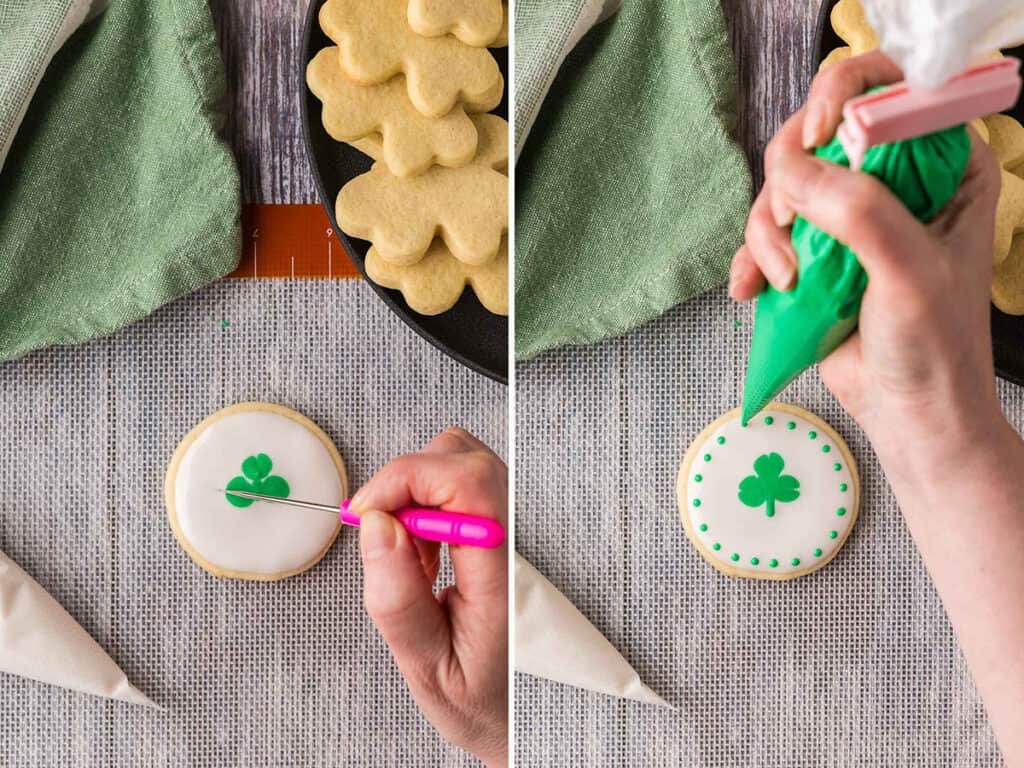
Or you can also try to make a shamrock shape in the middle of a cookie. To do this pipe and flood your cookie with a base color. I used white.
Add three good-sized green circles in a rough triangular pattern (think of these as the three leaves of the shamrock). Try to keep the circles close to each other, and touching is good. Fill in any space between the circles with green icing.
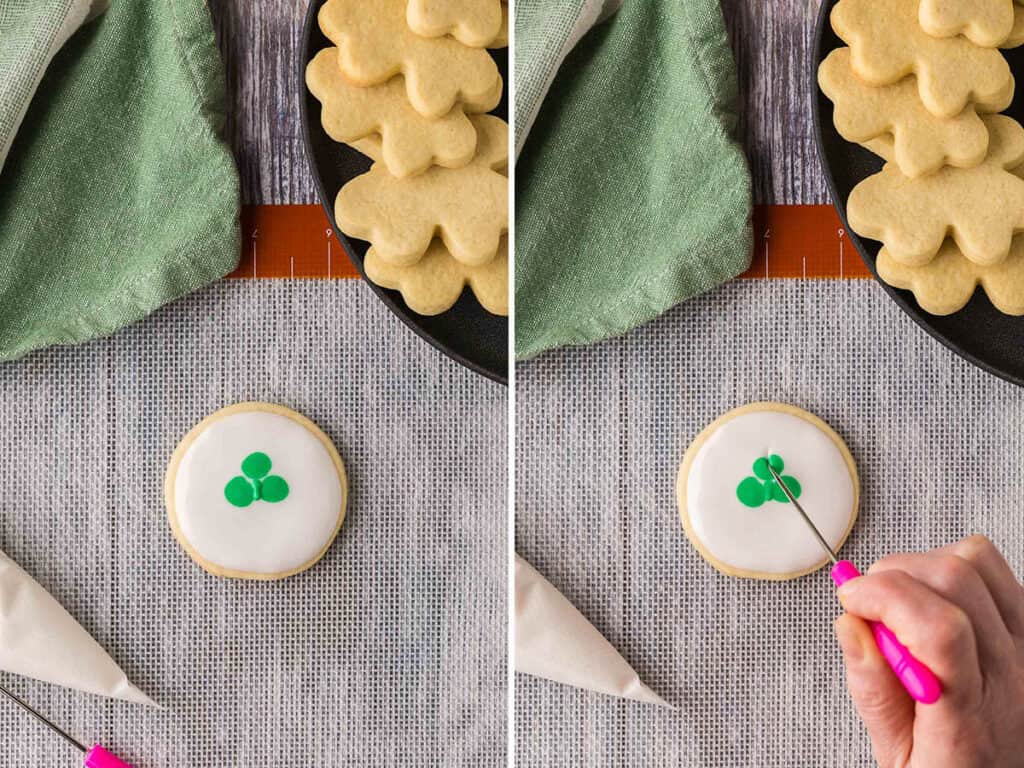
Use a scribe or toothpick to make the shamrock leaf shape. Start with the scribe just outside the edge of one of the circles. Drag the scribe through the background color and into the green circle. This should pull the green edge into the circle giving it that classic clover-like shape. Do this to the other two circles, dragging from the outside edge towards the middle of the shamrock.
Pipe on a green stem.
You can add green dots around the edge of the cookie as well if you want.
Pro Tips on Decorating St. Patrick’s Day Cookies
- If you are using sanding sugar as a sprinkle, it is best not to sprinkle it on right away, or the sugar dissolves a bit in the wet icing and the dye bleeds a little. I find waiting about 10-15 minutes lets the surface dry a little but it’s still wet enough for the sugar to adhere to.
- I use a scribe to do this decorative work, but a toothpick can also be used.
- It’s good practice to clean your scribe/toothpick every time it comes out of the icing.
FAQs
Can I make these sugar cookies ahead of time? Yes. You can bake the cookies a few days in advance and decorate later, or freeze undecorated cookies for up to three months. You can also freeze decorated cookies.
How long does royal icing take to dry? Royal icing usually dries to the touch in 1–2 hours, but it’s best to let decorated cookies dry overnight before stacking or storing.
What food coloring works best for bright green icing? Gel food coloring is best because it gives vibrant color without thinning the icing. The addition of black gel food coloring will give you a darker shade of green if you want.
How should I store decorated cookies? Store fully dried cookies in an airtight container at room temperature for up to 5 days and in the fridge for up to a week.
Follow Me On Social Media
If You Liked This St. Patrick’s Day Cookie Decorating Recipe…
If you liked this recipe, please consider rating the recipe and leaving a comment below – I love to hear how people get on with my recipes and I truly make an effort to respond to everyone who takes the time to comment. For other sugar cookie ideas check out my Christmas Sugar Cookies, and Valentine’s Cookies. More holiday decorating recipes to come.
Want weekly recipes straight to your inbox?
St. Patrick’s Day Cookies
Equipment
- Measuring Spoons
- Measuring Cups
- Stand Mixer with mixing bowls or hand mixer with a large mixing bowl
- Cooling Rack
- Plastic Wrap
- Rolling Pin
- Parchment Paper
- Baking Sheet
- Shamrock-shaped Cookie Cutters
- Piping Bags (optional)
- Scribe tool (optional) – can use a toothpick
Ingredients
- 1 Batch Shamrock-shaped Sugar Cookies
- 2 cups Confectioner's Sugar (226g)
- 1 ½ Tbsp Meringue Powder (15g)
- 3 ½ Tbsp Water
- ½ Tsp Vanilla Extract
- Gel Food Coloring green (or blue and yellow) and black
- Assorted Sprinkles optional
Instructions
Prepare Your Royal Icing
- Make a batch of royal icing, you can either follow my recipe or your own. Thin down the consistency by adding a little bit of water at a time until you get a 10 second consistency. This is where you can drizzle the the icing back into the bowl and it will sit on the surface for about 10 seconds before it melts back in to the rest of the icing.
- Divide the icing in to three bowls. Keep one bowl white, add green food coloring to the second bowl and stir in. Add green food coloring to the third bowl and stir it in, then add in black food coloring until you get the shade of green you want.
- Place colored royal icing into individual piping bags and snip off the ends. Just snip a small bit of the tip off. You can always cut off more if necessary.
One Solid Flooded Color
- The easiest cookie in this series will be just a solid color of royal icing piped and flooded on to the cookie.Pipe a line all around the edge of the cookie following the cookie shape.
- Fill inside this piped shape with more icing. This is called "flooding".
- Use a scribe tool or a toothpick to squiggle the icing around, filling in any gaps and smoothing it all out. Once done, give the bottom of the cookie a gentle tap on the surface of the counter, this helps to smooth out the top too.
- You can add sprinkles while the icing is still wet. If using sanding sugar see my notes about when to add.
- Set aside for 2 hours to allow the icing to harden up.
Polka Dot Shamrock
- Follow the steps above to pipe and flood the cookie.
- Pipe small dots of another color on top of the wet icing. The dots will sink into the wet icing, forming a dot on the same level as the original icing.
- Set aside to dry for two hours.
Swirly Outline A
- After flooded icing has dried for 2 hours you can now pipe lines on the surface.Pipe around the edge of the cookie in a different color. I did a little swirl in the middle of each shamrock leaf. Then starting again right next to where I made the swirl and continuing on, until the outline was complete. You could always add more swirls into the middle of the cookie if you want.
Swirly Outline B
- Wait for the flooding icing to dry, about two hours.Start on one of the side leaves, and began piping. Do a little loop at the middle of the leaf then continue on. At the far edge of the leaf make a straight line towards the opposite edge of the leaf on the other side of the cookie. Go through the middle of the cookie on your way.Once at the opposite leaf, pipe the outline making a loop in the middle of the leaf then continuing on. Once the leaf is complete, make a straight line back towards the first leaf that was piped, going through the middle of the cookie and connecting to where you first started piping. (See pictures and more details in the post)
- Now doing the vertical section of the shamrock, start on one side of the vertical leaf and begin piping around the edge of the leaf, making a loop in the middle then continuing on to the rest of the leaf. Once the vertical leaf is completed make a straight line down towards the opposite side of the stem, going through the middle of the cookie. Pipe around the stem, then come back straight through the middle of the cookie and connect your piping line to where you started.
Circular Cookies
- Make a festive cookie by making a shamrock shape in the middle of the cookie. Pipe and flood your cookie with a base color. I used white.
- Add three good-sized green circles in a rough triangular pattern (think of these as the three leaves of the shamrock). Try to keep the circles close to each other, and touching is good.
- Use a scribe to make the shamrock leaf shape. Start with the scribe just outside the edge of one of the circles. Drag the scribe through the background color and into the green circle. This should pull the green edge into the circle giving it that classic clover-like shape. Do this to the other two circles, dragging from the outside edge towards the middle of the shamrock. See post for pictures and more details)
- Pipe on a green stem.
- Pipe green dots around the edge of the cookie as well if you want.
Notes
- If you are using sanding sugar as a sprinkle, it is best not to sprinkle it on right away, or the sugar dissolves a bit in the wet icing and the dye bleeds a little. I find waiting about 10-15 minutes lets the surface dry a little but it’s still wet enough for the sugar to adhere to.
- I use a scribe to do this decorative work, but a toothpick can also be used.
- It’s good practice to clean your scribe every time it comes out of the icing.
These are so cute, saving this for St Patty’s Day!
Hi Eva, thanks for leaving a comment. Your friends and family will love these I’m sure.
Yum! I love all the decorating ideas, can’t wait to try making these cookies myself.
Good luck with it! It’s not too hard and the cookies are really yummy!
Saving these! They are absolutely the cutest shamrock cookies! Can’t wait to make them for St. Patrick’s Day!
Hope you had fun making these cookies!
I loved all your attention to detail and the tips! Thank you!
You are so welcome Misty, thanks for leaving a comment.
These designs are so cute. I cannot wait to make these for St. Patrick’s Day! I’ve had your decorated cookie recipe before, and it was so delicious and they did not spread.
Thanks for the comment Stephanie, so glad to hear you are enjoying the cookie recipe. They work great for all occasions IMO.
Love the thorough decorating tutorial! Definitely feeling confident to make these for St. Patrick’s Day 🙂
I hope you had fun decorating your St. Patrick’s Day cookies.
I can’t wait to try these for St. Paddy’s Day – They look delicious, and I love how thorough your directions are for creating the different designs on them! Thank you!
Hi Katrina, thanks for leaving a comment. I hope the cookies worked out well for you and your designs turned out great!
I made these for the St Paddy’s Day weekend. Mine didn’t look as good as yours but they were yummy!
I’m sure yours looked awesome! But being yummy is the most important part!