
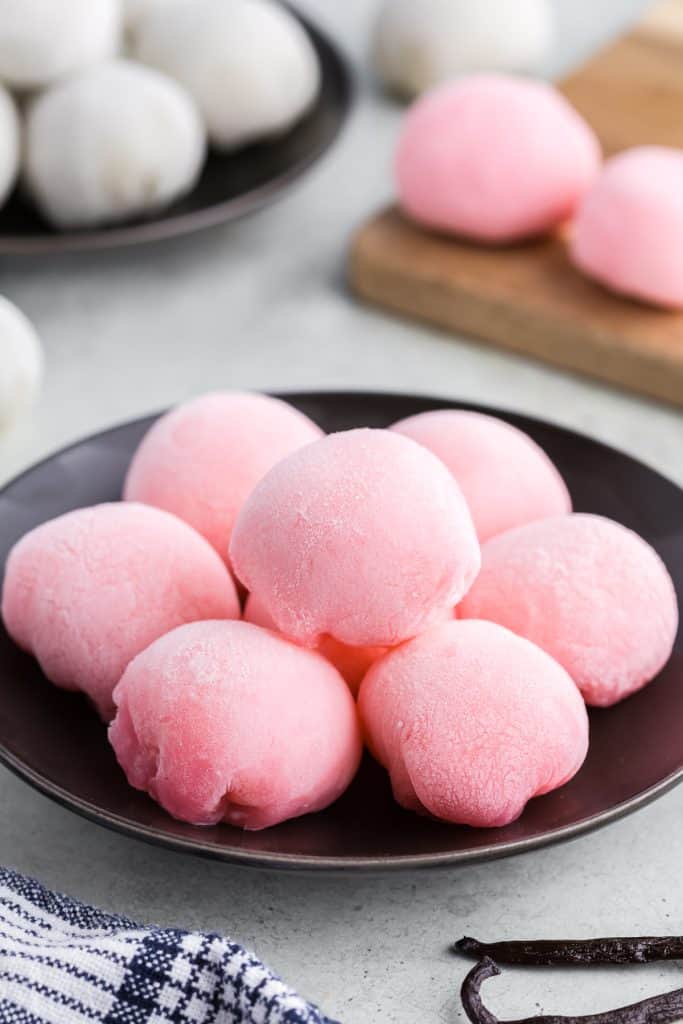
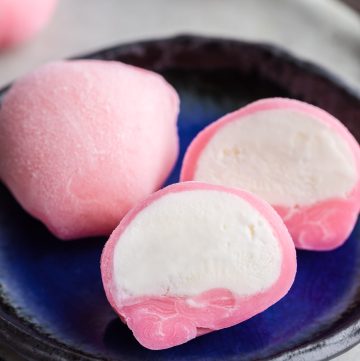
Mochi ice cream is a delicious Japanese bite sized dessert. This make at home recipe uses your favourite ice cream and wraps it in a chewy, subtly sweet mochi dough. Mochi is super easy to make with a microwave and has a unique elastic and chewy texture that you just can’t get enough of. Ice cream you can eat with your fingers!
All About Mochi
My introduction to mochi came during a memorable New Year’s celebration in Japan. We were fortunate to be invited by a Japanese family to experience their traditional festivities. The table was filled with all sorts of delightful foods, but one that truly stood out to me was the mochi. For those unfamiliar, mochi is a general term for a rice cake, often made from glutinous rice. Traditionally, making mochi is a labor-intensive process, but thankfully, modern methods allow us to whip up a batch in a matter of minutes.
Mochi comes in many forms, depending on how it’s served. The mochi we had that New Year’s was a savory version, thick and chewy, wrapped in dry seaweed (nori) and dipped in soy sauce. Its texture was dense—so chewy, in fact, that I could easily see it being a choking hazard for small children, the elderly, or, really, anyone not paying attention!
Later, I discovered another side of mochi through a traditional Japanese sweet called daifuku. This version has a soft, sweet mochi layer wrapped around a ball of sweetened red bean paste. I enjoyed the chewy mochi exterior, but wasn’t a huge fan of the red bean paste. Luckily, I soon found the perfect match for my taste—mochi wrapped around ice cream. The moment I took my first bite, I knew it was love at first taste. Creamy ice cream encased in a soft, chewy mochi shell—it was a revelation.
Mochi ice cream has become quite popular, not only in Asia but here in North America as well. I often see it in the freezer section of Canadian grocery stores, but the price always makes me pause—$1 per mochi? Making it at home is incredibly simple and much more affordable. So, whether you’re already a fan of this delightful frozen treat or you’re just curious to try it, you’re in the right place. Let’s dive into making homemade mochi ice cream—it’s fun, delicious, and a fraction of the cost!
Equipment Needed
Disclosure: as an Amazon affiliate, I receive a small amount of compensation from qualifying purchases at no expense to you. This helps support my work and allows me to bring more yummy recipes your way.
- Medium to large heat proof glass mixing bowl
- Rubber spatula spoon
- Measuring cups
- Plastic cling wrap – like saran wrap
- Rolling Pin
- Cookie Cutter (or you can use a cup or other circular object to cut the dough)
- Cookie Dough Scoop small size (I usedf 1.5 tbsp scoop)
Ingredients
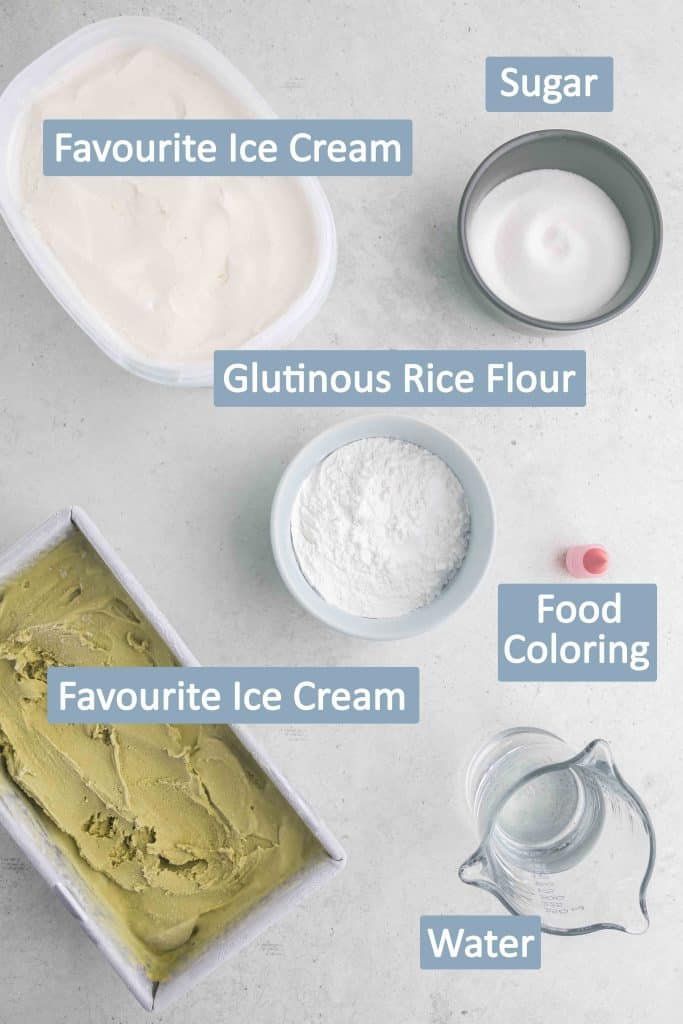
- Ice Cream (your choice)
- Glutinous Rice Flour (NOT just Rice Flour)
- Granulated Sugar
- Water
- Food Coloring, if desired
- Corn starch for dusting on work surface and top of mochi
How to Make Mochi Ice Cream
Preparing the Ice Cream
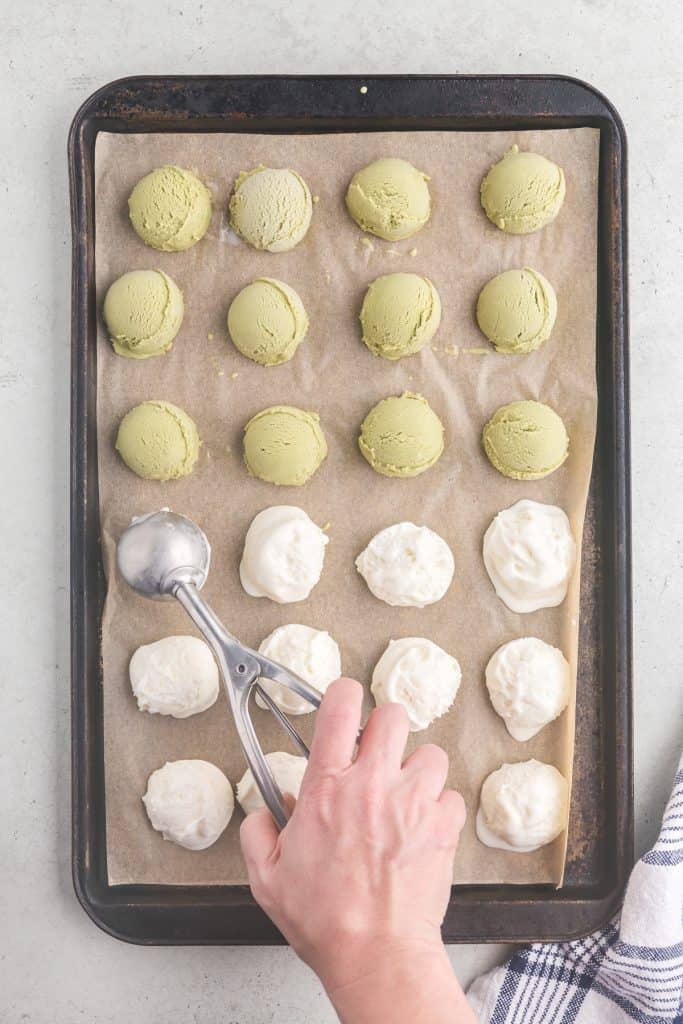
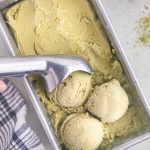
- Use a cookie scoop to scoop balls of your favourite ice cream. Be sure to pack the ice cream into the scoop so there are no air pockets and use a knife to wipe off the bottom edge so you will have a smooth flat surface.
- Place each ball of ice cream on a parchment lined baking sheet and chill in the freezer for 2 hours. See Note 1.
Making the Mochi Dough
- After 1 ½ hour of chilling your ice cream balls, you can begin making your mochi dough. Place the glutinous rice flour and sugar in a mixing bowl. Stir to combine well.
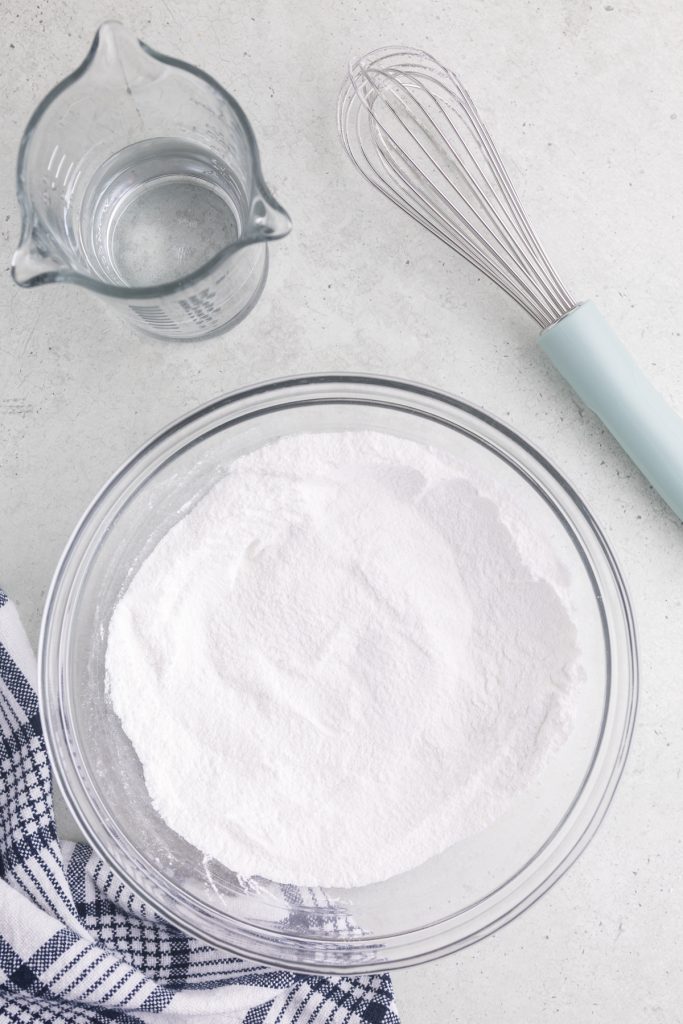
- Add in the water and whisk until smooth. If using, add a few drops of food coloring and mix in.
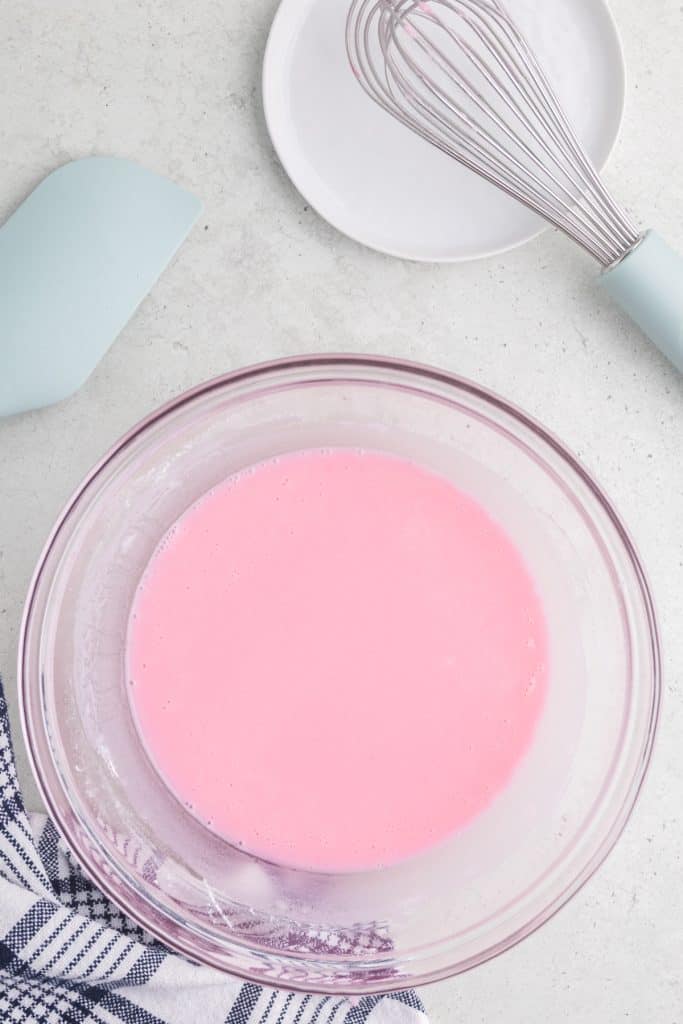
- Cover the mixing bowl loosely with plastic wrap
- Microwave for 1 minute (I am using a 1460 Watt microwave times may vary depending on your microwave)
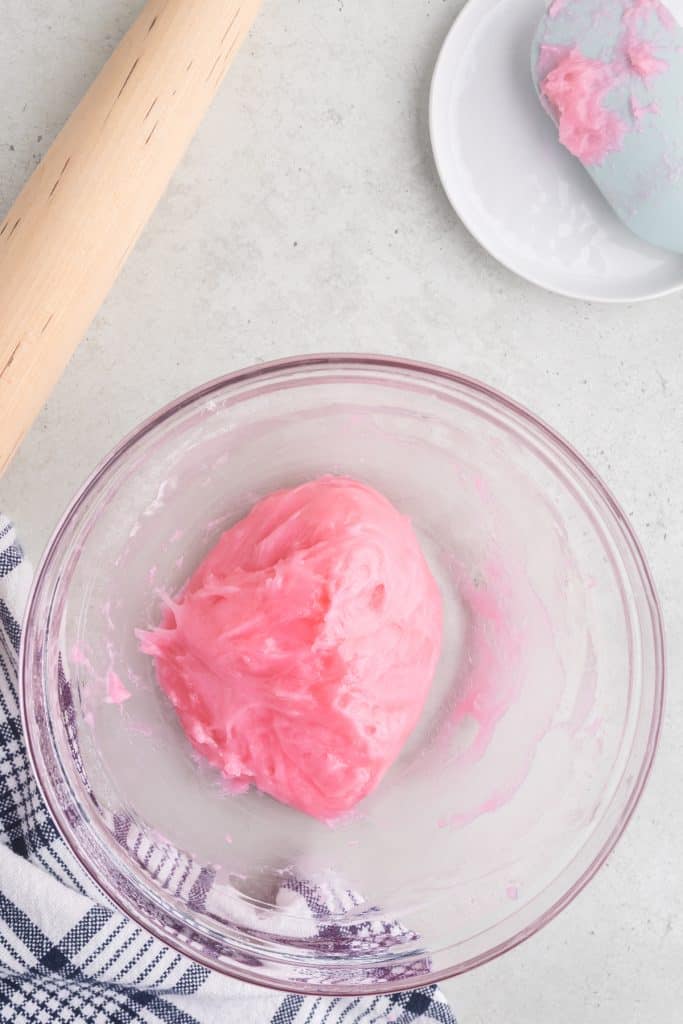
- Remove bowl and using a rubber spatula spoon dipped in water (to prevent sticking) mix the ingredients. There will be some solids and still some liquid, just give it all a good mix.
- Cover with plastic wrap again and microwave for 30 seconds.
- Stir the mochi with a wet rubber spatula and give it another 30 seconds in the microwave followed by another good stirring to bring the dough together into a ball. The mochi should be shiny and a little translucent.
- Place a large piece of parchment paper on the counter top and dust generously with cornstarch or potato starch.
- Pour mochi dough onto the parchment paper and dust the mochi with cornstarch. Roll out until it is a little more than ¼ inch thick.
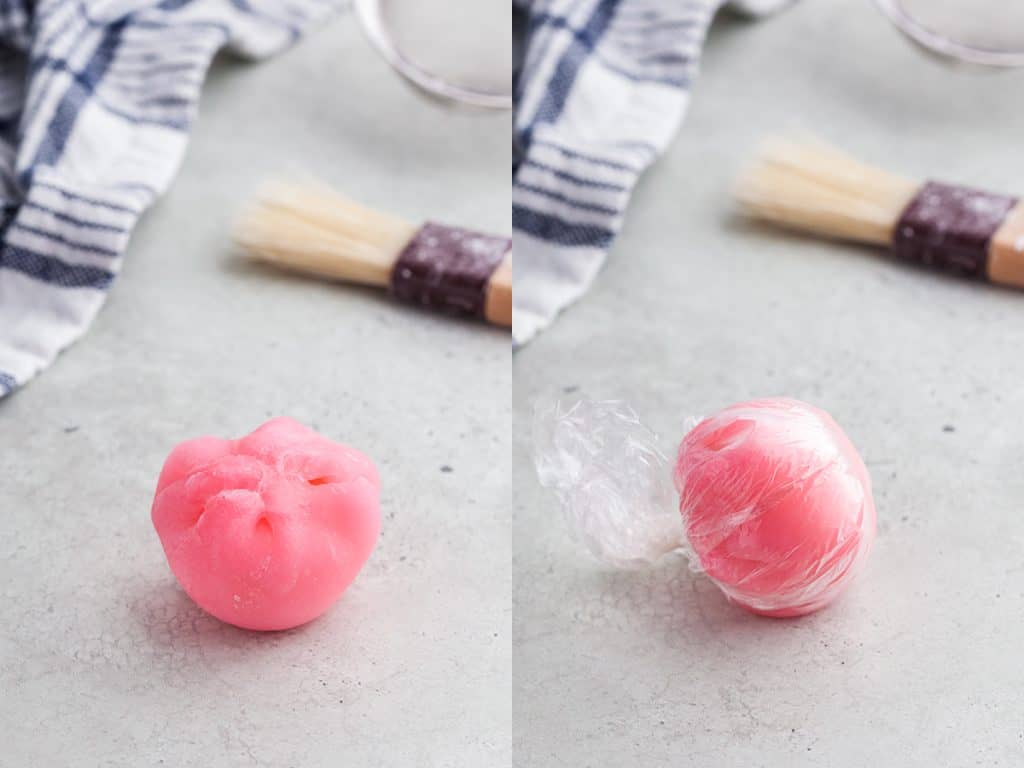
- Use a cookie/biscuit cutter about 3” diameter to cut out circles. Dust off excess cornstarch/potato starch with a dry pastry brush.

- Place each mochi dough circle on an individual piece of plastic wrap. The size of the plastic wrap should be at least 7 inches by 7 inches or bigger. Stack the mochi dough with plastic wrap on top of each other and place on a small plate. Chill in the fridge for 30 minutes or the freezer for 10 minutes. See Note 2.
Assembling Mochi Ice Creams
- Work with one mochi ice cream ball at a time. Best to keep the others in the freezer while you work.
- Take one mochi dough circle and place one of the ice cream balls into the middle, upside down so the flat edge of the ice cream is facing upward.
- Bring the dough over the ice cream so that all the dough edges meet along the middle of the flat plane of the ice cream. Pinch the dough together to seal. If you have a lot of excess dough you can cut the excess with scissors so you don’t end up with a big blob of dough on the bottom. See Note 2.

- Bring plastic wrap over the mochi ice cream ball in the same way you wrapped the ice cream. Then tightly rotate the saran wrap around the flat side of the mochi ball so that it is tightly held by the plastic wrap. Place the plastic wrapped mochi ice cream ball back into the freezer to chill (flat side down as much as possible).
- Continue with the other ice cream balls until they are all done.
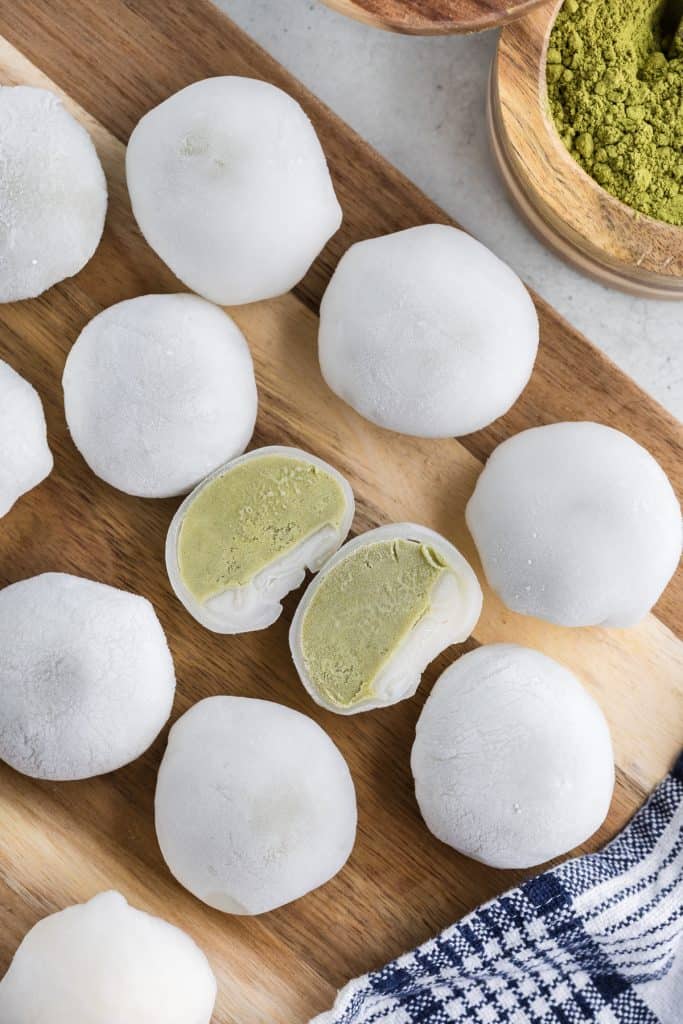
- Chill in the freezer for at least an hour to firm back up again.
- When ready to serve, bring the mochi ice cream out of the freezer for about 5 minutes before serving to soften a bit. Enjoy!
Notes
- Don’t skip chilling the ice cream balls after they have been scooped. The ice cream needs to be as cold and hard as possible when you wrap them in mochi so you don’t end up with melting ice cream oozing out, which will prevent you from being able to pinch the mochi closed. I once tried an ice cream that was just too soft no matter how long I let it sit in the freezer. Some additives in ice cream make it soft which is nice for serving on a pie or something, but not for wrapping mochi ice cream.
- Make sure the mochi dough is cold before trying to wrap around the ice cream ball. If it isn’t cold, it will begin to melt the ice cream and it becomes very difficult to wrap.
- If the circle of dough is not big enough to wrap the ice cream you won’t be able to bring the mochi dough together. If it needs to be a bit bigger you can work the edge with your fingers (ice cream should be back in the freezer) to just stretch the edge out a bit before wrapping. I have also found that when rolling the mochi out originally, I can leave it a little thicker than i want, then cut out my circles and roll each circle individually to get a larger circle than my cookie cutter.
- Having a little bowl of water nearby you can dip your fingers into to wet the mochi may help if you are having troubles getting it to stick together.
- If your mochi is too sticky and hard to work with, you can dip your fingers in cornstarch.
- For the best looking mochi don’t re-use scraps of leftover dough. But you can gather the scraps and rework them if you want, they will just not be as smooth of a final product, as the cornstarch/potato starch begins to dry out the mochi too much. They still taste great, but don’t look quite as nice.
FAQs
- What should I do if the mochi dough is sticking to my fingers too much? You can dip your fingers in a little cornstarch or potato starch, or you can sprinkle a little more cornstarch/potato starch on the dough.
- What should I do if my dough won’t pinch together? This is usually due to the dough not being sticky enough. You can dab a little water where you want to be more sticky and try pinching.
- My dough is tearing when I try to pinch it together around the ice cream, what should I do? If this is the case the dough circle you cut out is either too small to wrap around the ice cream or it was rolled too thin. Try cutting out the circle with a bigger object like a cup, or re-roll it a little thicker.
If You Liked This Mochi Ice Cream Recipe…
If you liked this recipe, please consider leaving a comment below – I love to hear how people get on with my recipes and I truly make an effort to respond to everyone who takes the time to comment. Other recipes you might enjoy include:


Ice Cream Mochi
Ingredients
- 3/4 cup glutinous rice flour (94g)
- 1/2 cup granulated sugar (108g)
- 1/2 cup water (120mL)
- a few drops food coloring (optional)
- 2 cups Ice Cream of your choice
- Cornstarch or Potato Starch for dusting the dough and work surface
- Plastic wrap for wrapping each mochi ball
Instructions
Preparing the Ice Cream Balls
- Use a cookie scoop to scoop balls of your favourite ice cream. Be sure to pack the ice cream into the scoop so there are no air pockets and use a knife to wipe off the bottom edge so you will have a smooth flat surface.
- Place each ball of ice cream on a parchment lined baking sheet and chill in the freezer for 2 hours. See Note 1.
Making the Mochi Dough
- After 1 ½ hour of chilling your ice cream balls you can begin making your mochi dough. Place the glutinous rice flour and sugar in a mixing bowl. Stir to combine well.
- Add in the water and whisk until smooth. If using, add a few drops of food coloring and mix in.
- Cover the mixing bowl loosely with plastic wrap and microwave for 1 minute (I am using a 1460 Watt microwave, times may vary depending on the power of your microwave)
- Remove bowl and using a rubber spatula dipped in water (to prevent sticking) mix the ingredients. There will be some solids and still some liquid, just give it all a good mix.
- Cover with plastic wrap again and microwave for 30 seconds followed by another good mixing to bring the dough together into a ball with a wet rubber spatula spoon. Repeat with one more round of 30 seconds in the microwave and stirring.
- Place a large piece of parchment paper on the counter top and dust generously with cornstarch or potato starch.
- Pour mochi dough onto the parchment paper, dust the mochi with cornstarch and roll out until it is a little more than ¼ inch thick.
- Use a cookie/biscuit cutter about 3” diameter to cut out circles. Dust off excess cornstarch/potato starch with a dry pastry brush.
- Place each circle on an individual piece of plastic wrap. The size of the plastic wrap should be at least 7 inches by 7 inches or bigger. Stack the mochi dough with plastic wrap on top of each other and place on a small plate. Chill in the fridge for 30 minutes or the freezer for 10 minutes.
Assembling the Ice Cream Mochi
- Work with one mochi ice cream at a time. Best to keep the others in the freezer while you work. Take one mochi dough circle and place one of the ice cream scoops into the middle, upside down so the flat edge of the ice cream is facing upward. Bring the dough over the ice cream so that all the dough edges meet along the middle of the flat plane of the ice cream. Pinch the dough together to seal. If you have a lot of excess dough you can cut the excess with scissors so you don’t end up with a big blob of dough on the bottom.
- Bring plastic wrap over the mochi ice cream ball in the same way you wrapped the ice cream. Then tightly rotate the saran wrap around the flat side of the mochi ball so that it is tightly held by the plastic wrap. Place the plastic wrapped mochi ice cream ball back into the freezer to chill (flat side down as much as possible).
- Continue with the other ice cream balls until they are all done.
- Chill in the freezer for at least an hour to firm back up again.
- When ready to serve, bring the mochi ice cream out of the freezer for about 5 minutes before serving to soften a bit. Enjoy!
Notes
- Don’t skip chilling the ice cream balls after they have been scooped. The ice cream needs to be as cold and hard as possible when you wrap them in mochi so you don’t end up with melting ice cream oozing out, which will prevent you from being able to pinch the mochi closed. I once tried an ice cream that was just too soft no matter how long I let it sit in the freezer. Some additives in ice cream make it soft which is nice for serving on a pie or something, but not for wrapping mochi ice cream.
- Make sure the mochi dough is cold before trying to wrap around the ice cream ball. If it isn’t cold, it will begin to melt the ice cream and it becomes very difficult to wrap.
- If the circle of dough is not big enough to wrap the ice cream you won’t be able to bring the mochi dough together. If it needs to be a bit bigger you can work the edge with your fingers (ice cream should be back in the freezer) to just stretch the edge out a bit before wrapping. I have also found that when rolling the mochi out originally, I can leave it a little thicker than i want, then cut out my circles and roll each circle individually to get a larger circle than my cookie cutter.
- Having a little bowl of water nearby you can dip your fingers into to wet the mochi may help if you are having troubles getting it to stick together.
- If your mochi is too sticky and hard to work with, you can dip your fingers in cornstarch.
- For the best looking mochi don’t re-use scraps of leftover dough. But you can gather the scraps and rework them if you want, they will just not be as smooth of a final product, as the cornstarch/potato starch begins to dry out the mochi too much. They still taste great, but don’t look as nice.
What if my mochi dough isn’t a dough ball after 5 minutes of it being in the microwave?
Hi Lindsey, that is very strange. It should not take anywhere near 5 minutes in the microwave. I’m thinking that you might have rice flour and not glutinous rice flour. These have very different properties and regular rice flour does not work. Glutinous rice flour can also be called sweet rice flour if that helps.
My favorite one! I could’t find them online glad I found your page, trying this recipe soon .
Glad you found my website! Good luck, you will really enjoy them I’m sure.
My kids love the little frozen treats and mochi at the grocery store, but man, it’s so expensive to have them all the time, so it was such a fun treat to come across this recipe and realize it wasn’t hard to make our own. Bonus points: the kids had so much fun making it. Bonus points: the kids had so much fun making it.
They do make a nice treat, and they don’t need to be expensive if you make them at home! Glad the kids had fun.