
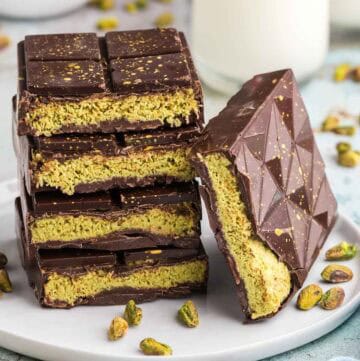
I’m a true chocolate lover, and after hearing so much buzz about the Dubai chocolate bar, I knew I had to give it a try. And…wow! One bite and I was instantly converted. These bars, with their yummy smooth chocolate and irresistible crunchy-yet-creamy pistachio filling, are pure indulgence. The pistachio cream has officially become my new best friend, and I’m already on a mission to weave it into more recipes in my kitchen – so stay tuned!

Why You Will Love This Dubai Chocolate Bar
Decadent flavor – You can make these with either rich dark chocolate, creamy milk chocolate, or even white chocolate. When paired with the creamy pistachio filling they are the ultimate indulgence.
Crunchy + creamy combo – The filling balances smooth sweet pistachio cream with just the right crunch from the toasted Kataifi (shredded phyllo pastry).
Middle Eastern flair – Think of it as a Middle Eastern twist on the classic chocolate and peanut butter combo, but with pistachios bringing their own unique, nutty flavor that’s similar yet distinctly different from peanuts.
Easy gifting idea – wrap them up for a homemade treat that looks (and tastes) elegant.
Make-ahead friendly – stores well so you can enjoy them anytime.
Surprising ingredient – pistachio cream adds a unique twist most people haven’t tried before.
Homemade luxury – skip the store-bought and enjoy a high-end treat from your own kitchen.
Two levels of instructions provided – If you love chocolate, you’ll definitely want to give them a try! The first method uses couverture chocolate and tempering for a high-end result – giving your bars a glossy finish, a crisp snap, and better resistance to melting in your hands. The second method is quick and easy, so you can enjoy them with less fuss and expense.
Equipment Needed
Disclosure: as an Amazon affiliate, I receive a small amount of compensation from qualifying purchases at no expense to you. This helps support my work and allows me to bring more yummy recipes your way.
- Measuring Spoons
- Measuring Cups
- Plastic Mixing Bowl (microwave safe) (I bought one from IKEA)
- Rubber Spatula
- Chocolate Bar Mold
- Large Frypan
Ingredients for The Dubai Chocolate Bar

Chocolate – The main ingredient in any chocolate bar. The quality of the chocolate will greatly impact the outcome of your chocolate bar. I highly recommend using a couverture chocolate (see Pro Tips for more information). This can be dark chocolate, milk chocolate (more common), and white chocolate. I used a Callebaut Dark Chocolate, but another good brand is Ghirardelli. Just read the label and make sure it says good for molding and enrobing. If you use the second method, you can buy your favorite plain chocolate.
Pistachio Cream – This is what really makes it a “Dubai” chocolate bar. This is NOT the same thing as pistachio butter which is basically pistachios blended into a paste (like peanut butter). Pistachio cream has added sugar, oils, and skim milk powder to make it sweet and creamy. I experimented with making my own pistachio cream using cream and milk – it was delicious, but the dairy caused the toasted kataifi to turn soggy, so not recommended for these bars. Be sure to stick to oils and milk powders. I found my jar of pistachio cream at my local Mediterranean market, but Persian markets would also be a good place to look. If that fails, you can always go online and find a jar like this pistachio cream– but it is more expensive online.
Kataifi – This is basically phyllo dough that has been cut into very thin vermicelli-like noodles. It goes by several other names depending on the region and specific context, including kadaif, kadayif, kunafa, and knafeh. I found my box in the freezer section of a local Mediterranean market. Once thawed the dough is fresh and soft like uncooked phyllo dough. You can also buy the dried version online. See Pro Tips and Substitutions for a substitution idea.
Tahini – A traditional Middle Eastern ingredient that adds more nutty depth, and umami richness.
Salted Butter – Used to toast the kataifi, but if you already have dry kataifi you might be able to get away with using less and toasting for a shorter period of time.
Gold Luster – is for decorative purposes only, therefore totally optional. See Pro Tips for other decorating ideas.
Vodka – for “dissolving” the gold luster. You could also use any other neutral flavor strong alcohol. You want to avoid water and the stronger the alcohol the faster it evaporates.
The Best Chocolate to Use for Dubai Chocolate Bars
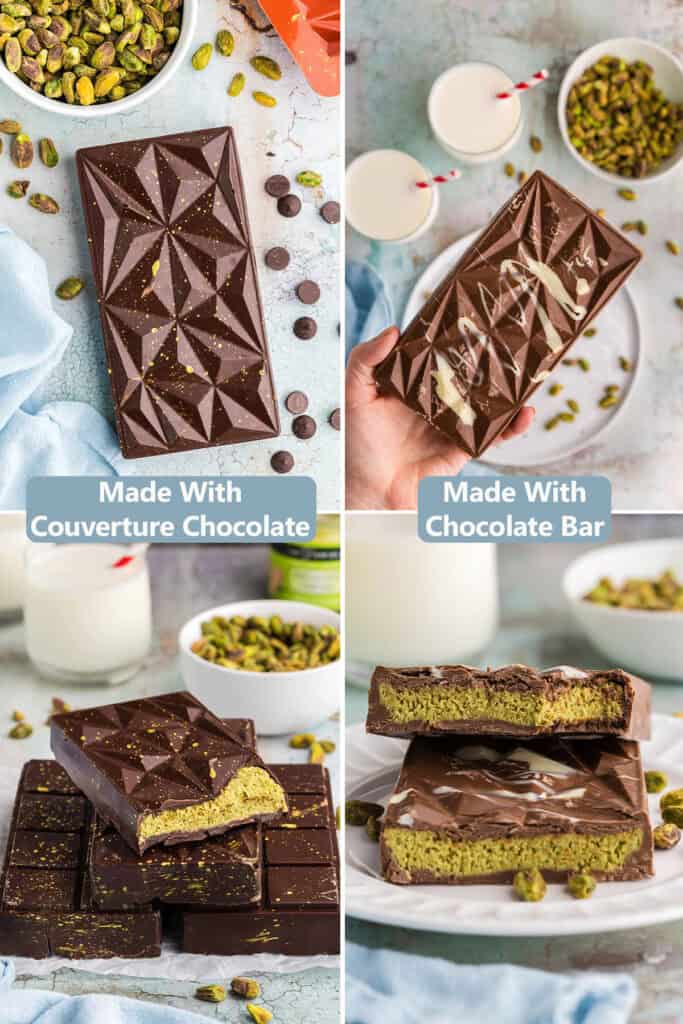
Now this is indeed a good question. What kind of chocolate should I buy for making a Dubai chocolate bar? And it really comes down to preference and what you want the final outcome to look like and feel like. Chocolatiers would probably say you should use a couverture chocolate so that your final product is shiny, resists melting in your hand, and has a satisfying “snap” when you bite into it. But tempering chocolate is a little complicated and temperamental (now I know where this word comes from!). Although I make it sound negative, the final product is beautiful and I would recommend this if you are giving these as a gift or you just want the best looking bars. But, if time is short, and you don’t have the patience to temper chocolate then you can buy your favorite solid chocolate bar (I chose Cadbury Dairymilk bars). I do show you how to temper chocolate and how to make the Dubai Chocolate Bar with this method, but I do also give you the option to use a regular plain chocolate bar.
If you use “regular” chocolate, you will probably end up with sugar and or fat bloom spots on the surface, but that’s not the end of the world, just not as pretty (you can see my photo at the bottom of the recipe showing the differences). The chocolate is more susceptible to melting, but it is easier to bite into because it is softer than couverture chocolate. So if you are making these just to see what all the Dubai chocolate bar hype is about, I would recommend using the “regular” chocolate method.
Here’s a little comparison chart where you can see the differences between couverture and non-couverture.
Couverture Chocolate VS. Non-Couverture Chocolate
| Ingredient | Couverture Chocolate | Regular (Non-Couverture) Chocolate |
|---|---|---|
| Cocoa Butter Content | High (at least ~31%) | Lower (sometimes replaced with other fats) |
| Texture When Melted | Very fluid, smooth, ideal for coating | Viscosity totally depends on the chocolate you choose. |
| Tempering Ability | Easy to temper, results in glossy shine + crisp snap | Often difficult to temper; may bloom or look dull |
| Professional Use | Used by chocolatiers for dipping, molding, enrobing, decorations | More common in baking, ganache, or general cooking |
| Finish | Glossy, smooth, with sharp snap | Softer finish, less shine, softer bite |
| Cost | More expensive due to high cocoa butter content | Usually less expensive |
Non-couverture chocolate is often fine for baking, making ganache, or flavoring – but it won’t give that professional glossy finish and crisp snap you get with artisan chocolates. In short, all couverture is chocolate, but not all chocolate is couverture.
Couverture chocolate can be dark chocolate, milk chocolate, or white chocolate, so you can pick your favorite. I chose dark chocolate for making these Dubai chocolate bars.

What is Chocolate Tempering
Tempering chocolate is the process of carefully heating and cooling chocolate so that the cocoa butter inside it forms stable crystals.
This gives the chocolate:
- A glossy, professional-looking finish
- A crisp, clean snap when broken
- Resistance to melting too quickly in your hands
- A smooth, even texture
If chocolate isn’t tempered, it can look dull, streaky, or have white “bloom” spots, and the texture will be softer. Tempering is what makes chocolate look beautiful, feel snappy, and stay stable.
Cocoa butter is a polymorphic fat, meaning it can solidify into six distinct crystal forms (I–VI) after melting. The specific form that develops is determined primarily by the temperature at which crystallization occurs, making temperature control the critical factor in all tempering methods. The desired structure is Form V (βV), often referred to as beta crystals or beta V crystals. This form provides tempered chocolate with its characteristic snap, glossy appearance, and stable mouthfeel. While I won’t go into the full phase transitions and melting ranges of each polymorph here, you can read about the science in more detail here.
There are several methods for tempering chocolate, the most common being tabling, seeding, the direct method, and the microwave method. For beginners, the microwave method is often the easiest, though it requires starting with already-tempered chocolate (such as chips, callets, or chopped couverture). Unlike other methods, it doesn’t require a thermometer – though having one is useful – or any specialized tools beyond a microwave and a plastic, microwave-safe bowl. Avoid glass or ceramic bowls, as they can retain too much heat, which can push the chocolate out of the tempering range and melt away the desired form V (βV) crystals. Because the tempering temperature window is very narrow, overheating is a common risk. Callebaut offers a practical demonstration of tempering using the microwave method.
Microwave Tempering
In a nutshell, the microwave method of tempering uses short bursts of heat so the chocolate doesn’t overheat. Stirring vigorously between bursts helps distribute the heat evenly, preventing hot spots and encouraging those stable βV crystals to form. Leaving a few chunks of chocolate “unmelted” and letting them melt through stirring ensures the chocolate temperature hasn’t gone too high.
Temperature control is critical. Each type of chocolate has a different threshold beyond which the βV crystals are destroyed:
Dark chocolate: do not exceed 93°F (34°C). Working range: 88–90°F (31–32°C).
Milk chocolate: do not exceed 88°F (31°C). Working range: 84–86°F (29–30°C).
White chocolate: do not exceed 86°F (30°C). Working range: 82–84°F (28–29°C).
If you accidentally exceed the maximum temperature, you can restore temper by adding a few unmelted callets or small chopped bits of the original couverture chocolate and stirring until incorporated. This “seeding” introduces fresh βV crystals, which encourage stable crystallization as the chocolate cools.
How to Check for a Good Temper
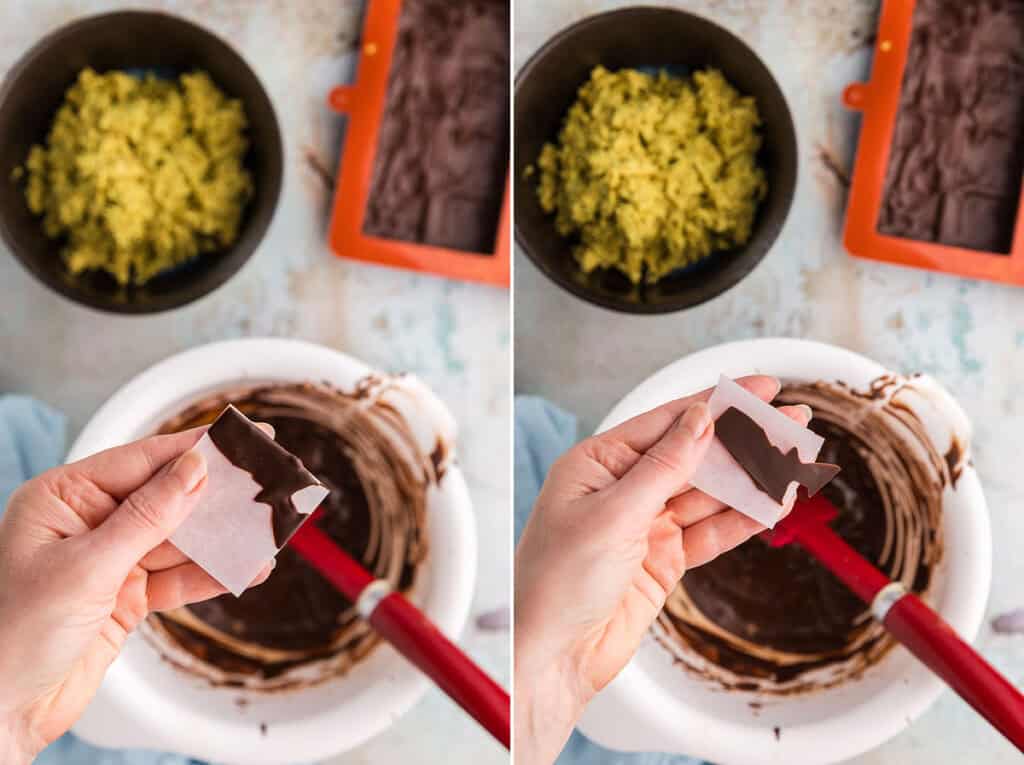
So how do you know if you are in the proper working range for your type of chocolate if you don’t have a thermometer? If you had a few left over stubborn pieces that you had to stir and stir in order to get them to melt, you know you didn’t get the chocolate too hot to go out of temper. Also you can check your temper by dipping a small piece of parchment in to the chocolate and make a thin coating on it. Set it aside. If it hardens up within 3-5 minutes and comes off the parchment cleanly once set up, you know you have a good temper. It should also have a bit of a snap when you break it.
How To Make The Dubai Chocolate Bar – 2 Methods
Ingredient measurements can be found in the recipe card below.
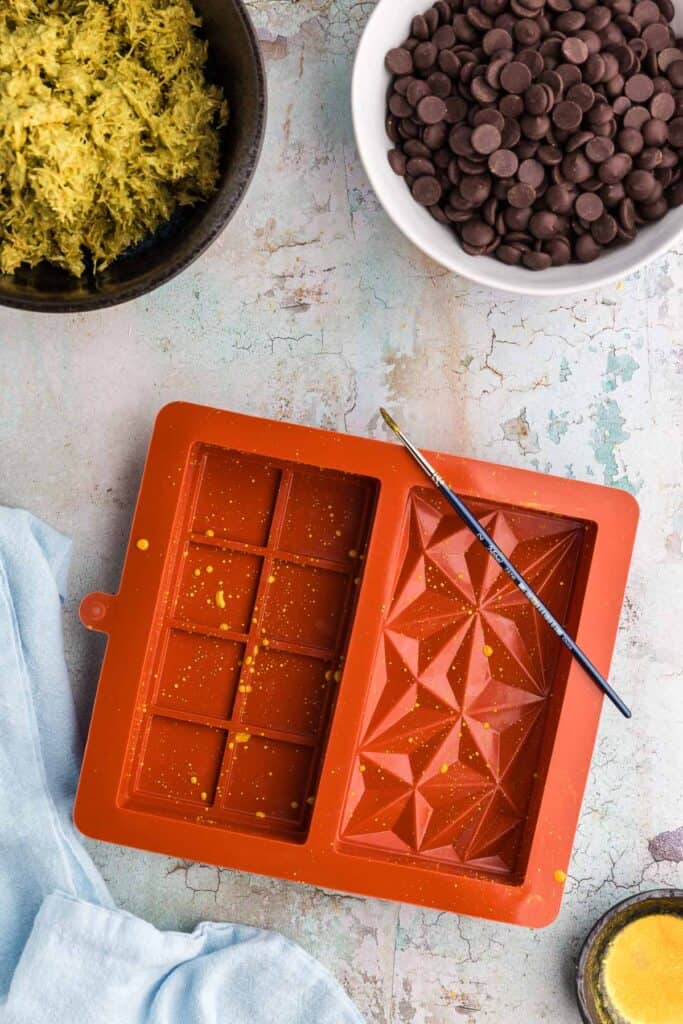
Prepare Your Chocolate Mold – Same for both methods
Make sure your chocolate mold is clean. Sometimes giving it a quick wipe with isopropyl alcohol helps to make it super clean by removing any smudges.
If decorating with gold luster, dissolve a small small amount of the gold luster in a teaspoon of hard neutral alcohol like vodka. You can paint the gold luster onto the mold, or you can make droplets by flicking a small craft paintbrush of the luster towards the bottom of the mold. Once you are happy with the amount of decorating, set the mold aside to allow the alcohol to evaporate.
See Pro Tips for an alternative decorating idea. Decorating the bars is totally optional, you can skip it if you like.
Making the Pistachio Filling – Same for both methods
Cut the Kataifi into small pieces. If using fresh kataifi like me, you can decide on how long you want them, I prefer them on the small side and I cut them about 1/4″ long as best I could.
Melt the butter in a frypan set over medium heat. Once melted add in the fresh kataifi and toss with a spatula. Don’t walk away from the frypan as the toasting can happen quickly. Just keep moving and tossing the kataifi in the pan until it is a light toasty brown. It’s fine, if you go past to a darker toastiness, just don’t burn it. This takes about 5 minutes.
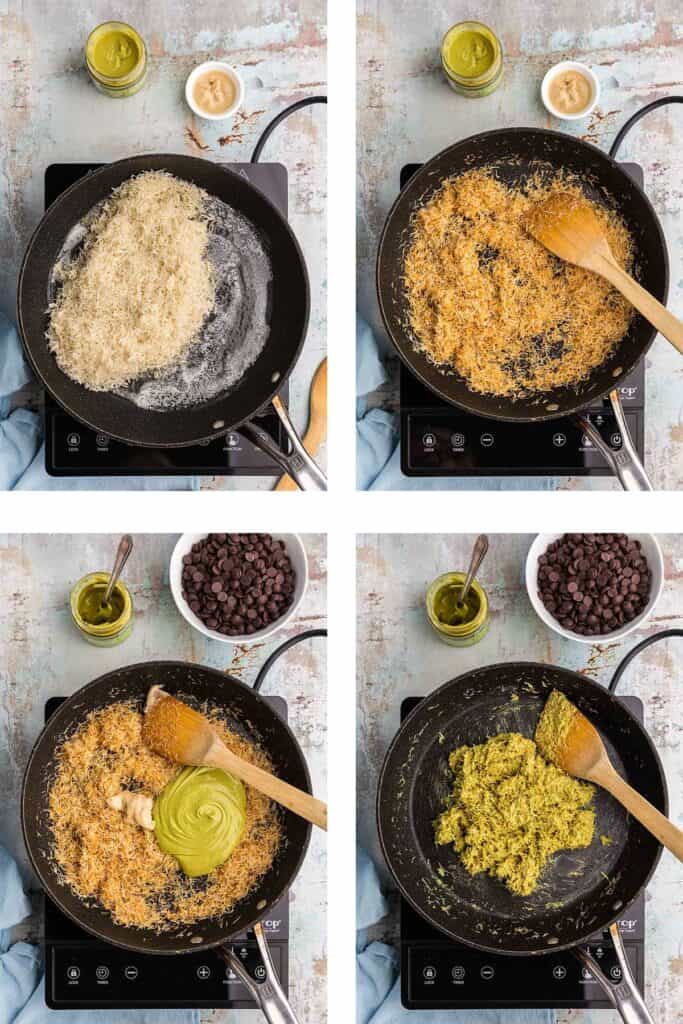
Turn the heat off and stir in the pistachio cream and tahini until homogenous. Set aside to cool while you temper your chocolate. If you want the pistachio filling more “liquidy”, just add a little more pistachio cream.
Melt and/or Temper Your Chocolate
If you want to make your bars as professional looking as possible, use couverture chocolate and follow Instructions 1. Tempering Couverture Chocolate. But if you aren’t worried about the bars having a glossy shine, sharp snap when broken, and a resistance to melting in your hands, you can follow Instructions 2. Melting Your Favorite Chocolate.
1. Tempering Couverture Chocolate
As I mentioned earlier, I am using the microwave method as I feel it is easiest and requires the least amount of equipment.
If your chocolate is sold as a bar, chop it up into small bits. If it is sold as callets (look like chocolate chips) you can just place them directly into a microwave safe plastic bowl.
Place the bowl in the microwave for a 45 second burst. Remove and use a rubber spatula to stir the chocolate. The chocolate will show signs of softening but still not be very melty. If your microwave isn’t as powerful as mine (1200W) your chocolate may still look the same but still give it a stir to see if you can squish the chocolate a bit and distribute the heat.
Place the bowl back in the microwave for a 20 second burst. Remove and stir again.
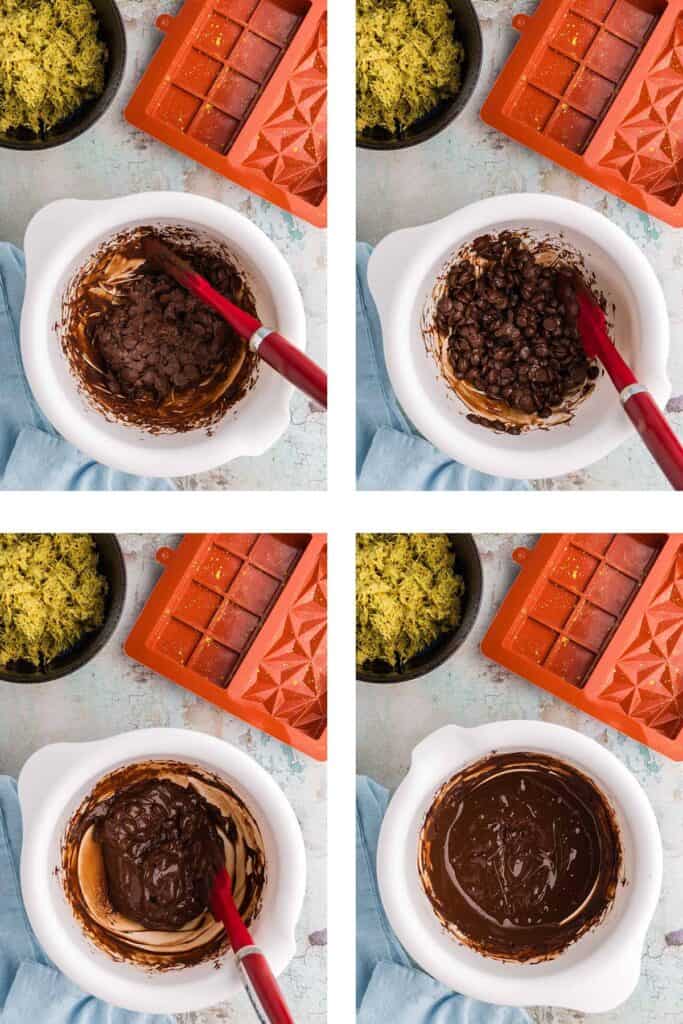
Do another 20 second burst and stir. You will have to decide how much time to give it in the microwave to get to the point where 80-90% of the chocolate is melted but the other 10-20% is not. Keep stirring to try to distribute the heat to melt the last bits of chocolate. If the last bits are really stubborn you can try 5-10 second bursts in the microwave with stirring between bursts.
Once you can melt all the chocolate by stirring it in, you have tempered chocolate. To double check your temper place a small piece of parchment into the chocolate and remove so that there is a thin coating on it. Lay the parchment aside on the bench. You have a good temper if it sets up in 3-5 minutes, has a bit of a sheen, easily comes away from the parchment, and has a bit of a snap when you break it in two.
Different couverture chocolates have different fluidities at this point. Some are easier to pour than others, if your chocolate is still a bit thick you can give it a burst or two in the microwave until it is easier to work with. This is where you run in to the danger of overheating it and melting away your βV crystals, so heat it slowly. If you do have an instant read thermometer it might be good to check the temperature to just make sure you don’t go over the working temperature for the chocolate you are using. Working temperatures are discussed in the “What is Chocolate Tempering” section above.
You are now ready to pour into the chocolate mold – move on to Assemble The Chocolate Bars.
2. Melting Your Favorite Chocolate
Take about 12oz of your favorite plain chocolate (no nuts, fruits etc) and chop it up into tiny pieces and place in a plastic microwave safe bowl.
Place the bowl in the microwave for a 45 second burst. Give it a good stir with a rubber spatula even if it doesn’t look like anything has changed. It will help distribute the heat around the chocolate.
Give the bowl a 30 second burst in the microwave. Again stir well. Continue with short bursts in the microwave (5-20 seconds) with stirring until all the chocolate has melted. You don’t want to get the chocolate super hot at any point, but just want to give it enough heat to melt it and make it easy enough to work with. Once all melted you are ready to move to the next step.
Assemble The Chocolate Bars
Once you have your melted tempered chocolate you can pour about half into your two chocolate molds. use a spoon or offset spatula to spread the chocolate around and up the sides of the mold. Its hard to be perfect but try to make all the edges an even thickness.
Set aside to cool for about 15 minutes. I let it cool at room temperature but many people have success with 5-10 minutes in the fridge to help the chocolate set up.
Once the first layer of chocolate is set you can add the pistachio cream-kataifi mixture. If this mixture is really solid you can give it a 10 second burst in the microwave to loosen it up, but you don’t want it warm enough to melt the chocolate. Evenly distribute the pistachio mixture between the two molds and flatten out the top.
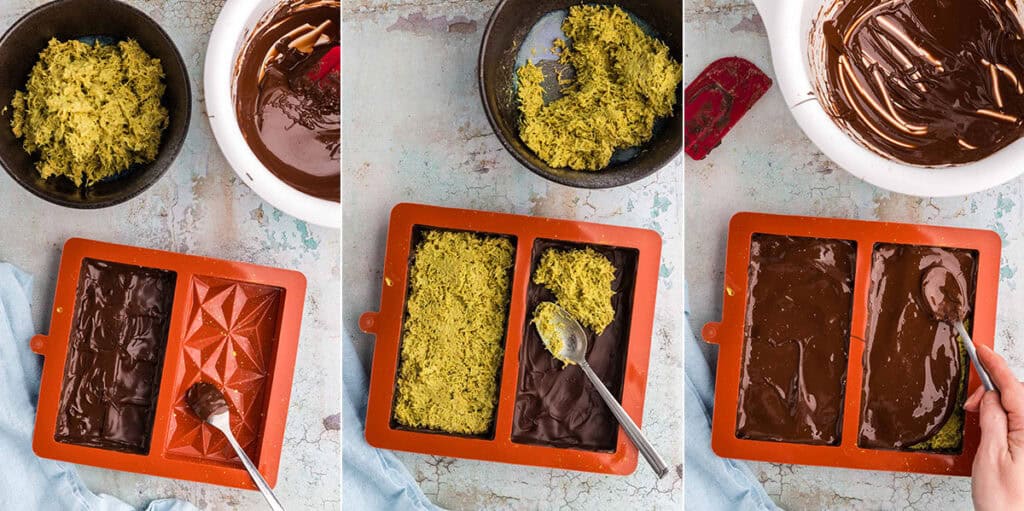
You may have to heat the melted chocolate in the microwave a bit if it has started to solidify in the bowl. Again, just do it in short bursts with stirring until you can work with it. Pour the rest of the melted chocolate on top of the pistachio mixture and smooth out with a spoon or offset spatula.
Set aside to cool for 15-20 minutes. Alternatively, you could pop it in the fridge for about 10 minutes.
Once set, it is ready to eat. Break open and enjoy!
Pro Tips Tricks and Substitutions
- Another common method for decorating the Dubai Chocolate Bar is to melt white chocolate and make a random “splashy” pattern by drizzling the white chocolate on to the chocolate mold first and allowing it to set up before adding the dark or milk chocolate. You can even add an oil based food coloring to give the white chocolate if you like.
- When it comes to homemade chocolate bars, couverture chocolate is the best choice. Thanks to its higher cocoa butter content, it can be tempered to give you that gorgeous shine, satisfying snap, and a bar that won’t melt too easily in your hands. But if tempering sounds like too much hassle, don’t worry – you can still use your favorite chocolate. Melt down Lindt bars, Dairy Milk (Cadbury), Jersey Milk (Nielsen) etc., and it’ll work just fine. Just keep in mind the bars might turn out a bit softer and won’t have the same glossy finish, but they will still be delicious. Some people even use brown candy melts from the craft store. I wouldn’t recommend this because although it is made for melting and will look nice and professional, I can’t imagine eating a bar of candy melts.
- Working with chocolate can be messy as it isn’t the most fluid for pouring etc. unless you have copious amounts to work with and are fine having a lot leftover. So give yourself some grace if they don’t turn out perfect looking the first time, we all get better with practice.
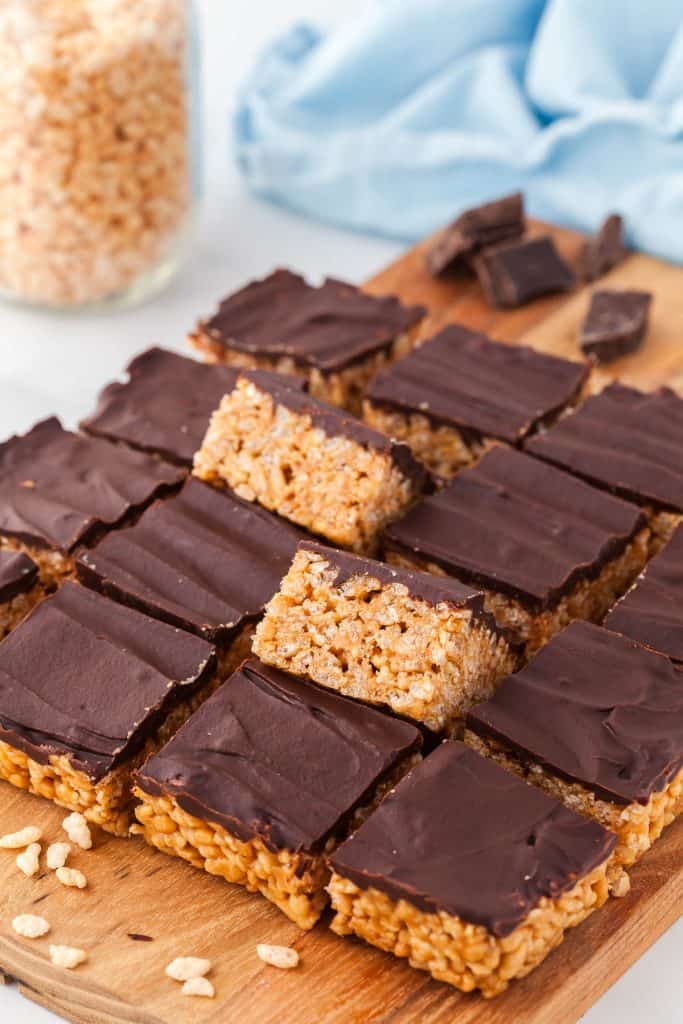
- If you can’t find kataifi and don’t want to order it online I think you could get away with adding slightly broken up rice krispies to the pistachio cream and tahini. It will give a crunch and won’t alter the flavor very much. If you do use rice krispies, you don’t need to toast them in butter, just use as is. That being said, a little heat can loosen up the pistachio cream and tahini making it easier to mix the rice krispies in.
FAQs
These chocolate bars are so thick, how do you break in to them? Yes, these are thick chocolate bars, I recommend using a knife to cut them into pieces. They are great for sharing because they are so big.
Can I use something other than a chocolate mold to made these Dubai bars? A proper silicone chocolate mold gives the best results, but you could also use a loaf pan and line it with parchment paper and use that as your mold. Or make them like peanut butter cups by placing muffin liners into a muffin tray, adding the melted chocolate, letting it firm up, adding the pistachio layer, and then finally topping with more melted chocolate.
Could I add extra flavors? Yes! Try adding a sprinkle of sea salt, dried rose petals, orange zest, or even a pinch of cardamom for extra Middle Eastern flair.
How long do Dubai Chocolate Bars last? They should be stored in an airtight container in a cool dark place ideally below 70F and they will last for about 3 weeks. I don’t recommend placing them in the fridge as chocolate doesn’t typically store well in the fridge as you can get sugar bloom (powdery look on the chocolate) and the chocolate can absorb fridge flavors.
Why do my chocolate bars look dull or have white streaks on them? This is called “bloom” and it happens when the cocoa butter separates from the chocolate. It can occur if the chocolate wasn’t tempered or if it was stored in a warm place. The bars are still safe to eat, but tempering couverture chocolate will help prevent bloom and give a glossy finish.
My chocolate bars came out too soft—what went wrong? This usually happens if you use regular eating chocolate instead of couverture, since it contains less cocoa butter and isn’t designed for tempering. Soft bars are still delicious, but if you want a firmer, snappier texture, try using couverture and tempering it before pouring into molds.
Dubai Chocolate Bar
Equipment
- Microwave
- Microwave Safe Plastic Bowl
- Chocolate Mold
Ingredients
- 3 tablespoons Salted butter
- 2⅓ cups Chopped kataifi (130g)
- 7.1 oz Pistachio cream 200g
- 1 tablespoon Tahini
- 12 oz Chocolate (see Pro Tips Tricks and Substitutions)
For Decoration
- Gold Luster (optional)
- 1 tsp Vodka (optional)
Instructions
- Two sets of instructions provided for if you want to use couverture chocolate and temper it for a glossy finish, sharp snap, and resistance to melting in your hands, or if you would prefer to keep things simple and just melt your favorite chocolate. The difference is explained in the blog post above.
Prepare Your Chocolate Mold – Same for both methods
- Make sure your chocolate mold is clean. A quick wipe with isopropyl alcohol helps to make it super clean by removing any smudges.
- If decorating with gold luster, dissolve a small small amount in a teaspoon of hard neutral alcohol like vodka. You can paint the gold luster onto the mold, or you can make droplets by flicking a small craft paintbrush of the "liquid luster" towards the bottom of the mold. Once you are happy with the amount of decorating, set the mold aside to allow the alcohol to evaporate.
- See Notes for an alternative decorating idea. Decorating the bars is totally optional, you can skip it if you like.
Making the Pistachio Filling – Same for both methods
- If using fresh kataifi like me, cut it into small pieces about 1/4" long.
- Melt the butter in a frypan set over medium heat. Once melted add in the chopped kataifi and toss with a spatula. Don't walk away from the frypan as the toasting can happen quickly. Just keep moving and tossing the kataifi in the pan until it is a light toasty brown.
- Turn the heat off and stir in the pistachio cream and tahini until homogenous. Set aside to cool while you temper or melt your chocolate. If you want the pistachio cream center more soft and liquidy, just add a little more pistachio cream.
Melt and/or Temper Your Chocolate
- If you want to make your bars as professional looking as possible, use couverture chocolate and follow instructions under 1. Tempering Couverture Chocolate. But if you aren't worried about the bars having a glossy shine, sharp snap when broken, and a resistance to melting in your hands, you can follow Instructions 2. Melting Your Favorite Chocolate.
1. Tempering Couverture Chocolate
- I am using the microwave tempering method as I feel it is easiest and requires the least amount of equipment.
- If your chocolate is sold as a bar, chop it up into small bits. If it is sold as callets (looks like chocolate chips) you can just place them directly into a microwave safe plastic bowl.
- Place the bowl in the microwave for a 45 second burst. Remove and use a rubber spatula to stir the chocolate. The chocolate will show signs of softening but still not be very melty. If your microwave isn’t as powerful as mine (1200W) your chocolate may still look the same but still give it a stir to see if you can squish the chocolate a bit and distribute the heat.
- Place the bowl back in the microwave for a 20 second burst. Remove and stir again.
- Do another 20 second burst and stir. You will have to decide how much time to give it in the microwave to get to the point where 80-90% of the chocolate is melted but the other 10-20% is not. Keep stirring to try to distribute the heat to melt the last bits of chocolate. If the last bits are really stubborn you can try 5-10 second bursts in the microwave with stirring between bursts.
- Once you melt all the last pieces of chocolate by stirring, you have tempered chocolate. To double check your temper place a small piece of parchment into the chocolate and remove so that there is a thin coating on it. Lay the parchment aside on the bench. You have a good temper if it sets up in 3-5 minutes, has a bit of a sheen, easily comes away from the parchment, and has a bit of a snap when you break it in two.
- Different couverture chocolates have different fluidities at this point. Some are easier to pour than others, if your chocolate is still a bit thick you can give it a burst or two in the microwave until it is easier to work with. This is where you run in to the danger of overheating it and melting away your βV crystals, so heat it slowly. If you do have an instant read thermometer it might be good to check the temperature to just make sure you don't go over the working temperature for the chocolate you are using. The working temperatures are discussed in the blog above.
- You are now ready to add it into the chocolate mold – move on to Assemble The Chocolate Bars.
2. Melting Your Favorite Chocolate
- Take about 12oz of your favorite plain chocolate (no nuts, fruits etc) and chop it up into tiny pieces and place in a plastic microwave safe bowl.
- Place the bowl in the microwave for a 45 second burst. Give it a good stir with a rubber spatula even if it doesn’t look like anything has changed. It will help distribute the heat around the chocolate.
- Give the bowl a 30 second burst in the microwave. Again stir well. Continue with short bursts in the microwave (5-20 seconds) with stirring until all the chocolate has melted. You don't want to get the chocolate super hot at any point, but just want to give it enough heat to melt it and make it easy enough to work with. Once all melted you are ready to move to the "Assemble The Chocolate Bars" step.
Assemble The Chocolate Bars
- Once you have your melted tempered chocolate you can pour about half into your two chocolate molds. use a spoon or offset spatula to spread the chocolate around and up the sides of the mold. Its hard to be perfect but try to make all the edges an even thickness.
- Set aside to cool for about 15 minutes. I let it cool at room temperature but many people have success with 5-10 minutes in the fridge to help the chocolate set up.
- Once the first layer of chocolate is set you can add the pistachio cream-kataifi mixture. If this mixture is really solid you can give it a 10 second burst in the microwave to loosen it up, but you don’t want it warm enough to melt the chocolate. Evenly distribute the pistachio mixture between the two molds and flatten out the top.
- You may have to re-heat the melted chocolate in the microwave a bit if it has started to solidify in the bowl. Again, just do it in short bursts with stirring until you can work with it. Pour the rest of the melted chocolate on top of the pistachio mixture and smooth out with a spoon or offset spatula.
- Set aside to cool for 15-20 minutes. Alternatively, you could pop it in the fridge for about 10 minutes.
- Once set, it is ready to eat. Break open and enjoy!
Notes
- Another common method for decorating the Dubai Chocolate Bar is to melt white chocolate and make a random “splashy” pattern by drizzling the white chocolate on to the chocolate mold first and allowing it to set up before adding the dark or milk chocolate. You can even add an oil based food coloring to give the white chocolate if you like.
- When it comes to homemade chocolate bars, couverture chocolate is the best choice. Thanks to its higher cocoa butter content, it can be tempered to give you that gorgeous shine, satisfying snap, and a bar that won’t melt too easily in your hands. But if tempering sounds like too much hassle, don’t worry – you can still use your favorite chocolate. Melt down Lindt bars, Dairy Milk (Cadbury), Jersey Milk (Nielsen) etc., and it’ll work just fine. Just keep in mind the bars might turn out a bit softer and won’t have the same glossy finish, but they will still be delicious. Some people even use brown candy melts from the craft store. I wouldn’t recommend this because although it is made for melting and will look nice and professional, I can’t imagine eating a bar of candy melts.
- Working with chocolate can be messy as it isn’t the most fluid for pouring etc. unless you have copious amounts to work with and are fine having a lot leftover. So give yourself some grace if they don’t turn out perfect looking the first time, we all get better with practice.
- If you can’t find kataifi and don’t want to order it online I think you could get away with adding slightly broken up rice krispies to the pistachio cream and tahini. It will give a crunch and won’t alter the flavor very much. If you do use rice krispies, you don’t need to toast them in butter, just use as is. That being said, a little heat can loosen up the pistachio cream and tahini making it easier to mix the rice krispies in.
Follow Me On Social Media
If You Liked This Dubai Chocolate Bar Recipe…
If you liked this recipe, please consider rating the recipe and leaving a comment below – I love to hear how people get on with my recipes and I truly make an effort to respond to everyone who takes the time to comment. Other recipes you might enjoy include:
Now that I have finally tried these chocolate bars, I can see what the hype is. The texture of the filling is just addicting! I made the silly mistake of bringing these to Girl Scouts and now they all want me to keep making them again.
🤣Yes that does sound like a mistake! You could try selling Dubai bars instead of cookies and see if that goes over well for a fundraiser lol.
Loved this Dubai Chocolate Bar recipe! It was so easy to make, and your clear instructions made it simple to follow. Turned out perfectly, thank you!
So happy to hear they worked out nicely for you. I love the flavor and texture of these bars.
Despite really wanting to eat all of the pistachio cream with a spoon, I managed to have enough for the recipe! Loved your easy to follow instructions and good tip about using a higher quality chocolate!
oh my goodness, pistachio cream is so yummy!!! Glad you were able to save some for the recipe lol!
This sounds amazing! How do you usually use the leftover pistachio cream besides enjoying it in the chocolate bars?
Hi Madhu, you can use pistachio cream just like Nutella – spread it on toast or a croissant, swirl it into ice cream, or drizzle it over desserts. Honestly, I have to stop myself from eating it straight out of the jar.
Loved this recipe! So fun to make. Instructions were very clear and the various suggestions made it easy to find the ingredients. The crunchiness of the filling really adds another dimension to it. My goal is to be making these as gifts, though whether someone can actually drag them out of my hands before I scarf them down remains to be seen. Look forward to more amazing recipes from you, Leanne!
Thanks for stopping in and leaving a comment Srabana. I’m so happy to hear you loved the recipe, and I agree the kataifi which makes the crunchy filling is amazing. Your friends will be thrilled to receive these as gifts I’m sure!
I am so intrigued by these bars, and after seeing your recipe I am so excited to try these! Thank you for the detailed instructions, and the information on where to buy the ingredients. I am looking forward to trying the pistachio cream and the chocolate bars!
These bars are truly decadent, I hope you enjoy them as much as I do!
Hello,
I had a couple of questions.
1. I want to make these Dubai chocolate bars but not sure what kind of chocolate I should use- could you tell what kind of couverture chocolate I can get(brand name)?
2. Many recipes use pistachio paste or pistachio butter or pistachio cream; I’m not sure which one to use.
Please help
Hi Christina. I used Callebaut dark chocolate. It is a couverture chocolate. You are right, many recipes call for pistachio butter, paste, or cream, and this is confusing. You want to use a pistachio cream. If you look on the back of the jar in the ingredients it will be something along the lines of: pistachios, sugar, milk powder, oil of some sort and maybe soy lecithin. Pistachio butter, is like peanut butter, it is just the pistachios ground to a paste and it will not give you the sweetness or proper consistency you will need. And pistachio paste may be similar to the butter with possibly sugar added. There’s a link in the “ingredients” portion of the blog to a jar of pistachio cream that is correct. I hope that helps. Good luck!