
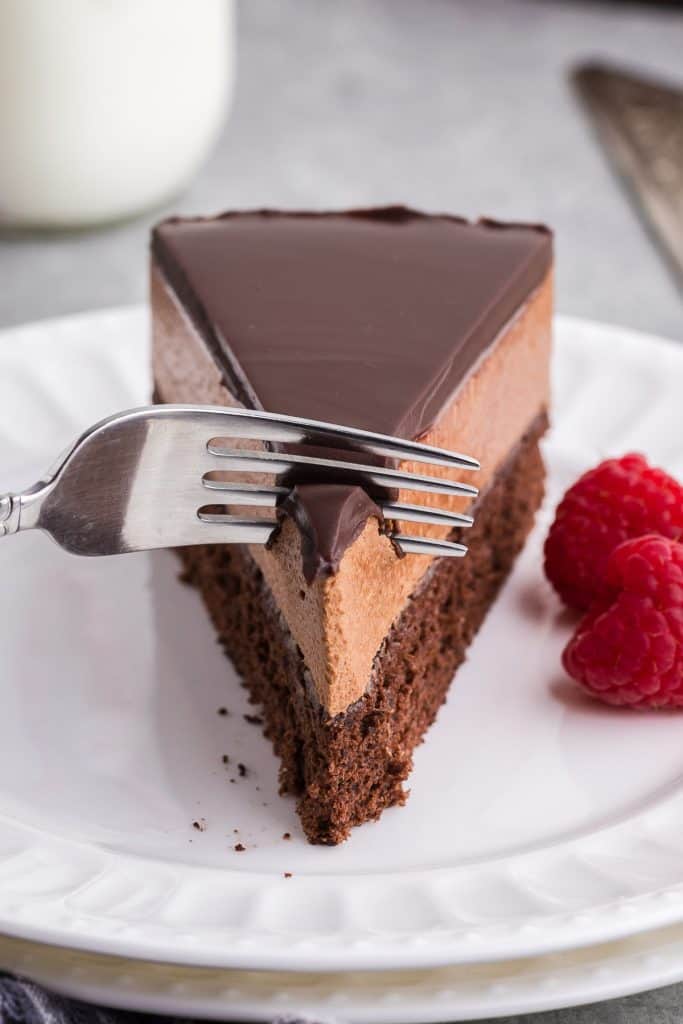
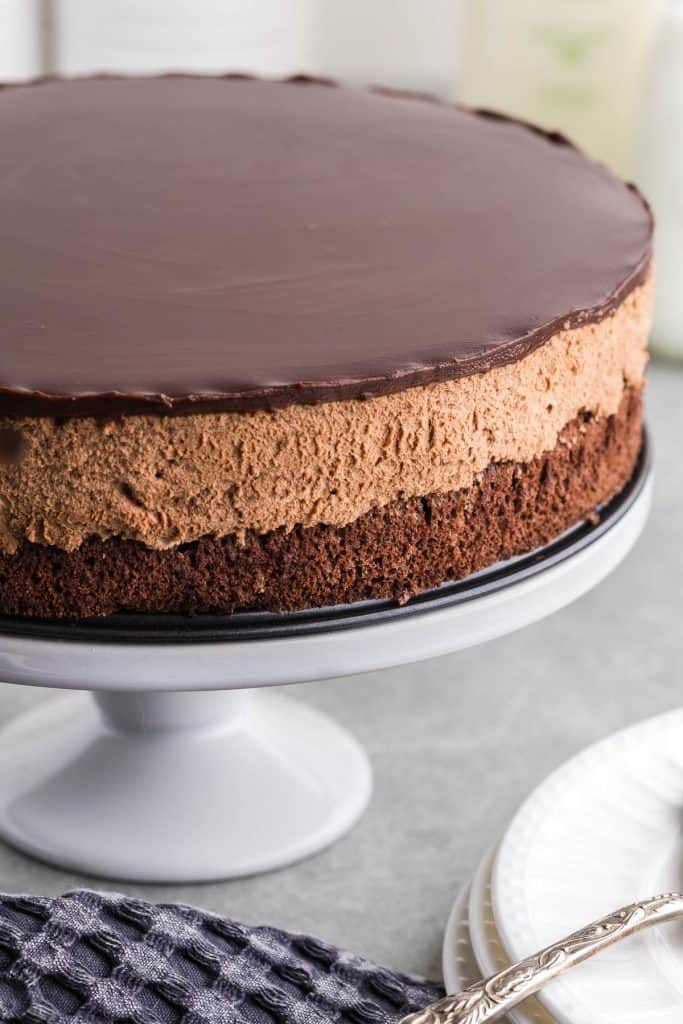
Yes, you read that right, it’s chocolate chocolate…because this mousse cake is all about chocolate. Although chocolatey, I didn’t want this to be too heavy a dessert, so each layer has been thoughtfully crafted to not leave you in a sugar coma. The bottom layer is a spongey and light chocolate chiffon cake, the middle layer – a fluffy chocolate mousse, and the top layer – a smooth and elegant chocolate ganache. Maybe I should have called it a chocolate chocolate chocolate mousse cake or triple chocolate mousse cake!
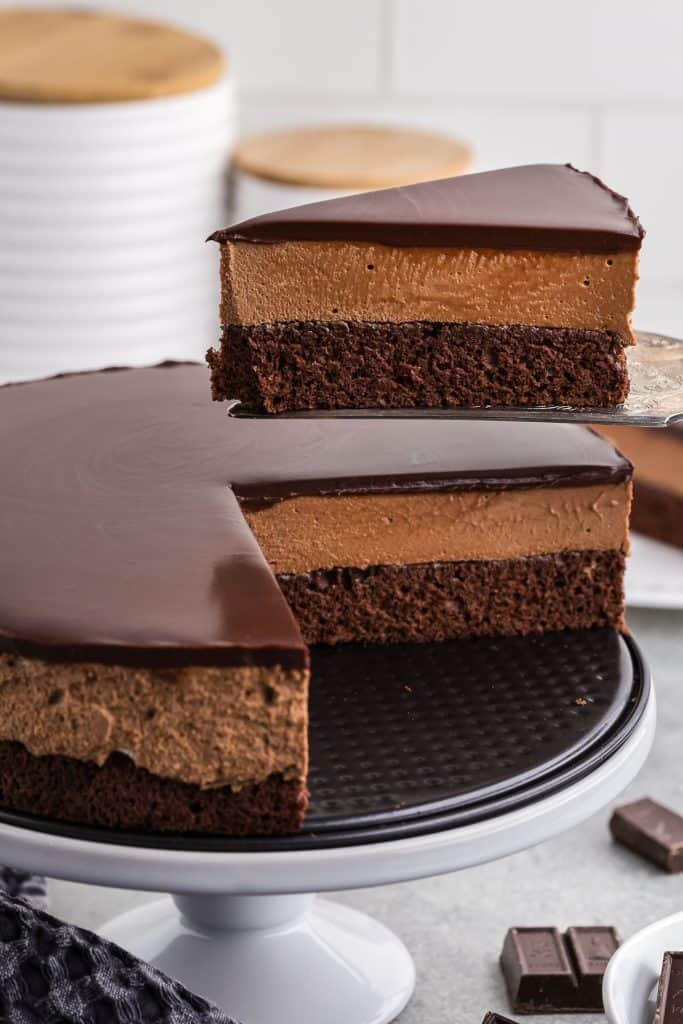
This chocolate chocolate mousse cake takes time to prepare due to the three layers and chilling time involved, but the ingredients are simple and easy to find, and each layer on it’s own is totally doable – you can do it! If you want to satisfy that chocolate craving or impress that special someone – this is your cake!
I have made this cake many times during its development. Originally, I thought I wanted a very thin cake layer, but things didn’t seem quite balanced as my sister-in-law judiciously pointed out. The second time, the mousse layer was too thick/heavy and needed adjusting. But the third time was a charm. This recipe of chocolate mousse cake is very well balanced in looks and in taste and texture. My husband loves chocolate cake and chocolate mousse, so he didn’t mind me having to perfect this one. Fortunately, my son’s jazz band was having a bake sale and we didn’t need to figure out how to eat three cakes.
EQUIPMENT NEEDED…OR RECOMMENDED
Disclosure: as an Amazon affiliate, I receive a small amount of compensation from qualifying purchases at no expense to you. This helps support my work and allows me to bring more yummy recipes your way.
Most of this equipment you will probably already have if you make cakes at home, but the cake strips and the acetate collar are handy if you don’t already have them. The cake strips help the cake bake evenly and prevent the top from doming so you have a flat surface to work with, and the acetate collar goes around the cake so that each layer stays where it should and looks clean and nice. You can use parchment paper to replace the acetate collar in a pinch.
- Mixing bowls
- Measuring Cups
- Measuring Spoons
- Cooling Rack
- 8″ springform pan
- Cake strips
- Hand mixer or Mixing Stand
- Acetate collar
INGREDIENTS FOR CHOCOLATE CHOCOLATE MOUSSE CAKE
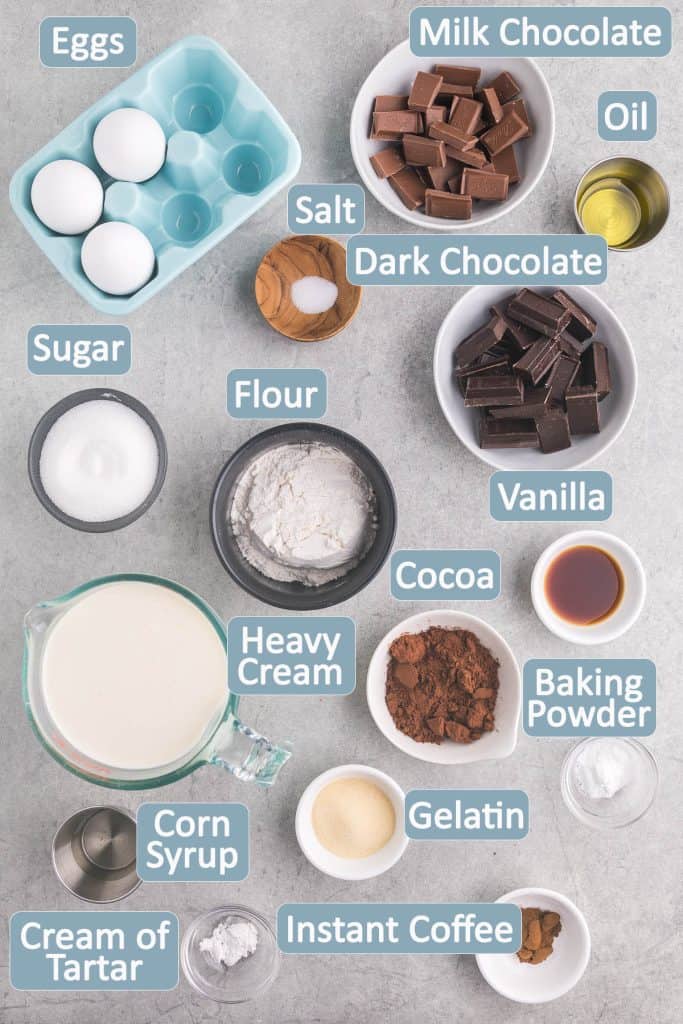
Chocolate Chiffon Cake
- cake flour (can sub with all-purpose flour if you don’t have, see Note 1)
- Dutch processed cocoa powder
- baking powder
- salt
- sugar
- 2 large eggs (separated)
- vegetable oil
- water
- instant coffee powder (can replace water and coffee powder with brewed coffee or delete the coffee powder all together. (see Note 2)
- vanilla
- cream of tartar
Chocolate Mousse Layer
- dark semi-sweet chocolate
- milk chocolate
- heavy cream, also known as whipping cream
- water
- gelatin
Ganache Layer
- semi-sweet dark chocolate
- heavy cream, also known as whipping cream
- corn syrup (optional) see Note 3
HOW TO MAKE CHOCOLATE CHOCOLATE MOUSSE CAKE
Chocolate Chiffon Cake Layer
Preheat the oven to 340F.
Line the bottom of a 9” spring form pan with parchment paper then tighten up the sides of the pan so that there is excess paper hanging out the bottom. Cut the excess off with scissors. Set the pan aside.
In a large mixing bowl sift together the flour and cocoa. Stir in baking powder, salt, and sugar until combined. Set bowl aside.
In another mixing bowl stir together water and instant coffee powder. Stir in the rest of the wet ingredients: 3 egg yolks, vegetable oil, and vanilla. Add the contents of the wet ingredient bowl to the dry ingredient bowl and stir to combine without over mixing.
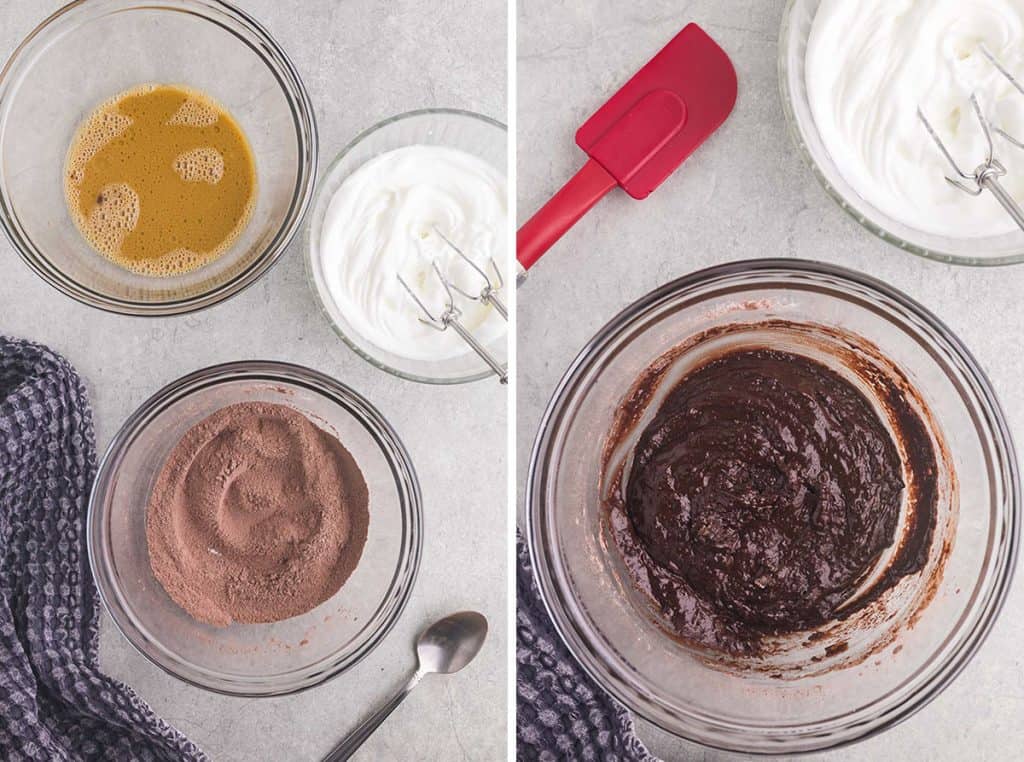
In a medium mixing bowl, make sure it is clean and dry (see note 4). Add the 3 egg whites and 1/8 teaspoon cream of tartar. Using a mixing stand or hand mixer, beat the egg whites until stiff peaks form (see note 5).
Scoop 1/3 of the beaten egg whites into the cake batter mixture and stir gently to combine. Then
scoop the next 1/3 of beaten egg whites into the cake batter and fold in very gently with a rubber spatula. Finally, scoop the remaining egg whites into the batter bowl and gently fold in again with a rubber spatula.
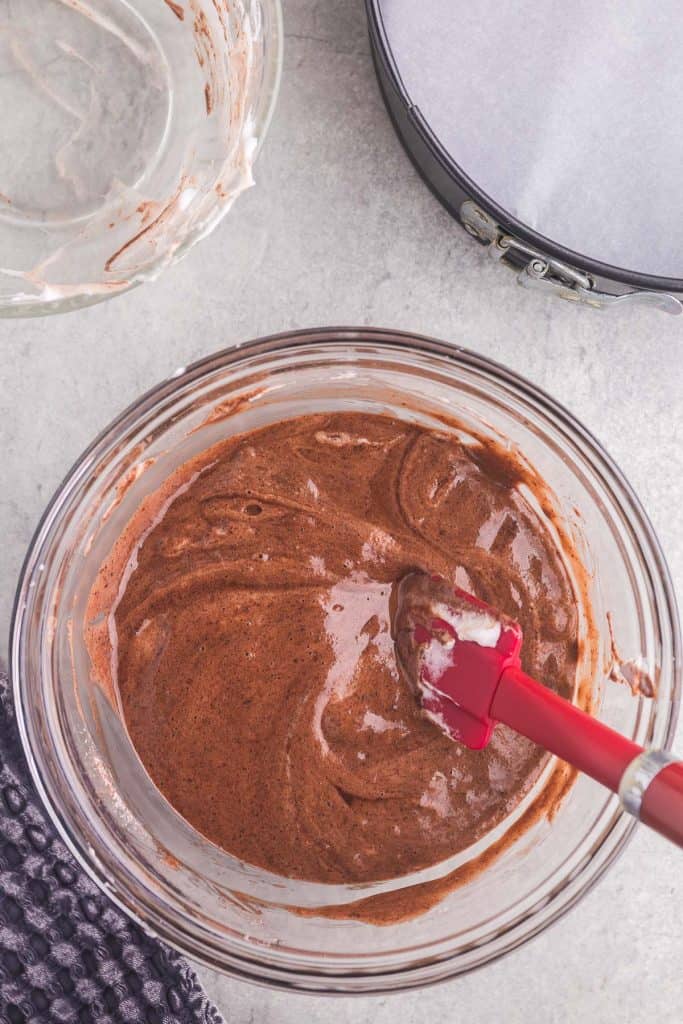
Pour the cake batter into the prepared springform pan. If you have a cake strip follow the manufacturer’s instructions which is usually to soak in water and wrap around the outside of the cake pan. See note 6.
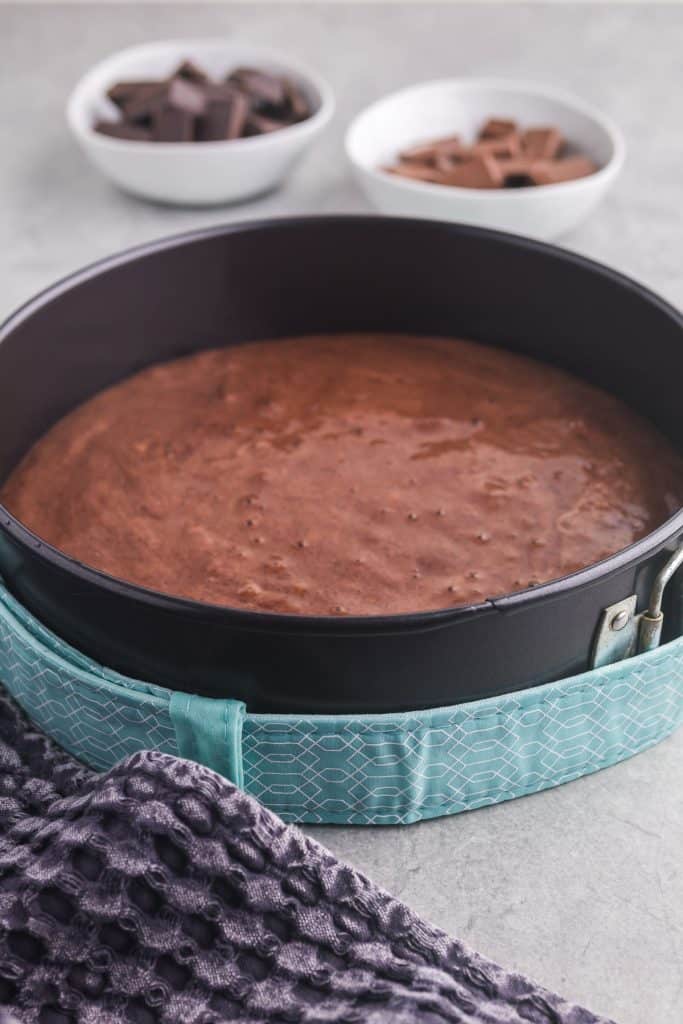
Bake at 340F for 18-20 minutes. Cake is done when a toothpick comes out clean. You might want to start checking at 16 minutes.
Let cake cool in the springform pan on a cooling rack for 30 minutes
For the Chocolate Mousse Layer
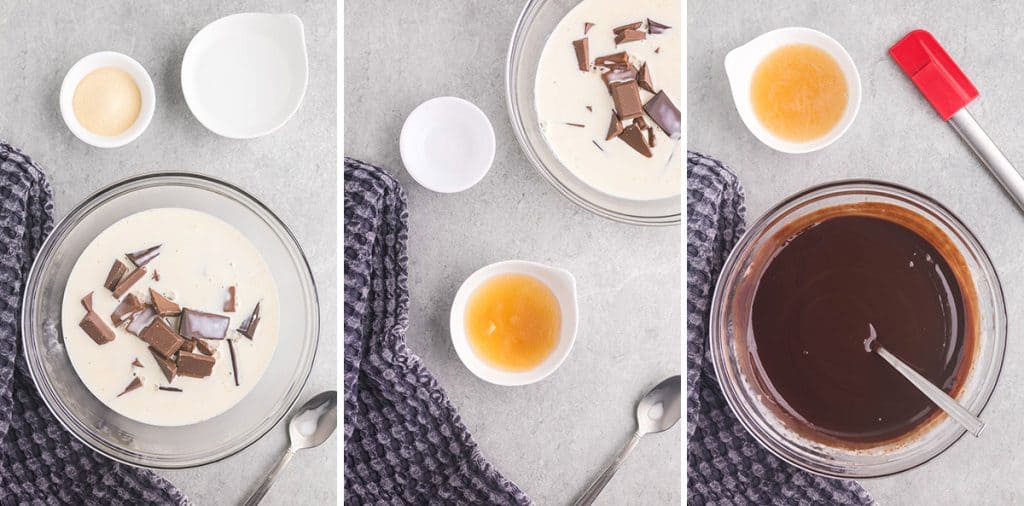
Heat 3/4 cup of heavy cream in a saucepan until just below a simmer. Pour the hot heavy cream overtop of the chopped dark and milk chocolate in a mixing bowl. Allow to sit for 3-4 minutes and then stir until all the chocolate has melted into a homogenous mixture. If all the chocolate hasn’t melted you can place in the microwave for 10 seconds and stir again. If necessary you can heat again for another ten seconds until fully melted. Set the bowl aside.
Sprinkle gelatin over the water in a small bowl and allow it to hydrate for two minutes. Then heat the small bowl in the microwave for 15 seconds and stir until completely dissolved. If necessary you can give it another 10 seconds in the microwave if it needs it. Stir the gelatin mixture into the chocolate until fully incorporated. Allow to cool with intermittent stirring, about 15 minutes.
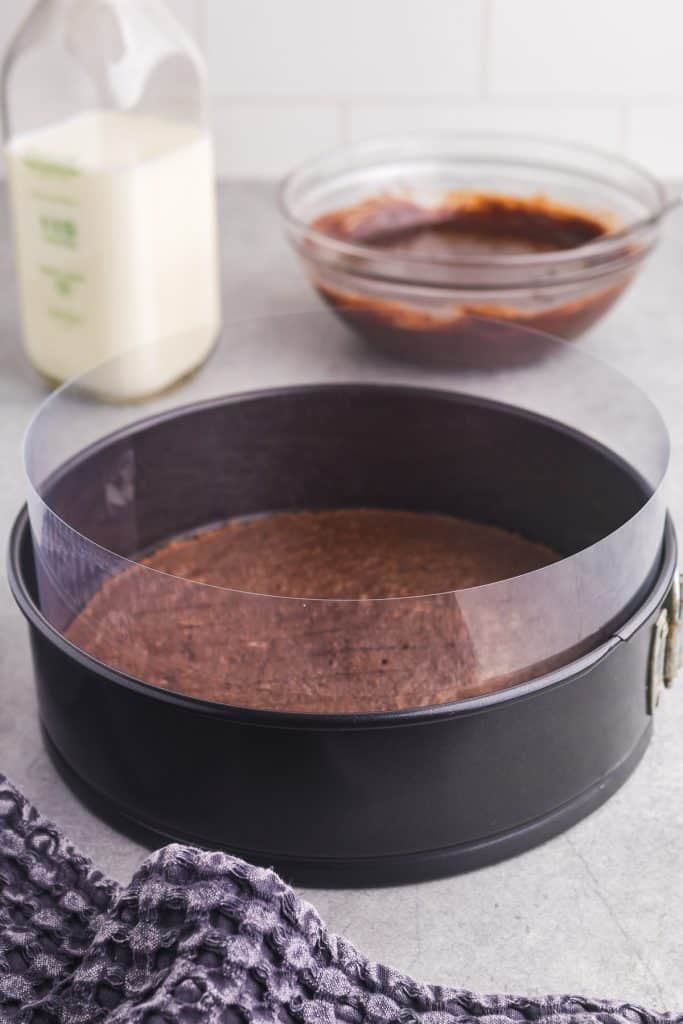
While the chocolate mixture is cooling, prepare the springform pan with an acetate cake collar or parchment paper. Start by running a knife around the edge of the cake to loosen it, then release and remove the springform ring. Lift the cake out, discard the parchment paper from the bottom, and place the cake back into the base of the springform pan. Wrap an acetate collar around the cake and secure the springform ring back in place. If you don’t have an acetate collar, use parchment paper instead, wrapping it around the entire edge of the cake so it extends at least to the top of the pan or slightly above. Set the prepared pan aside.
Once chocolate mixture has finished cooling for about 15 minutes you can begin to whip 1 1/2 cups cream. Add the heavy cream to an empty mixing bowl and beat to firm peaks. Scoop about 1/3 of the whipped cream into the chocolate mixture and gently stir it in. Scoop another 1/3 of the whipped cream and very gently fold it in with a rubber spatula. Add the rest of the whipped cream and again gently fold in with a rubber spatula. Folding in the whipped cream will keep your mousse nice and airy see Note 7.
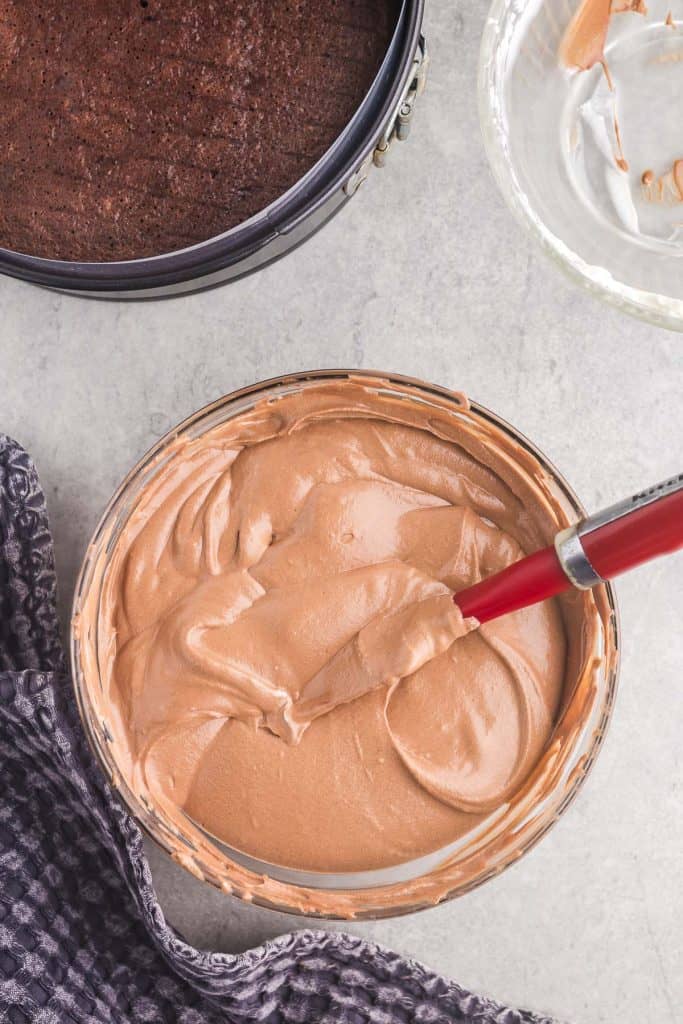
Pour/scoop the mousse onto the top of the chocolate cake in the prepared springform pan. Use the back of a spoon or rubber spatula to evenly spread the mousse over the top of the cake. Cover with plastic cling wrap and place in the fridge to set for at least 4 hours or overnight. The plastic wrap can rest on top of the acetate or parchment paper collar and doesn’t need to come in contact with the mousse.
Chocolate Ganache Layer
Chop the chocolate and place in a pyrex measuring cup if you have one, or a heat proof bowl.
Heat heavy cream in a small saucepan with stirring just before it comes to a simmer. Pour the hot cream over the chocolate and allow it to sit for 4 minutes. Stir the cream and chocolate together until it becomes a homogenous smooth mixture. Stir in the corn syrup.
Allow the ganache to cool for 25 minutes with gentle intermittent mixing (you don’t want to introduce air bubbles). You can either leave the acetate collar on and pour the ganache over the cooled and set chocolate mousse layer tilting the cake to allow the ganache to coat evenly. Or, you can remove the acetate collar then pour the ganache on and use a rubber spatula or offset spatula to coax the ganache to the edges of the cake and even over the edge to form drips down the sides.
This second method is more finicky and requires the ganache to be cooled to the point where it is quite thick and won’t easily run down the side of the cake. You will have to cool the ganache for longer than the 25 minutes and test to see at what point it is thick enough to not easily run all the way down the cake. The first method is more foolproof it you want to play it safe.
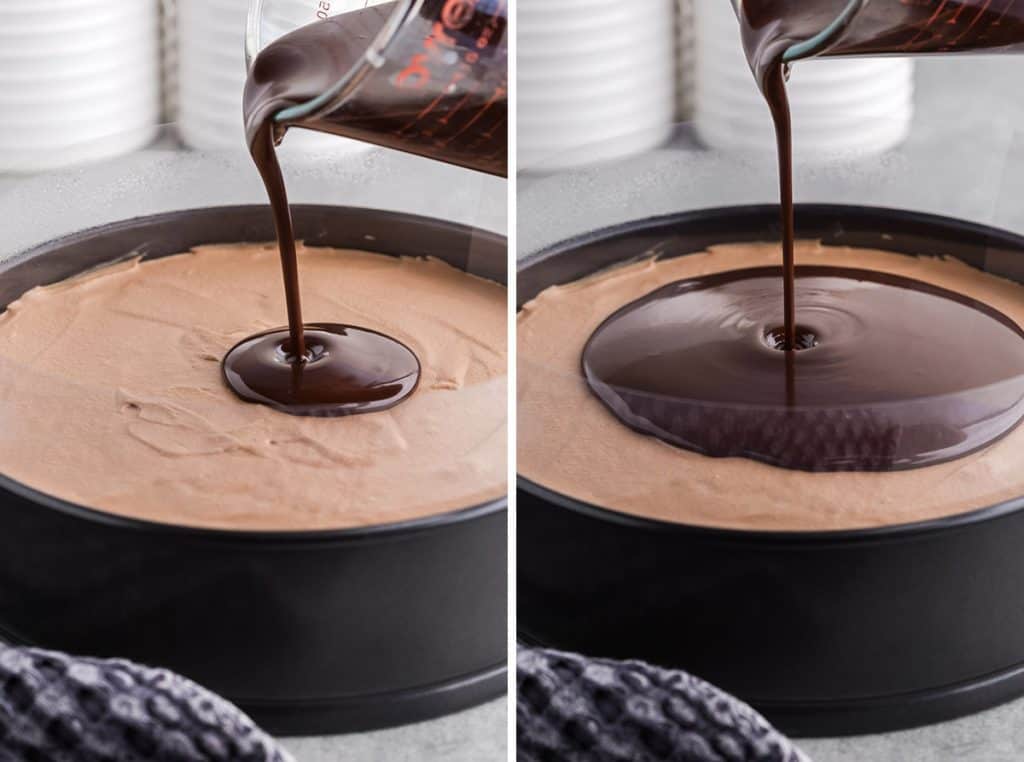
Return the cake to the fridge to allow the ganache to cool and set, for at least 2 hours.
Once the ganache has set you can remove the acetate collar or parchment paper (see note 8), slice, serve, and enjoy.
NOTES
- You can sub all-purpose flour for cake flour if you do not have it. Cake flour has a lower gluten content and produces a lighter airier crumb, but I have made this with all-purpose flour too and the results really were just as good.
- If you don’t have instant coffee powder, but you do brew coffee at home, you can replace the coffee powder and 1/8 cup water with 1/8 cup of brewed coffee. The coffee helps to bring out the chocolate flavour. If you don’t want to add coffee you can also delete it, and just add 1/8 cup of water.
- Corn syrup helps to make the chocolate ganache shiny, but can be deleted if you don’t have it.
- In order to beat egg whites to stiff peaks, your bowl and beaters must be totally free of any oil residue and preferably no water. Any oil present will prevent the eggs from whipping properly. Also it is best to use a glass or metal bowl as plastic bowls can have an oil residue.
- You know you have beaten your egg whites to stiff peaks when you lift the beater out and the egg whites stand straight up.
- Cake strips are soaked in water and prevent the formation of a dome on your cake. This is merely for appearances as it keeps the cake layer straight. You could also just slice off the dome after the cake has cooled.
- When adding the whipped cream to the chocolate mixture, you want to fold it in gently to maintain as much of the airiness as possible so the final mousse is light and fluffy. You also don’t want to add the whip cream when the chocolate mixture is too warm or it will melt and your mousse will be more dense.
- I find the ganache to be quite soft and pulls away a bit with the acetate collar. After you pull the collar off you can just run the back of a knife or offset spatula around the cake to clean up the ganache layer at the end.
FAQs
Why is my mousse not as light and fluffy as the picture? If you add the whipped cream to the chocolate mixture while it is still quite warm, it will deflate the whipped cream and you will lose the fluffiness. Also, if you stir the whipped cream into the chocolate mixture too roughly you will lose a lot of the air bubbles you produced in making the whipped cream originally and the final product will not be as fluffy.
How should I store leftovers? Leftovers? I’m not sure what you mean. Ha! Ok, if you happen to have leftovers, the chocolate mousse cake needs to be stored in the fridge. If you leave it out on the counter too long it will start to droop a bit, and with all that dairy you need to keep it in the fridge for safety. It will last in the fridge for up to four or five days.
Can I freeze the cake? Yes, you can freeze the cake or individual slices. While I wouldn’t recommend freezing if you’re serving guests, it works well for leftovers. The cake might not look as attractive after thawing, but it will still taste great. If freezing the whole cake, you can do so in an airtight container. If you don’t have one big enough, I would freeze it as is overnight and then place in a ziploc bag for up to three months. It might be easier to freeze individual servings as is and then wrap in saran wrap and place in a ziploc bag. Allow to thaw in the fridge before eating.
Can I make parts of the recipe ahead of time? You could make the chiffon cake ahead of time, but the rest of the cake should be made and layered as soon as possible.
If You Liked This Chocolate Chocolate Mousse Cake Recipe…
If you liked this recipe, please consider rating the recipe and leaving a comment below – I love to hear how people get on with my recipes and I truly make an effort to respond to everyone who takes the time to comment. Other recipes you might enjoy include:

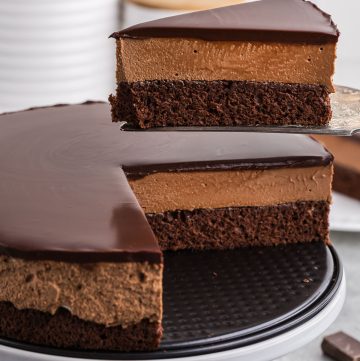
Chocolate Chocolate Mousse Cake
Ingredients
Chocolate Chiffon Cake Layer
- 1/2 cup Cake flour or all-purpose (70g)
- 3 tablespoons Cocoa powder (Dutch processed) (20g)
- 1/3 cup + 1 tablespoon Sugar (83g)
- 3/4 teaspoon Baking powder
- 1/4 teaspoon Salt
- 3 large Eggs separated
- 1 1/2 tablespoons vegetable oil
- 3 tablespoons water
- 3/4 teaspoon instant coffee powder
- 3/4 teaspoon vanilla extract
- 1/4 teaspoon cream of tartar
Chocolate Mousse Layer
- 2 1/4 cups heavy cream (divided)
- 5 oz Semi-sweet dark chocolate chopped (140g)
- 4 oz milk chocolate chopped (113g)
- 2 tablelspoons water
- 2 3/4 teaspoons gelatin
Chocolate Ganache Layer
- 5 oz semi-sweet dark chocolate chopped (140g)
- 2/3 cup heavy cream
- 1 tablespoon corn syrup if using
Instructions
Chocolate Chiffon Cake
- Preheat the oven to 340F.Line the bottom of a 9” spring form pan with parchment paper then tighten up the sides of the pan so that there is excess paper hanging out the bottom. Cut the excess off with scissors. Set the pan aside.
- In a large mixing bowl sift together the 1/2 cup flour and 3 tablespoons of cocoa. Stir in 3/4 teaspoon baking powder, 1/4 teaspoon salt, and 1/3 cup + 1 tablespoon of sugar until combined. Set bowl aside.
- In another mixing bowl stir together the 3 tablespoons of water and 3/4 teaspoon of instant coffee powder. Stir in the rest of the wet ingredients: 3 egg yolks, 11/2 tablespoons vegetable oil, and 3/4 teaspoons of vanilla. Add the contents of the wet ingredient bowl to the dry ingredient bowl and stir to combine without over mixing.
- In a medium mixing bowl, make sure it is clean and dry (see note 4). Add the 3 egg whites and 1/4 teaspoon cream of tartar. Using a mixing stand or hand mixer, beat the egg whites until stiff peaks form (see note 5).
- Scoop 1/3 of the beaten egg whites into the cake batter mixture and stir gently to combine. Then scoop the next 1/3 of beaten egg whites into the cake batter and fold in very gently with a rubber spatula. Finally, scoop the remaining egg whites into the batter bowl and gently fold in again with a rubber spatula.
- Pour the cake batter into the prepared springform pan. If you have a cake strip follow the manufacturer's instructions which is usually to soak in water and wrap around the cake pan. See note 6.
- Bake at 340F for 18-20 minutes. Cake is done when a toothpick comes out clean. You might want to start checking at 16 minutes.
- Let cake cool in the springform pan on a cooling rack for 30 minutes
Chocolate Mousse
- Heat the 3/4 cups of heavy cream in a saucepan until just below a simmer. Pour the hot heavy cream overtop of the chopped dark and milk chocolate in a mixing bowl. Allow to sit for 3-4 minutes and then stir until all the chocolate has melted into a homogenous mixture. If all the chocolate hasn't melted you can place in the microwave for 10 seconds and stir again. If necessary you can heat again for another ten seconds until fully melted. Set the bowl aside.
- Sprinkle 2 3/4 teaspoons of gelatin over the 2 tablespoons of water in a small bowl and allow it to hydrate for two minutes. Then heat the small bowl in the microwave for 15 seconds and stir until completely dissolved. If necessary you can give it another 10 seconds in the microwave if it needs it.
- Stir the gelatin mixture into the melted chocolate mixture until fully incorporated. Allow to cool with intermittent stirring, about 15 minutes.
- While the chocolate mixture is cooling, prepare the springform pan with an acetate cake collar or parchment paper. Start by running a knife around the edge of the cake to loosen it, then release and remove the springform ring. Lift the cake out, discard the parchment paper from the bottom, and place the cake back into the base of the springform pan. Wrap an acetate collar around the cake and secure the springform ring back in place. If you don’t have an acetate collar, use parchment paper instead, wrapping it around the entire edge of the cake so it extends at least to the top of the pan or slightly above. Set the prepared pan aside.
- Once chocolate mixture has finished cooling for about 15 minutes, you can begin to whip your cream. Add the 1 1/2 cups of heavy cream to an empty mixing bowl and beat to firm peaks. Scoop about 1/3 of the whipped cream into the chocolate mixture and gently stir it in. Scoop another 1/3 of the whipped cream and very gently fold it in with a rubber spatula. Add the rest of the whipped cream and again gently fold in with a rubber spatula. See Note 7.
- Pour/scoop the mousse onto the top of the chocolate cake in the prepared springform pan. Use the back of a spoon or rubber spatula to evenly spread the mousse over the top of the cake. Cover with plastic cling wrap and place in the fridge to set for at least 4 hours or overnight.
Chocolate Ganache
- Chop the chocolate and place in a pyrex measuring cup if you have one, or a heat proof bowl.
- Heat 2/3 cup of heavy cream in a small saucepan with stirring just before it comes to a simmer. Pour the hot cream over the chocolate and allow it to sit for 4 minutes. Stir the cream and chocolate together until it becomes a homogenous smooth mixture.
- Stir in the 1 tablespoon of corn syrup.
- Allow the ganache to cool for 25 minutes with intermittent gentle stirring. Pour the ganache over the cooled chocolate mousse layer tilting the cake to allow the ganache to coat evenly.
- Return the cake to the fridge to allow the ganache to cool and set, for at least 2 hours.
- Once the ganache has set you can remove the acetate collar or parchment paper (see note 8), slice, serve, and enjoy.
Notes
- You can sub all-purpose flour for cake flour if you do not have it. Cake flour has a lower gluten content and produces a lighter airier crumb, but I have made this with all-purpose flour too and the results really were just as good.
- If you don’t have instant coffee powder, but you do brew coffee at home, you can replace the coffee powder and 1/8 cup water with 1/8 cup of brewed coffee. The coffee helps to bring out the chocolate flavour. If you don’t want to add coffee you can also delete it, and just add 1/8 cup of water.
- Corn syrup helps to make the chocolate ganache shiny, but can be deleted if you don’t have it.
- In order to beat egg whites to stiff peaks, your bowl and beaters must be totally free of any oil residue and preferably no water. Any oil present will prevent the eggs from whipping properly. Also it is best to use a glass or metal bowl as plastic bowls can have an oil residue.
- You know you have beaten your egg whites to stiff peaks when you lift the beater out and the egg whites stand straight up.
- Cake strips are soaked in water and prevent the formation of a dome on your cake. This is merely for appearances as it keeps the cake layer straight. You could also just slice off the dome after the cake has cooled.
- When adding the whipped cream to the chocolate mixture, you want to fold it in gently to maintain as much of the airiness as possible so the final mousse is light and fluffy. You also don’t want to add the whip cream when the chocolate mixture is too warm or it will melt and your mousse will be more dense.
- I find the ganache to be quite soft and pulls away a bit with the acetate collar. You can just run the back of a knife or offset spatula around the cake to clean up the ganache layer at the end.
This cake looks incredibly moist – those layers of chocolate. I need to make this!
This really is a great cake if you like chocolate cake and chocolate mousse, which I do! You def should make it 😉
Oh my! Can’t wait to try this!!
I hope you and your family enjoy!
Let me know how it turns out!
Look at the perfect slice! Can’t wait to make it.
Thanks! I’m always nervous taking that first slice out!
This was just perfect. It was so light and airy I nearly ate the whole thing!!! Dangerously delicious!
I know what you mean about dangerously delicious, you need to make sure there are plenty of people around to help you eat it!
Wow! We made this and it was incredible. It looked intimidating to make, but it really wasn’t. It was so luscious and rich, but not overly so! We will definitely make it again, everyone has been asking already!! Thank you.
Hi Eva, I’m glad it you all really enjoyed it! Cakes with layers look intimidating, but you just have to take it one layer at a time 😜.
This cake sounds absolutely delicious! I love the combination of light chiffon, fluffy mousse, and rich ganache. A true chocolate lovers dream!
Hi Madhu. Yes, if you love chocolate, this is the cake for you!