Valentine's Cookies
Homemade Valentine's Cookies are an easy and fun way to celebrate love in the sweetest form. From classic heart shapes to festive pink and red icing designs, these Valentine's sugar cookies are perfect for gifting to that special someone, sharing with friends, or enjoying with family. This step by step decorating guide is geared toward novice to intermediate cookie decorators.

I think you can make a sugar cookie for pretty much any occasion. With a plethora of cookie cutter shapes and my royal icing recipe the possibilities are endless! But today we are focusing on Valentine's Day, so I busted out the heart shaped cookie cutters. I also am using a round cookie cutter to show you that you don't need heart shapes to make Valentine-esque cookies. And if you don't have round cookie cutters, you can use an inverted cup to make your shapes.
Baking for your sweetheart must be one of the oldest ways to say I love you. So it makes sense that you might want to whip up a batch of Valentine's cookies that look and taste amazing. My sugar cookie recipe provides the perfect canvas for decorating and it's simple vanilla flavor can't be beat. The decorating magic begins with a bowl of Royal Icing, and a little food coloring. For Valentine's Day I chose white, red, and pink royal icing.
If you are in the mood for more cookie recipes, check out my Brookies Recipe (brownie collides with chocolate chip cookie), Chocolate Chipless Cookies (for those of you who pick out the chocolate chips), Red velvet cake cookies, Raspberry thumbprint cookies, or Chocolate chocolate chip cookie bars.
Why You Will Love These Valentine's Cookie Decorating Ideas
- Made for beginners to intermediate cookie decorators - You don't need to feel intimidated about decorating. I outline many different options so you can choose what feels doable for you. You can also challenge yourself with options you may not have tried before.
- Simple ingredients - Most of these ingredients you probably already have. The meringue powder is probably the only different item, but it can be picked up at craft stores, or online.
- Beautiful Valentine Designs - You will learn how to make many different designs all beautiful in their own way.
- Taste great - The sugar cookies are delicious as is the royal icing. A beautiful cookie that tastes even better!
- Make great gifts - A lovely way to say I love you to your special Valentine.
Equipment Needed
Disclosure: as an Amazon affiliate, I receive a small amount of compensation from qualifying purchases at no expense to you. This helps support my work and allows me to bring more yummy recipes your way.
This recipe uses basic baking tools, and a few optional specialty items.
- Measuring Spoons
- Measuring Cups
- Stand Mixer with mixing bowls or hand mixer with a large mixing bowl.
- Cooling Rack
- Plastic Wrap
- Rolling Pin
- Parchment Paper
- Baking Sheet
- Heart-shaped Cookie Cutter Shape
- Piping Bags (optional)
- Scribe tool (optional) - can use a toothpick
Ingredients
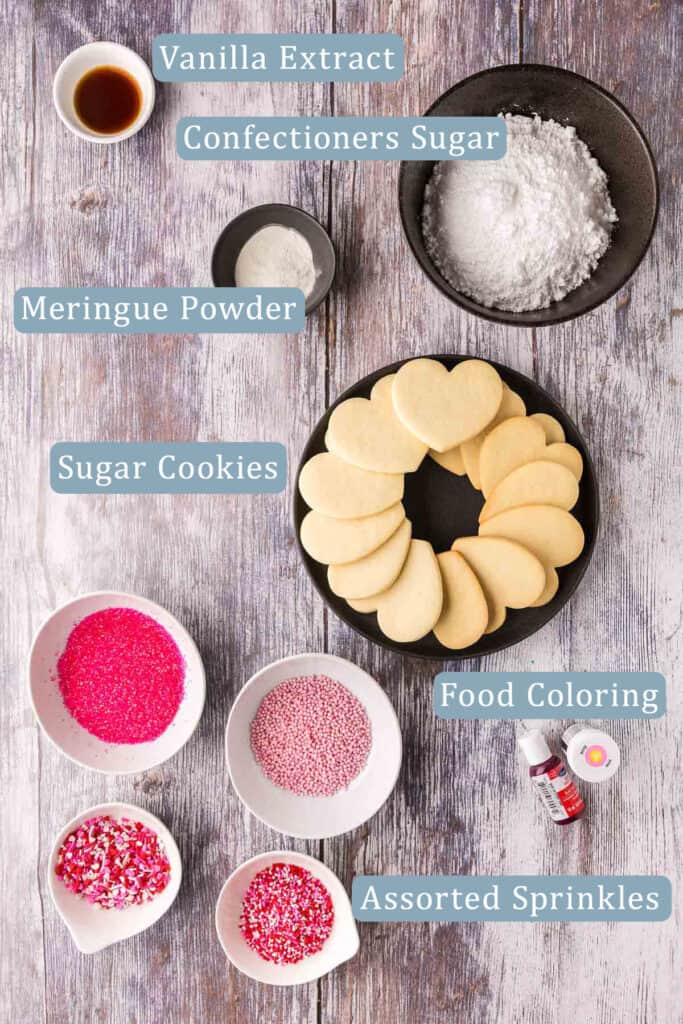
Batch of The Best Sugar Cookies - preferably heart-shaped or circular, or your favorite cookie type for decorating.
Confectioners sugar - used to make royal icing. Provides sweetness and the bulk of the solid state of the icing.
Vanilla extract - used in the royal icing to give a vanilla flavor.
Meringue Powder - improves consistency and provides structure and stability for piping. It also helps the icing dry and harden.
Food coloring gel - to dye the royal icing. I used red and pink.
Sprinkles and/or small candies (optional) - to decorate the cookies.
How To Decorate Valentine's Cookies
Cookie decorating is fun, you get to exercise your creativity, and you end up with a beautiful and tasty cookie! This is also the part that kids enjoy helping with, if they have the patience to not eat the cookies before they make it to the decorating step. These step by step tutorials are geared towards beginner/intermediate cookie decorators.
Whip up your batch of royal icing, you will want to thin it down with water to about a 10 second consistency plus or minus a few seconds. A little water goes a long way so just go ¼-1/2 teaspoon at a time. You can read more about royal icing consistency on my royal icing post.
Once you have the right consistency divide the icing among three bowls. I kept one bowl white, and to one bowl I added pink food coloring, and to the third bowl I added red food coloring. Deep colors like red, will require more food coloring, but not all food colorings are of the same quality. I find gel food colorings to be the most concentrated and give the strongest colors. I struggled with the Wilton brand trying to make red icing, but had much better success with a brand called Satin Ice.
Place colored royal icing into piping bags and snip off the ends. Just snip a small bit of the tip off. You can always cut off more if necessary. (small zipper top bags can be used if you don't have piping bags)

Level 1 - Easy Cookie Decorating - Good for All Ages
Sprinkles
The easiest decorating technique I can think of would be to add sprinkles to a sugar cookie before it gets baked. You can press down slightly on the sprinkles to get them to adhere. The downside to this method is you can get bleeding of the dye into the cookie. This methods risks not getting a super clean look, but it is fast and easy. Another possibility is to add the sprinkles to a cookie that is hot out of the oven. The surface will be slightly moist, and most sprinkles will be able to adhere ok to it. Or you could brush the hot cookie with a simple syrup then add the sprinkles. The sprinkles will adhere better to this surface.
Glazing
This is another straightforward technique. You can use royal icing to glaze cookies, but you'll want it thinner than the 10-second consistency mentioned earlier. The goal is a consistency that allows you to dip the front of the cookie into the icing - thin enough to settle smoothly, but not so thin that it all runs off when you lift it out. The icing should cling to the cookie's surface and level out into a smooth finish.
You may need to adjust the consistency by adding a little water to thin it or more icing sugar to thicken it. Once royal icing has been thinned for glazing, avoid adding large amounts of icing sugar to thicken it back up for piping. For best results, complete any decorating that requires a thicker consistency first, then thin your icing for glazing - or plan to glaze all of your cookies at once.
Glaze and Sprinkle
After glazing you can add sprinkles if you like, or you can just have the glaze. For Valentine's Cookies - think about using white, red, and pink for colors of the glaze and sprinkles.
Level 2 - Piping and Flooding Royal Icing on Valentine's Cookies
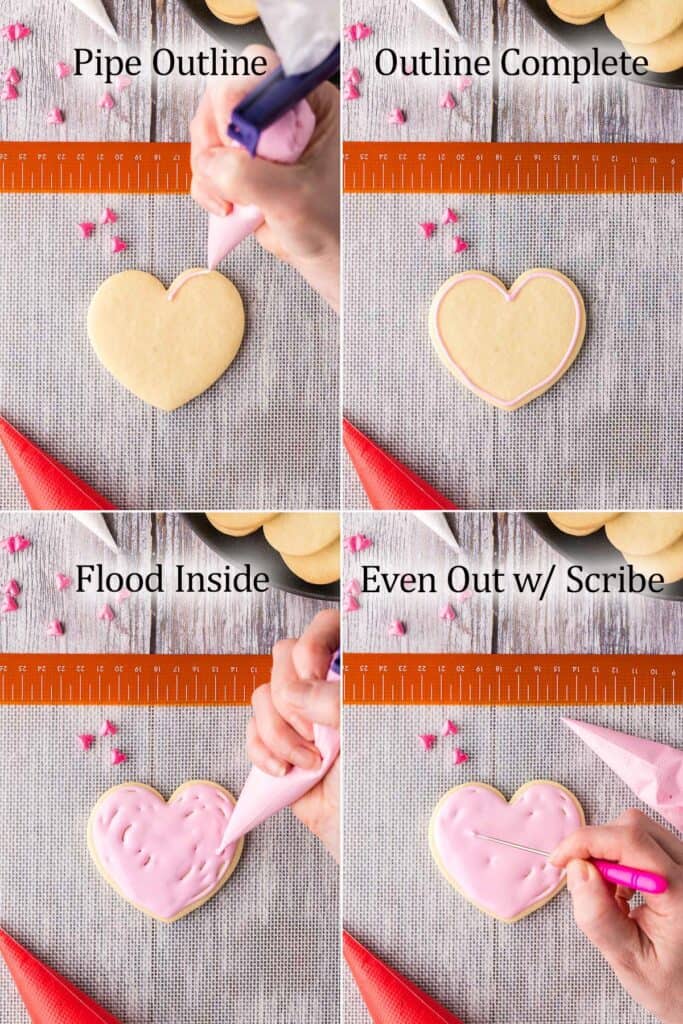
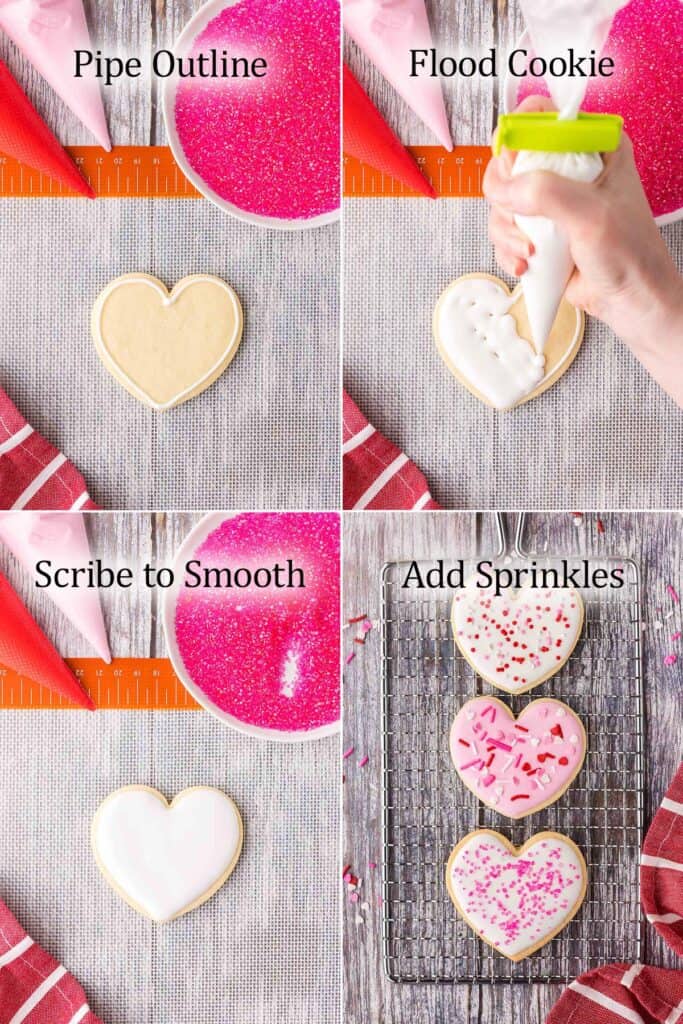
How To Pipe and Flood
Most of the decorating I've done in this post involves piping and flooding. To pipe a line of icing, place the piping bag tip so it is just touching the front edge of the cookie. Gently squeeze the piping bag until icing begins to come out. As the icing is coming out pull the tip slightly upwards so it isn't touching the cookie and there is a bit of a "string" of icing between the cookie and the bag. Guide this string of icing around the edge of the cookie as you keep gentle pressure on the piping bag. Keep the thin line of icing around the edge of the cookie - close to the edge but don't go over. This piped edge provides a barrier for the next step.
Flood the inside of this piped edge with more icing. You want to follow the pattern of the piped edge laying down a thick coat of icing (by squeezing more firmly on the piping bag) making your way around so the entire cookie is covered. Try not to leave any gaps.
Now use a scribe (pointy metal tool) or a toothpick to wiggle the icing around to fill in any small gaps. Sometimes a little shake of the cookie also helps the icing to settle into a smooth coating. This is a little different than glazing because a glaze is a thin coating, whereas a flooded cookie is more of a puffy coat on top of the cookie - a different look.
Flooding With Sprinkles
Use the same technique for piping and flooding as mentioned above. Once the cookie is fully covered with royal icing you can sprinkle on sprinkles of your choice, you can also use sanding sugar - see notes. Set the Valentine's cookie aside for about 2 hours for the icing to harden.
Connected Hearts
Pipe and flood the cookie with royal icing. I chose to use a light pink color icing.
Choose a different color of royal icing that you want the little hearts to be. In my case I chose red. Pipe little dots of red icing around the edge of the cookie. Not too close together. This technique requires that the icing doesn't dry between flooding the cookie and adding the dots. This is known as a wet on wet application. It allows the dot to sink in to the flooded icing instead of sitting on top of the surface.
Start with your scribe at one of the top dots. You want to start the scribe in the background flood color (pink in my case) about ¼" away from the first dot and drag the scribe through the first dot - top to bottom, this will create a heart shape in the dot. Don't remove the scribe from the icing but keep dragging through the background color and move on to the second dot. Drag the scribe through the second dot and continue around the cookie going through all the dots. This is one of my favorite decorations for Valentine's Cookies.

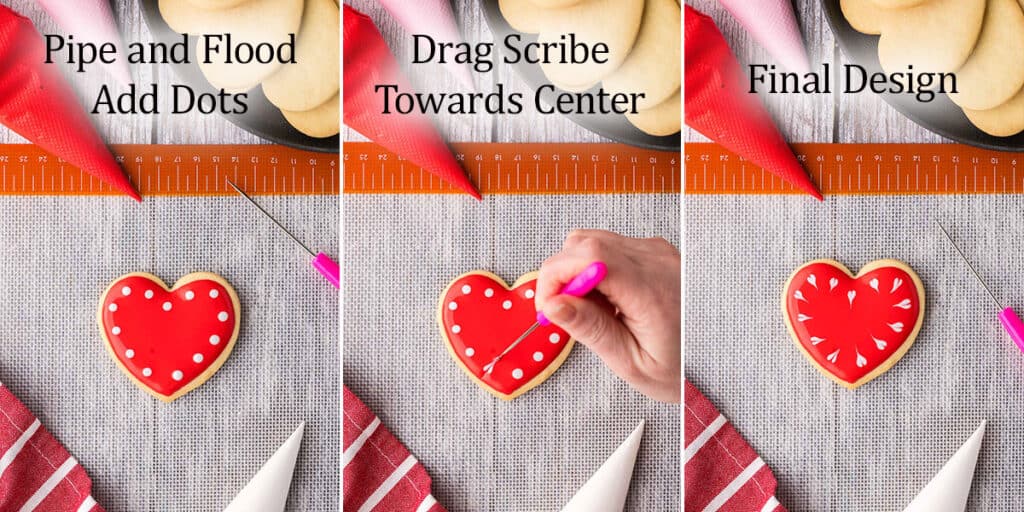
Individual Heart Edge
Pipe and flood your background color. Add dots of a different color around the edge of the cookie while the background is still wet. Use your scribe to make hearts pointing towards the center of the cookie. Pick any dot to start with. Scribe starts on the side of the dot closest to the outside edge of the cookie, pull the scribe through the dot towards the center of the cookie. This will make a heart. Remove the scribe and clean the point before moving on to the next dot.
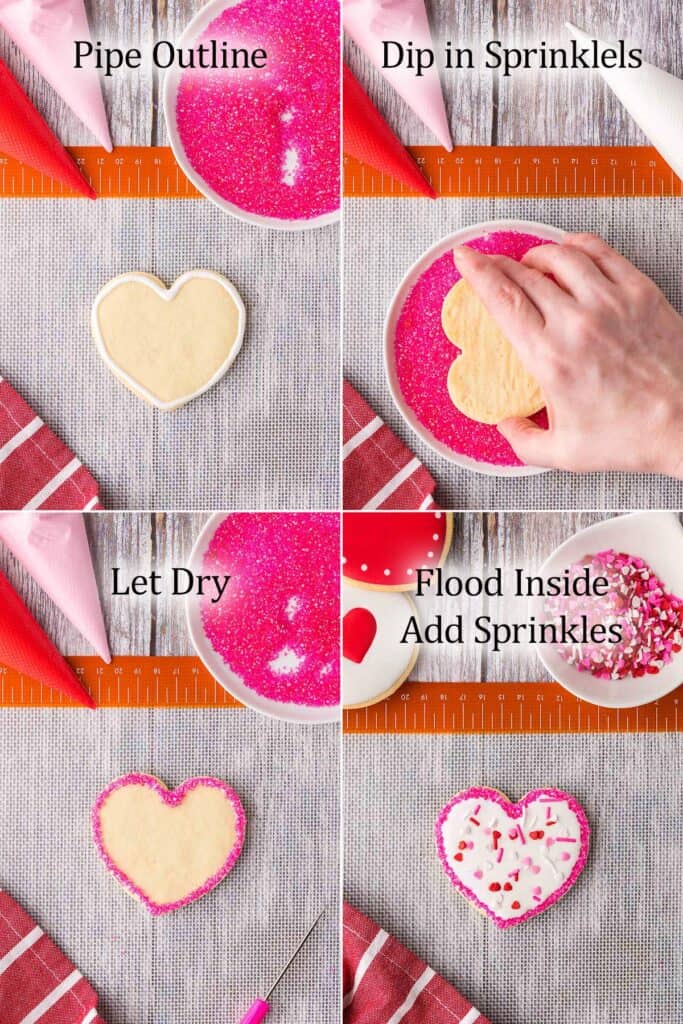
Piped Edge with Sprinkles
Pipe the edge of your cookie with royal icing. Dip the front face of the cookie into sprinkles of your choosing. Try not to push too hard into the sprinkles or it will flatten the edge. Gently rotate the cookie around as needed until the piped line is covered. Set the cookie aside for about 2 hours to allow the icing to harden
If desired, you can flood the cookie inside the piped area with another color and add different sprinkles if you want, or just leave as icing.
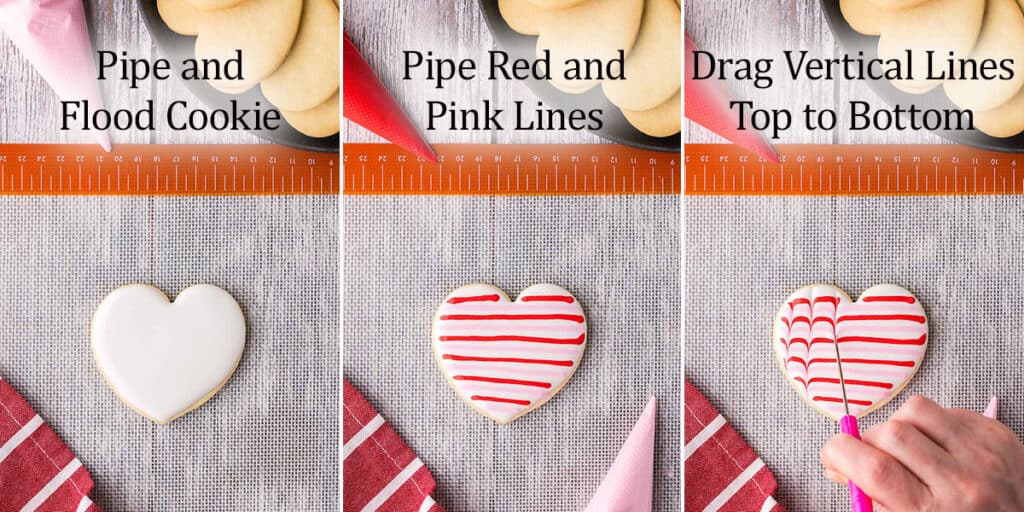
Feathered Valentine's Cookies
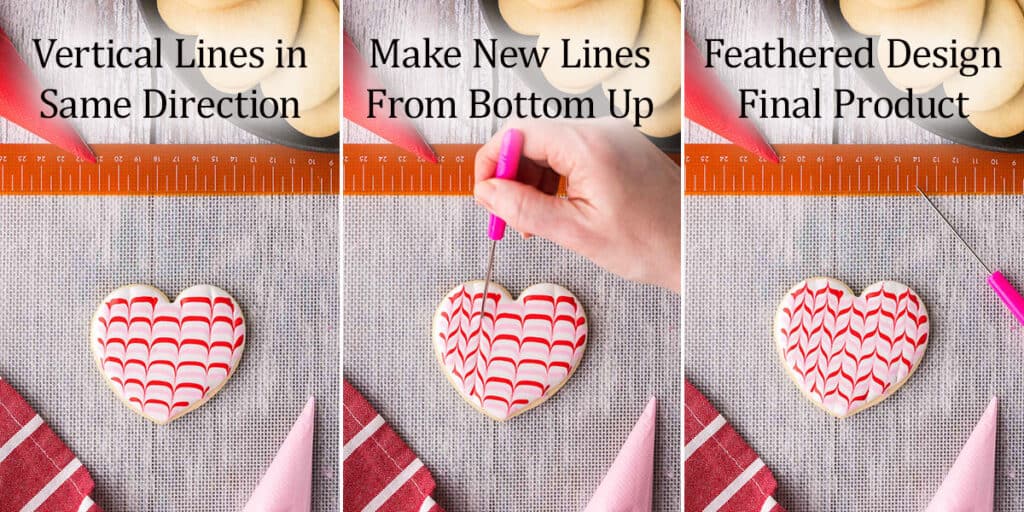
Pipe and flood the cookie with the color you want as the background, I used white. Pipe alternating horizontal lines of two other colors (red and pink for me). Using a scribe or toothpick, start at the top left edge and drag the scribe down through the horizontal lines. Once at the bottom remove the scribe and clean the tip. Then move over to the right a bit and drag another line down. (Spacing between vertical lines should be such that there is enough space to drag another vertical line between them - see picture below). Continue drawing vertical lines down until you reach the other edge of the cookie.
Once you have done all the vertical lines from top to bottom. Go in between each set of vertical lines and drag the scribe in another vertical line but from bottom to top. This whole process is another wet on wet application, you do not let the icing dry in between any of the steps. Now set the cookie aside to dry for about 2 hours.
Block Flooding
Block flooding Valentine's cookies can be used to make freehand shapes. In this case I used it to make a red wave in a heart shaped sugar cookie, and I also used it to make a small red heart in the center of a circle shaped cookie.
Begin by piping the design you want inside your cookie. Then flood inside the shape you made. Set the cookie aside to allow the icing to dry. You can wait 2 hours, or you can wait about 1 hour once the icing becomes matte and has a bit of a crust on it. Just be careful not to disturb the first icing. Now pipe and flood the next color of icing you want. You want to pipe right up to the edge of the dried icing you made in step one. Again, use your scribe to help move the icing to where you need it. Allow the new icing to fully harden by resting the cookie for about 2 hours.
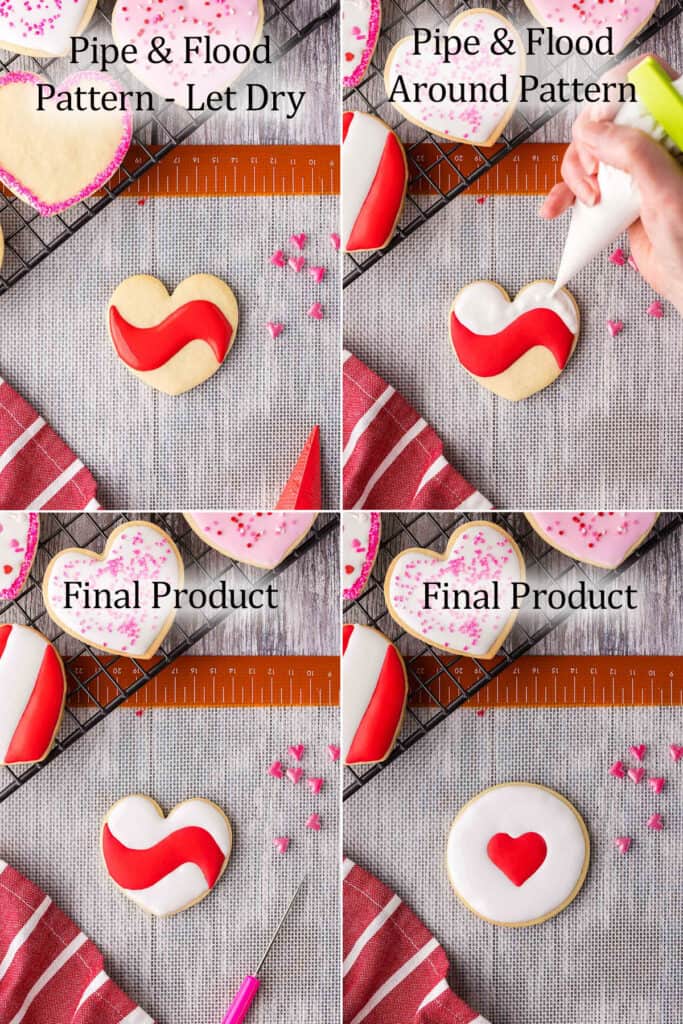
With this technique you can make any designs of your choosing. So if you don't have heart shaped cookie cutters, block flooding allows you to create a Valentine's Day theme, while using a generic shaped cookie, like a circle. Let your creativity go!
Notes on Valentine's Cookies
- If you want to glaze cookies, you can use royal icing which has meringue powder. It hardens fast. But if you don't have meringue powder you can just make a glaze with icing sugar and water or milk. Just add the liquid slowly with lots of stirring until you get a consistency that you can dip the cookie in with out it all running off.
- If you are using sanding sugar as a sprinkle, it is best not to sprinkle it on right away, or the sugar dissolves a bit in the wet icing and the dye bleeds a little. I find waiting about 10-15 minutes lets the surface dry a little but it's still wet enough for the sugar to adhere to.
- Anywhere where I mention using a scribe you can sub with a toothpick. They both work.
- When you pull the scribe out of the icing to begin a new drag it is best to clean the tip each time for best results
FAQs on Valentine Sugar Cookies
Why is my royal icing in the bowl crusting over? Royal icing with meringue powder sets fast. Once you make up a bowl of royal icing you don't want to leave it undisturbed for long or it will begin to harden. It helps if you keep plastic wrap over it, or better yet, get it into the piping bag right away where it is safe and will be fine for days.
What can I use if I don't have a scribe? Toothpicks work well too.
Do I have to use sugar cookies? No, you can use any cookie you want. The best results will be a cookie with a flat surface. But you could even buy plain cookies and then decorate them at home.
How come my icing dots won't melt in to the background icing? If you let the background icing sit too long before adding the dots, the surface will begin to harden. At this point new icing added will sit on top of the background icing instead of melting in to it. You can still decorate this way, but you won't be able to make the hearts, they will just be dots instead (still pretty though).
Follow Me On Social Media
If You Liked This Valentine's Cookie Recipe...
If you liked this recipe, please consider rating the recipe and leaving a comment below - I love to hear how people get on with my recipes and I truly make an effort to respond to everyone who takes the time to comment.
Perhaps you are in the mood for more cookie recipes, if so, check out my Brookies Recipe (brownie collides with chocolate chip cookie), Chocolate Chipless Cookies (for those of you who pick out the chocolate chips), Red velvet cake cookies, Raspberry thumbprint cookies, or Chocolate chocolate chip cookie bars.

Valentine's Cookies
Equipment
- Measuring Spoons
- Measuring Cups
- Stand Mixer with mixing bowls or hand mixer with a large mixing bowl
- Cooling Rack
- Rolling Pin
- Parchment Paper
- Baking Sheet
- Heart-shaped Cookie Cutter
- Piping Bags (optional)
- Scribe tool (optional) (can use a toothpick instead)
Ingredients
- 1 Batch Heart-shaped sugar cookie or cookies of your choice
- 2 cups Confectioners Sugar 226g
- 1 ½ tablespoon Meringue Powder 15g
- 3 ½ tablespoon Water
- ½ teaspoon Vanilla Extract
- Food Coloring Red, Pink, and White
- Assorted Sprinkles
Instructions
Prepare the Royal Icing
- Make a batch of royal icing, you can either follow my recipe or your own. Thin down the consistency by adding a little bit of water at a time until you get a 10 second consistency. This is where you can drizzle the the icing back into the bowl and it will sit on the surface for about 10 seconds before it melts back in to the rest of the icing.
- Divide the icing in to three bowls. Keep one bowl white, add red food coloring to the second bowl and stir in. Add pink food coloring to the third bowl and stir it in.
- Place colored royal icing into piping bags and snip off the ends. Just snip a small bit of the tip off. You can always cut off more if necessary.
How To Pipe and Flood Cookies
- To pipe a line of icing, place the piping bag tip so it is just touching the front edge of the cookie. Gently squeeze the piping bag until icing begins to come out. As the icing is coming out pull the tip slightly upwards so it isn't touching the cookie and there is a bit of a "string" of icing between the cookie and the bag. Guide this string of icing around the edge of the cookie as you keep gentle pressure on the piping bag. Keep the thin line of icing around the edge of the cookie - close to the edge but don't go over. This piped edge provides a barrier for the next step.
- Flood the inside of this piped edge with more icing. You want to follow the pattern of the piped edge laying down a thick coat of icing (by squeezing more firmly on the piping bag) making your way around so the entire cookie is covered. Try not to leave any gaps.
- Now use a scribe (pointy metal tool) or a toothpick to wiggle the icing around to fill in the gaps. Sometimes a little shake of the cookie also helps the icing to settle into a smooth coating.
- The cookie is now piped and flooded. If left to dry it will take about 2 hours. Or you can add sprinkles onto the wet icing surface, then allow the icing to dry.
How to Make Connected Heart Shapes
- Pipe and flood a cookie with royal icing. I chose to use a light pink icing.
- Choose a different color of royal icing that you want the little hearts to be. In my case I chose red. Pipe little dots of red icing around the edge of the cookie. Not too close together.
- Start with your scribe at one of the top dots. You want to start the scribe in the background flood color (pink in my case) about ¼" away from the first dot and drag the scribe through the first dot - top to bottom of dot, this will create a heart shape out of the dot. Don't remove the scribe from the icing but keep dragging through the background color and move on to the second dot. Drag the scribe through the second dot and continue around the cookie going through all the dots. Set the cookie aside to dry for 2 hours.
Individual Heart Edge
- Pipe and flood your background color. Add dots of a different color around the edge of the cookie while the background is still wet.
- Use your scribe to make hearts pointing towards the center of the cookie. Pick any dot to start with. Scribe starts on the side of the dot closest to the outside edge of the cookie, pull the scribe through the dot towards the center of the cookie. This will make a heart. Remove the scribe and clean the point before moving on to the next dot.
Feathered Valentine's Cookies
- Pipe and flood the cookie with the color you want as the background, I used white. Pipe alternating horizontal lines of two other colors (red and pink for me).
- Using a scribe or toothpick, start at the top left edge and drag the scribe down through the horizontal lines. Then move over a bit and drag another line down. (Spacing between vertical lines should be such that there is enough space to drag another vertical line between them in the next step.) Continue drawing vertical lines down until you reach the other edge of the cookie.
- Once you have done all the vertical lines from top to bottom. Go in between each set of vertical lines and drag the scribe in another vertical line but from bottom to top. Now set the cookie aside to dry for about 2 hours.
Piped Edge with Sprinkles
- Pipe the edge of your cookie with royal icing. Dip the front face of the cookie into sprinkles of your choosing. Try not to push too hard into the sprinkles or it will flatten the edge. Gently rotate the cookie around as needed until the piped line is covered. Set the cookie aside for about 2 hours to allow the icing to harden
- If desired, you can flood the cookie inside the piped area with another color and add different sprinkles if you want, or just leave as icing.
Block Flooding
- Block flooding Valentine's cookies can be used to make freehand shapes. In this case I used it to make a red wave in a heart shaped sugar cookie, and I also used it to make a small red heart in the center of a circle shaped cookie.
- Begin by piping the edge of the design you want inside the cookie. Then flood inside the shape you made. Set the cookie aside to allow the icing to dry. You can wait 2 hours, or you can wait about 1 hour once the icing becomes matte and has a bit of a crust on it. Just be careful not to disturb the first icing. Now pipe and flood the next color of icing you want. You want to pipe right up to the edge of the dried icing you made in step one. Again, use your scribe to help move the icing to where you need it. Allow the new icing to fully harden by resting the cookie for about 2 hours.
Notes
- If you want to glaze cookies, you can use royal icing which has meringue powder. It hardens fast. But if you don't have meringue powder you can just make a glaze with icing sugar and water or milk. Just add the liquid slowly with lots of stirring until you get a consistency that you can dip the cookie in with out it all running off.
- If you are using sanding sugar as a sprinkle, it is best not to sprinkle it on right away, or the sugar dissolves a bit in the wet icing and they dye bleeds a little. I find waiting about 10-15 minutes lets the surface dry a little but it's still wet enough for the sugar to adhere to.
- Anywhere where I mention using a scribe you can sub with a toothpick. They both work.
- When you pull the scribe out of the icing to begin a new drag it is best to clean the tip each time for best results
FAQs
Why is my royal icing in the bowl crusting over? Royal icing with meringue powder sets fast. Once you make up a bowl of royal icing you don't want to leave it undisturbed for long or it will begin to harden. It helps if you keep plastic wrap over it, or better yet, get it into the piping bag right away where it is safe and will be fine for days. What can I use if I don't have a scribe? Toothpicks work well too. Do I have to use sugar cookies? No, you can use any cookie you want. The best results will be a cookie with a flat surface. But you could even buy plain cookies and then decorate them at home. How come my icing dots won't melt in to the background icing? If you let the background icing sit too long before adding the dots, the surface will begin to harden. At this point new icing added will sit on top of the background icing instead of melting in to it. You can still decorate this way, but you won't be able to make the hearts, they will just be dots instead (still pretty though).
Wow, these are so pretty. I am sure mine wont look the same but I am going to try them.
I'm sure you will do a great job. They aren't as hard as they look.
I absolutely loved and appreciated your detailed decorating tips! These are tasty and so pretty!
I'm so happy to hear that. Thanks for commenting.
Bookmarking this recipe, planning to make them for this valetines day season, hope I nail the icing like yours!
Hi Abi, I'm sure you will get the icing just right. Good luck!
I’m planning to make these cookies this year and can’t wait! They look so fun to decorate and perfect for sharing with family and friends.
They are fun to decorate. And even more fun if you have friends or family who want to help out.
I have not made them yet but found your directions on how to decorate them easy to follow. They look very tempting.
Hi Janice, thanks for commenting. I hope you try them, they are delicious and make a pretty Valentine treat!
Omg these are so gorgeous. I can't wait to try them!
Thanks Therese! Yours will be gorgeous too!
I can't wait to make these cookies with my teens for Valentine's Day! I haven't used Royal Icing much, and I really appreciate the detailed directions for decorating. These cookies are gorgeous! Thanks for the great recipe!
Your teens will love making these with you I'm sure. Have fun and enjoy them!
I've always been intimidated by decorating with royal icing but your thorough instructions made it so easy! Looking forward to making these for other holidays, too.
Hi Courtney. I know how intimidating decorating can be. I'm glad you found the instructions helpful. It gets easier and easier the more you do it!
I love how you included step-by-step pictures of all the different ways you can decorate the images.
Thanks Stephanie, I hope it helps people have success at their decorating.