Fudgy Red Velvet Brownies
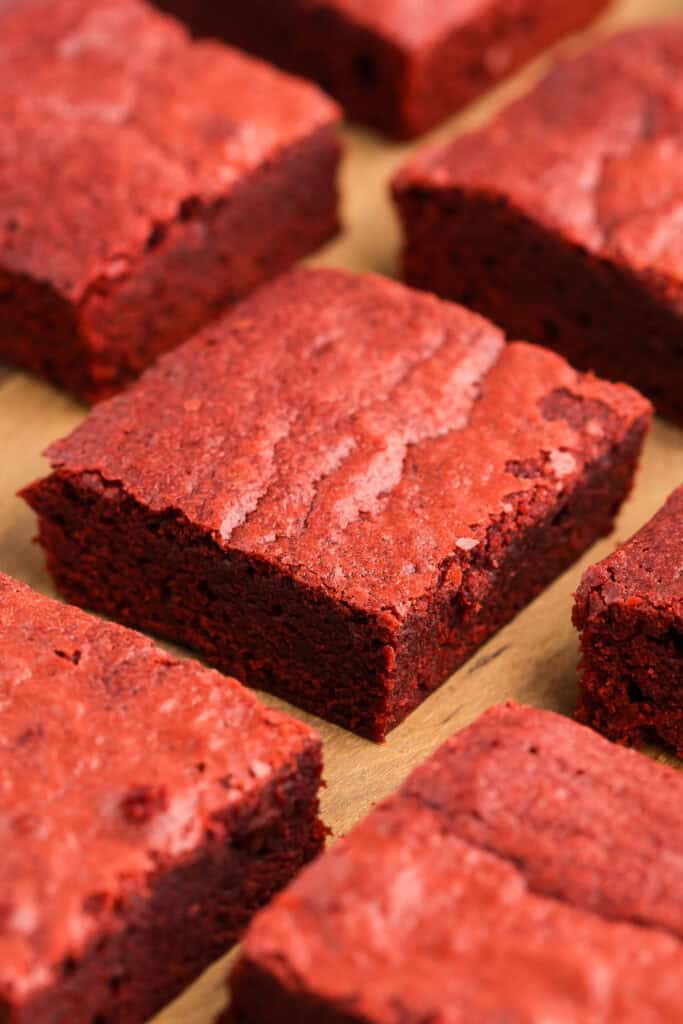
These fudgy red velvet brownies are what happens when red velvet cake and classic brownies meet in the middle. They have the rich, chewy texture of a brownie, paired with a softer cocoa flavor and the signature color of red velvet cake with its slight tang. It has a crackly top and dense, fudgy center that stays moist for days, creating the perfect balance of texture and flavor. Serve as is, or gussy it up with a cream cheese drizzle or frosting.
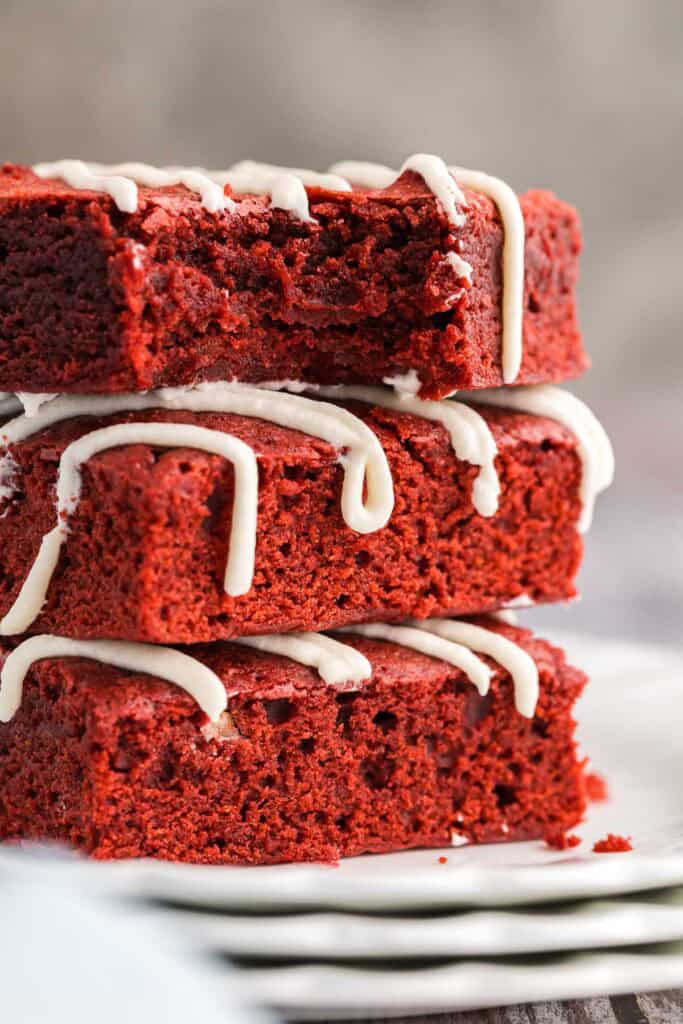
This red velvet brownie recipe is great any time of year, but it is especially ideal around Valentines Day, as are my Red Velvet Cake Cookies. Their crimson red good looks just shout "Be my Valentine". Instead of cutting squares with a knife, you could use a heart shaped cookie cutter to cut out heart shapes which would be super cute. But red isn't just for Valentines, I bet Santa would love to have these treats laid out for him on Christmas eve too!
What Makes Red Velvet Cake/Brownies Red?
Red velvet cake was developed in the 1800s and the original recipes did not use red food coloring. The red-tint was actually a happy bi-product that I don't think anyone probably expected. The original recipes, and this one, use natural cocoa powder (not the Dutch processed versions that are common today). Natural cocoa contains chemical compounds called anthocyanins. These are antioxidants that change color based on the pH of their surroundings. So the addition of vinegar (and buttermilk as in the cake version) lowers the pH sufficiently to produce the red-tint.
The red-tint produced this natural way is a subtle red, not the vibrant red we associate with red velvet today. So if you are trying to avoid red food coloring, you can can still make these red velvet brownies without the dye. Make sure you use a natural cocoa (I used Hershey's), and you may even want to add another teaspoon of vinegar. Apparently the red color is only noticed after the brownies or cake have been baked - again, don't expect it to be a screaming red color.
Other bars and treats you might want to try are:
- Chocolate chocolate chip cookie bars - double chocolate chip!
- Brookies - a combination of chocolate chip cookies and brownies
- Banana Chocolate Chunk Muffins
- Cinnamon coffee cake
- Strawberry Scones - for a less sweet treat
Why You Will Love These Red Velvet Fudgy Brownies
- Perfectly fudgy texture with a dense, chewy center that doesn't feel heavy
- Shiny, crackly brownie top for a bakery-style finish.
- Mild cocoa flavor with the subtle tang red velvet is known for
- Not too cakey, not overly chocolatey - right in that sweet spot
- Stays moist for days, making them great for baking ahead
- Simple ingredients you likely already have on hand
- Perfect for holidays, Valentine's Day, or anytime you want a red velvet dessert
- Easy to slice cleanly, perfect for sharing, gifting, or serving at gatherings
Equipment Needed
Disclosure: as an Amazon affiliate, I receive a small amount of compensation from qualifying purchases at no expense to you. This helps support my work and allows me to bring more yummy recipes your way.
- Mixing bowl
- Measuring cups
- Measuring spoons
- Whisk
- Fine Mesh Sieve
- Rubber Spatula
- 8x8 metal baking pan
- Parchment paper optional, but it does make clean up and removing the brownies easier.
Ingredients for Red Velvet Brownies

Salted Butter - Adds rich flavor and helps dissolve the sugar, which contributes to the shiny, crackly brownie top.
White Sugar - Provides sweetness and creates that classic glossy, crackly surface when dissolved properly.
Brown Sugar - Adds moisture and chewiness, keeping the brownies soft and fudgy for days.
Vegetable Oil - Keeps the brownies extra moist and tender without making them cakey.
Eggs - Bind the batter and give structure while helping create a dense, chewy texture.
Vanilla Extract - Enhances the overall flavor and balances the cocoa and sugar.
Vinegar - Adds the subtle tang that red velvet is known for and helps tenderize the crumb.
Red Food Coloring - Gives the brownies their signature red velvet color.
All-Purpose Flour - Provides structure so the brownies hold their shape.
Cocoa Powder - Adds mild chocolate flavor without overpowering the red velvet profile.
Baking Powder - Gives the brownies a slight lift so they're not overly dense while staying fudgy.
Ingredients for Cream Cheese Drizzle or Frosting (optional)
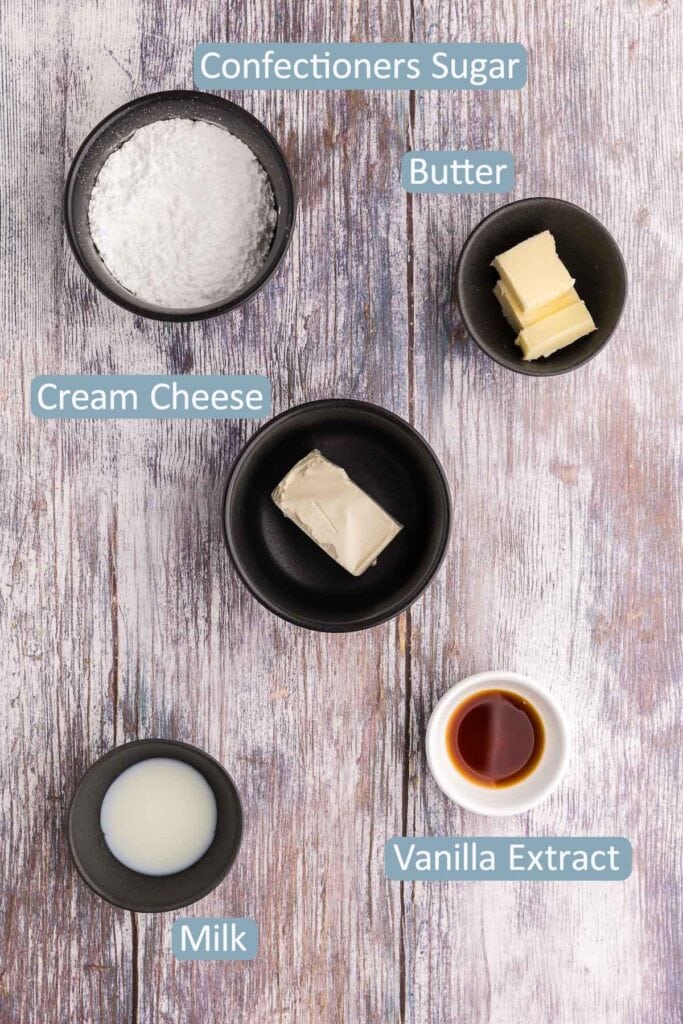
Cream Cheese - Provides the tangy, creamy base that pairs perfectly with red velvet flavor.
Butter - Adds richness and helps create a smooth, spreadable frosting texture.
Confectioners Sugar - Sweetens and helps to thicken the frosting.
Vanilla Extract - Enhances flavor and rounds out the tanginess of the cream cheese.
Milk - Thins the frosting to a drizzle-able consistency without affecting flavor.
How to Make Fudgy Red Velvet Brownies
Full recipe including measurements are posted in the recipe card at the bottom
Preheat oven to 350F
Prepare pan with parchment paper - have the paper overhang the edges on just two sides. This will make it easy to pop the brownies out once baked. Set aside.
Making the Brownies
Heat up the butter so it melts and is hot, without it browning. Either in a saucepan or in the microwave.
Stir in about 3 tablespoon of the white sugar, you can use a spoon or whisk. Once it is mixed in as much as possible, add approximately 3 more tablespoons of the white sugar and mix in as thoroughly as possible. The idea is to dissolve as much of the white sugar as possible into the butter - this is the secret to the crackly shiny surface on brownies. When no more sugar can be dissolved, add the rest of the white sugar and all of the brown sugar. Combine to get a homogenous mixture. You will have a very thick mixture.
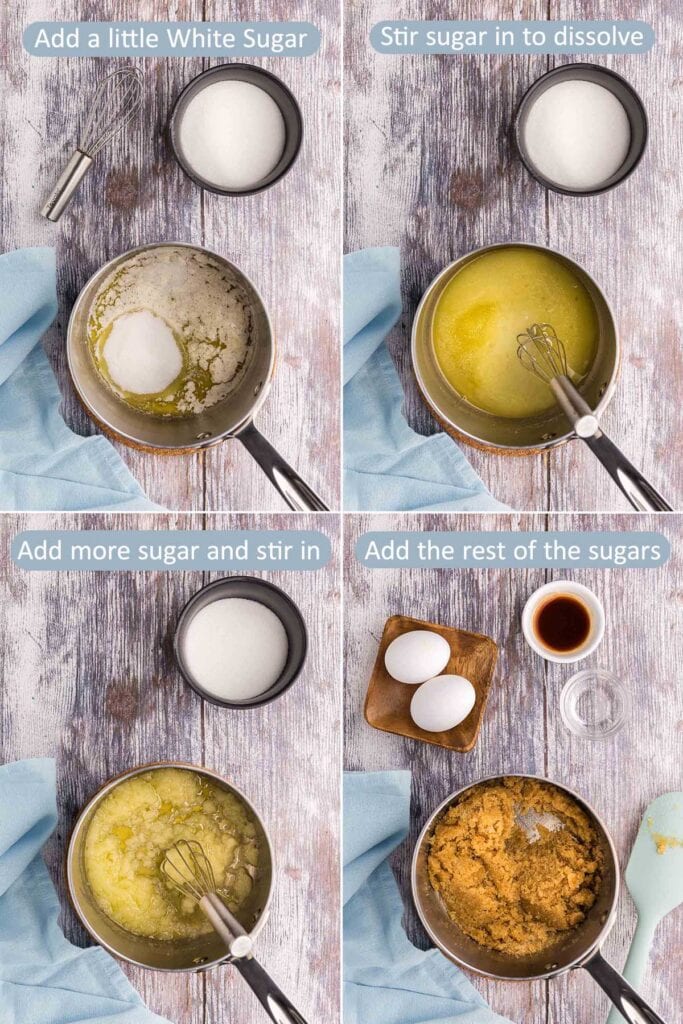
If you were using a saucepan, transfer the contents to a mixing bowl for easier stirring.
Add in the eggs, vanilla, and vinegar. Stir to thoroughly combine.
Stir in the oil completely.
Mix in red food coloring until the batter is completely red.
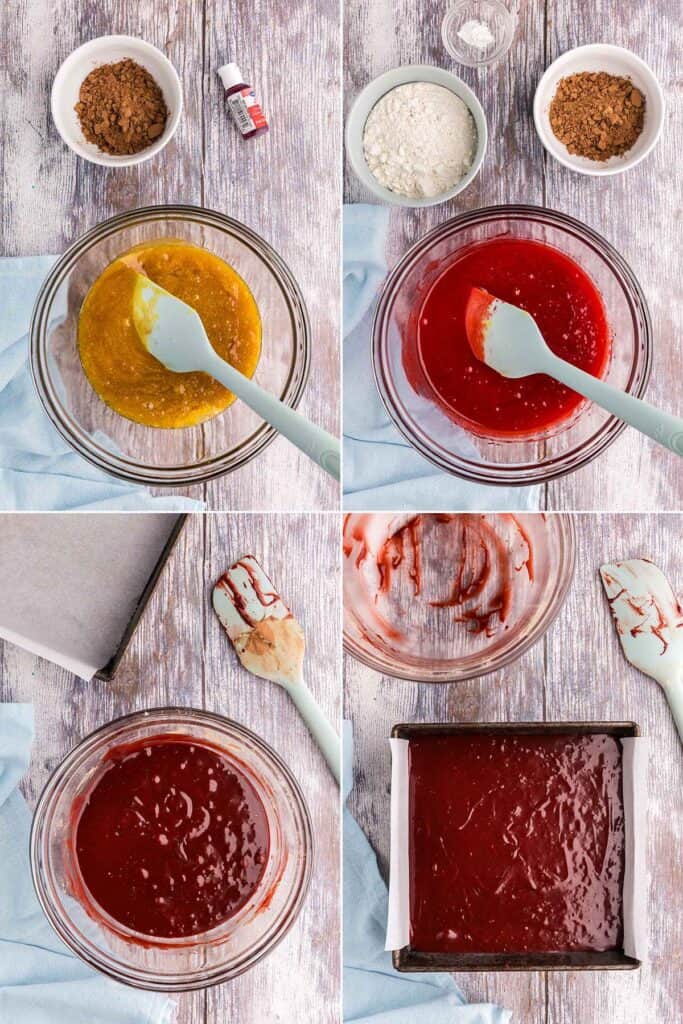
Sift in the cocoa, flour and baking powder. Stir well until a uniform batter comes together.
If using white chocolate chips, stir in ½ cup of them.
Pour into the prepared 8x8 pan and smooth out the top with a rubber spatula. If using white chocolate chips you can sprinkle ¼ cup on top.
Place in the preheated oven at 350F and bake for 20-25 minutes. A toothpick should come out relatively clean.
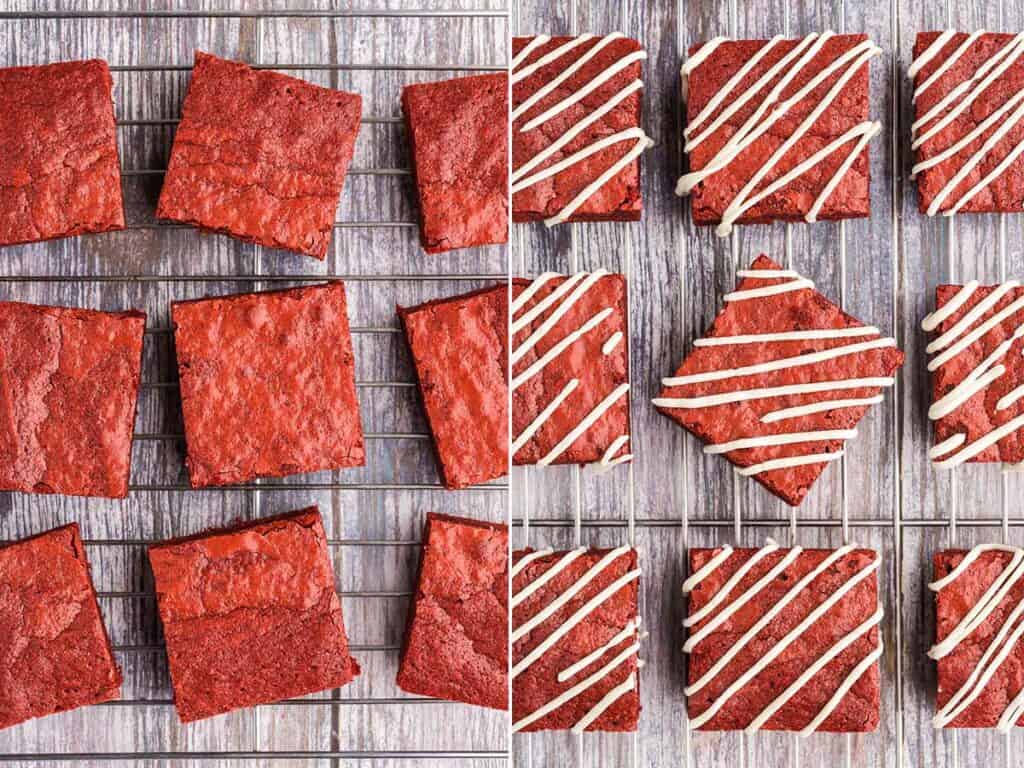
Allow the brownies to completely cool in the pan, about an hour.
Using the overhanging edges of the parchment paper, remove the brownie square from the pan to a cutting board. If not adding the cream cheese frosting/drizzle, then cut into 9 equal squares and enjoy!
Making the Cream Cheese Frosting/Drizzle - optional
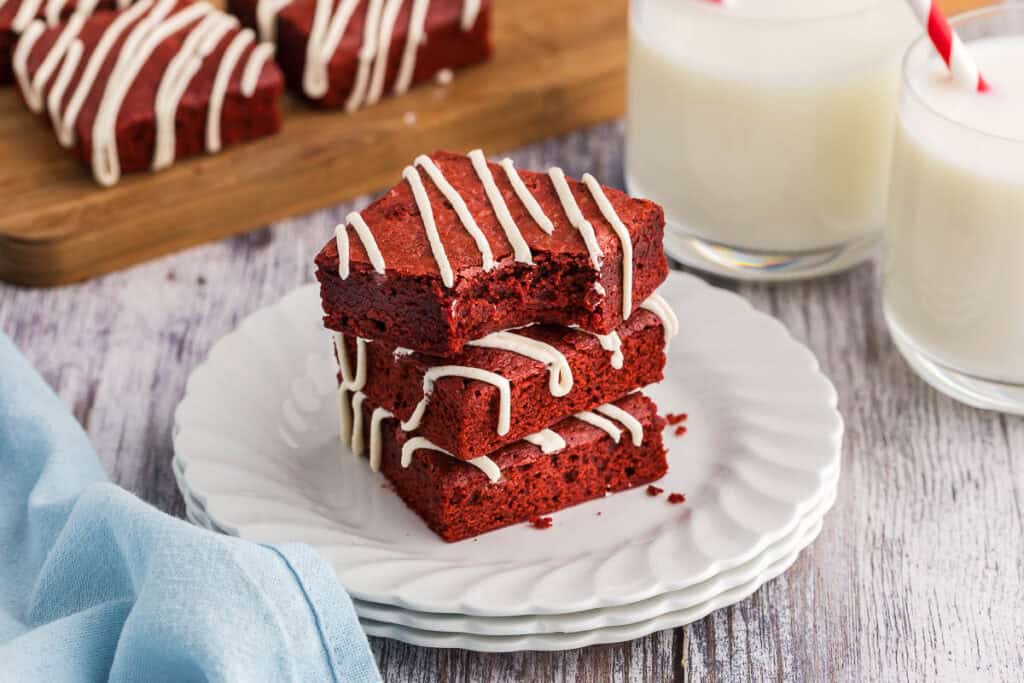
These red velvet brownies are delicious on their own, but you can take them over the top with this cream cheese frosting, or just drizzle it on. It adds a little more tang to this exceptional brownie.
In a mixing bowl add the room temperature cream cheese and butter. Blend together with the mixer until nice and fluffy, about a minute.
Add in the vanilla extract and combine.
Add in the confectioners sugar and continue blending until fully combined. The mixture will be quite thick and if you are going to frost the brownies, you can use as is.
If you want more of a drizzle, then add a teaspoon of milk and blend it in. Keep adding a teaspoon more of milk and blending until you get the consistency you want. Place the cream cheese drizzle in a piping bag or a ziploc bag, cut the corner off and squeeze out the drizzle in the pattern of your choosing.
Cut the red velvet brownies into 9 equal pieces and enjoy!
Notes on Red Velvet Brownies
- How you melt your butter is up to you. You can do it in the microwave or on the stovetop. The idea is that you want it warm/hot to help dissolve as much of the white sugar as possible. This is what gives the brownies that shiny crackly top. It's actually a very thin meringue layer! If you don't care about that layer and you are going to just frost the top, then you need only combine the melted butter and sugars all at once.
- I add the oil after the eggs and vinegar have been incorporated, this is so the oil doesn't impede the sugar being incorporated with the butter and eggs. Again, it's for the crackly top.
- I used natural cocoa powder as it is not as dark brown a color as Dutch processed, therefore giving more of a red color. If you are not using any food coloring and still want a tint of red, you will have to use natural cocoa powder. But, if you only have Dutch processed on hand, it will work and you will still get a red color from the food coloring.
- If you don't like the idea of red food coloring you can leave it out, the flavor will still be the same.
- White chocolate chips or cream cheese chips make a great addition, they taste great and add visual appeal.
FAQs About Red Velvet Brownies
Are red velvet brownies more like cake or brownies?
Red velvet brownies fall somewhere in between, but this recipe leans fudgy. The longer you bake them, the drier they will be - more like a dense cake. Take them out a little earlier for a fudgier texture.
What makes red velvet brownies red?
Red velvet gets its signature color from the red food coloring. But originally natural cocoa (not Dutch Processed) reacts with baking soda and vinegar to make a red color. This red color is fairly subtle, so people started adding red food coloring to enhance it.
Why do red velvet brownies use vinegar?
Vinegar adds the subtle tang red velvet is known for and helps create a tender crumb without adding flavor.
How do I get a shiny, crackly top on brownies?
Dissolving the sugar into warm butter before adding the eggs helps create the glossy, crackly top.
How should I store red velvet brownies?
Store them in an airtight container at room temperature for best texture, or refrigerate if frosted. They will stay fresh for 3-5 days.
Can red velvet brownies be frozen?
Yes, unfrosted brownies freeze well and can be thawed at room temperature before serving. They can be frozen for up to 3 months in a zipper top bag or air tight container.
Why are my red velvet brownies cakey?
Too much flour, overmixing, or too much leavening can cause a cakey texture.
Can I use natural food coloring instead of red food dye?
Natural colorings can be used, but the color will be more muted compared to traditional red velvet.
What to Serve with Red Velvet Brownies?
As a snack these brownies go great with a tall glass of milk or milk alternative. They are great with coffee or tea if you just want to sit back for a moment and have a little "me" time. Or serve them to your guests along with some other yummy treats like my:
- Chocolate and Peanut Butter Rice Krispie Squares
- Chocolate Chocolate Chip Cookie Bars
- Chocolate Chipless Cookies
- Cinnamon Coffee Cake
Follow Me On Social Media
If You Liked This Red Velvet Brownie Recipe...
If you liked this recipe, please consider rating the recipe and leaving a comment below - I love to hear how people get on with my recipes and I truly make an effort to respond to everyone who takes the time to comment.

Red Velvet Brownies
Ingredients
- ¼ cup salted butter 58g
- ¾ cup Granulated Sugar 152g
- ¼ cup Brown Sugar 52g
- 2 Large Eggs
- 1 teaspoon Vanilla Extract
- ¼ cup Vegetable Oil 49g
- 2 teaspoon Vinegar
- 1 teaspoon Red Gel Food Coloring - you will have to add more if using liquid red food coloring
- ¼ cup Cocoa Powder 22g
- 1 cup All-purpose Flour 124g
- ¼ teaspoon Baking Powder
- ¾ cup White Chocolate Chips divided optional
Cream Cheese Frosting/Drizzle
- 2 oz Cream Cheese room temperature
- 2 tablespoon Salted Butter room temperature
- ½ cup Confectioners Sugar
- 1 teaspoon Vanilla Extract
- Milk as needed (a few tsp)
Instructions
- Preheat oven to 350F
- Prepare 8x8 inch pan with parchment paper - have the paper overhang the edges on just two sides. This will make it easy to pop the brownies out once baked. Set aside.
- Heat up the butter so it melts and is hot, without it browning. Either in a saucepan or in the microwave.
- Stir in about 3 tablespoon of the white sugar, you can use a spoon or whisk. Once it is mixed in as much as possible, add approximately 3 more tablespoons of the white sugar and mix in as thoroughly as possible. The idea is to dissolve as much of the white sugar as possible into the butter - this is the secret to the crackly shiny surface on brownies. When no more sugar can be dissolved, add the rest of the white sugar and all of the brown sugar. Combine to get a homogenous mixture. You will have a very thick mixture.
- If you were using a saucepan, transfer the contents to a mixing bowl for easier stirring.
- Add in the eggs, vanilla, and vinegar. Stir to thoroughly combine.
- Stir in the oil completely.
- Mix in the red food coloring until the batter is completely red.
- Sift in the cocoa, flour and baking powder. Stir well until a uniform batter comes together.
- If using white chocolate chips, stir in ½ cup of them.
- Pour into the prepared 8x8 pan and smooth out the top with a rubber spatula. If using white chocolate chips you can sprinkle ¼ cup on top.
- Place in the preheated oven at 350F and bake for 20-25 minutes. A toothpick should come out relatively clean.
- Allow the brownies to completely cool in the pan, about an hour.
- Using the overhanging edges of the parchment paper, remove the brownie square from the pan to a cutting board. Cut into 9 equal squares and enjoy!
Cream Cheese Frosting or Drizzle
- If you will be frosting the brownies I would double the recipe, if just drizzling, use the ingredients as is - you will have lots.
- In a mixing bowl add the room temperature cream cheese and butter. Blend together with the mixer until nice and fluffy, about a minute.
- Add in the vanilla extract and combine with the mixer.
- Add in the confectioners sugar and continue blending until fully combined. The mixture will be quite thick and if you are going to frost the brownies, you can use as is.
- If you want more of a drizzle, then add a teaspoon of milk and blend it in. Keep adding a teaspoon more of milk and blending until you get the consistency you want. Place the cream cheese drizzle in a piping bag or a ziploc bag, cut the corner off and squeeze out the drizzle in the pattern of your choosing.
- Cut the red velvet brownies into 9 equal pieces and enjoy!
Notes
- How you melt your butter is up to you. You can do it in the microwave or on the stovetop. The idea is that you want it warm/hot to help dissolve as much of the white sugar as possible. This is what gives the brownies that shiny crackly top. It's actually a very thin meringue layer! If you don't care about that layer and you are going to just frost the top, then you need only combine the melted butter and sugars all at once.
- I add the oil after the eggs and vinegar have been incorporated, this is so the oil doesn't impede the sugar being incorporated with the butter and eggs. Again, it's for the crackly top.
- I used natural cocoa powder as it is not as dark brown a color as Dutch processed, therefore giving more of a red color. If you are not using any food coloring and still want a tint of red, you will have to use natural cocoa powder. But, if you only have Dutch processed on hand, it will work and you will still get a red color from the food coloring.
- If you don't like the idea of red food coloring you can leave it out, the flavor will still be the same.
- White chocolate chips or cream cheese chips make a great addition, they taste great and add visual appeal.
FAQs About Red Velvet Brownies
Are red velvet brownies more like cake or brownies?Red velvet brownies fall somewhere in between, but this recipe leans fudgy. The longer you bake them, the drier they will be - more like a dense cake. Take them out a little earlier for a fudgier texture. What makes red velvet brownies red?
Red velvet gets its signature color from the red food coloring. But originally natural cocoa (not Dutch Processed) reacts with baking soda and vinegar to make a red color. This red color is fairly subtle, so people started adding red food coloring to enhance it. Why do red velvet brownies use vinegar?
Vinegar adds the subtle tang red velvet is known for and helps create a tender crumb without adding flavor. How do I get a shiny, crackly top on brownies?
Dissolving the sugar into warm butter before adding the eggs helps create the glossy, crackly top. How should I store red velvet brownies?
Store them in an airtight container at room temperature for best texture, or refrigerate if frosted. They will stay fresh for 3-5 days. Can red velvet brownies be frozen?
Yes, unfrosted brownies freeze well and can be thawed at room temperature before serving. They can be frozen for up to 3 months in a zipper top bag or air tight container. Why are my red velvet brownies cakey?
Too much flour, overmixing, or too much leavening can cause a cakey texture. Can I use natural food coloring instead of red food dye?
Natural colorings can be used, but the color will be more muted compared to traditional red velvet.


Wow, you weren't kidding when you said these were fudgy. They were that perfect level of fuzziness that I need with a brownie.
I'm glad you enjoyed them!
I made these last night and they are gone already!!! I will have to make double batch next time.
lol, sometimes a double batch is a good idea. Especially if you have brownie lovers in your household.
YES! We loved these brownies! Thank you!
I'm so glad to hear that. Thanks for commenting.
These are such a delicious way to switch up the traditional brownie! So delicious!
I totally agree. Thanks for commenting.
Love the more subtle chocolate flavor in these! They had such a great texture -- exactly what I want in a brownie.
I'm so glad they were just what you were looking for. Thanks for the kind comment
We love everything red velvet, I am going to make these for Valentines treats for my kiddo’s glass.
The kids will love you for it I'm sure!
Can’t wait to make these fudgy red velvet brownies soon! They look perfectly chewy with that crackly top and moist, rich center, definitely a treat worth trying.
I think you will really enjoy them if you like brownies. Let me know how it goes.
These are the BEST brownies! I love that they are a perfect Valentine's treat. The cream cheese drizzle takes them over the top. Thanks so much for the great recipe!
Hi Risa, thanks for commenting. I'm glad you enjoyed these brownies, I agree, the cream cheese drizzle really adds some yum!
These were absolutely incredible! I'll be bringing them back out for valentines day.