
This royal icing recipe is your secret to turning simple cookies into something truly special. I love how this version, made with meringue powder instead of egg whites, comes together so easily – no worrying about raw eggs, just smooth, glossy icing ready for decorating. It’s my go-to for holiday cookies. I make one consistency which works great for both piping and flooding cookies – easy peasy is always welcome over the holidays!

In this post, I outline two different methods which can be used to make royal icing with meringue powder. A non-whipped method, and a whipped method. The whipped method is by far the most common method and produces an icing that is very versatile. But the non-whipped method can be used if you are in a rush or don’t have a mixer available. I used the non-whipped method to pipe and do a little flooding on my gingerbread cookies, and I used the whipped method to pipe and flood my Christmas sugar cookies, Valentine’s Cookies, and St. Patrick’s Day Cookies.
Why You Will Love This Icing Royal Recipe Too
- Made with meringue powder – no raw eggs to worry about, just quick, reliable results every time.
- Dries quickly – but not too fast giving you plenty of time to apply perfect detailed piping, or flooding and will harden in about 2 hours.
- Smooth finish – gives your cookies that professional bakery look.
- Easy to color and flavor – customize it for any season or celebration.
- Stable and long-lasting – dries firm for stacking, gifting, and storing. Can also be placed in the freezer to use months from now.
- Simple to make – comes together in minutes with just a few ingredients.
- I give you two options to make this icing incase you don’t have a hand mixer or stand mixer.
Equipment Needed
Disclosure: as an Amazon affiliate, I receive a small amount of compensation from qualifying purchases at no expense to you. This helps support my work and allows me to bring more yummy recipes your way.
This recipe uses the following baking tools:
- Measuring spoons
- Measuring Cups
- Mixing bowl
- A Stand Mixer or hand mixer is optional if you want to get a very stiff consistency.
- Piping Bag and Tips or zipper top bags (like a Ziploc)
Ingredients
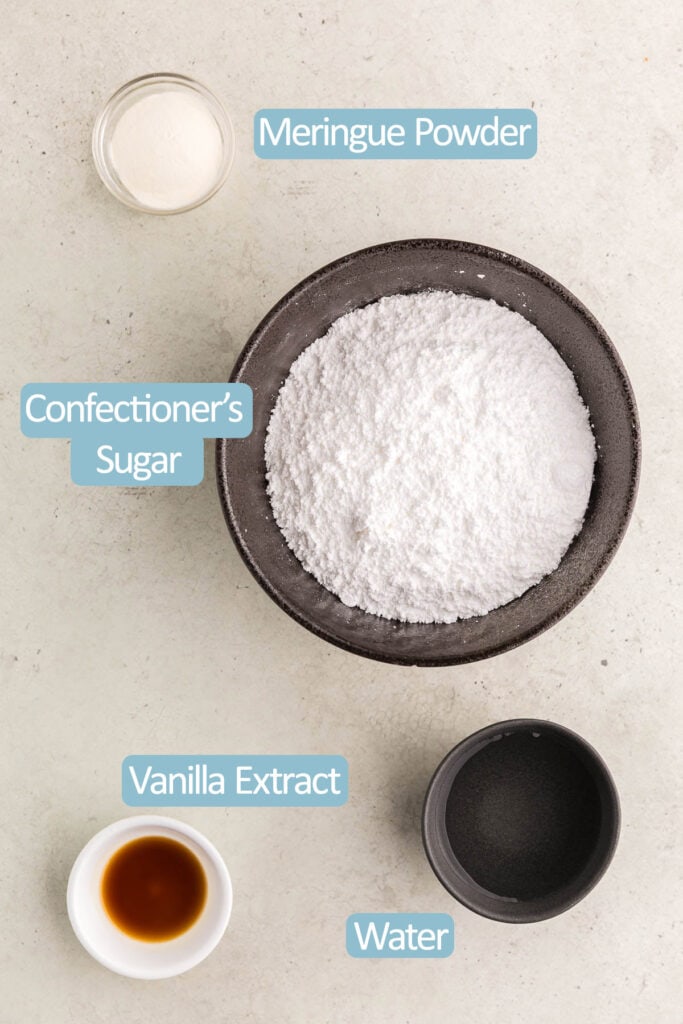
Confectioners sugar – also known as icing sugar, gives the icing its sweetness and structure.
Meringue powder – improves consistency and provides structure and stability for piping. It also helps the icing to dry and harden. Can be found in craft stores or on amazon.
Water – the liquid that turns the sugar and meringue powder into a smooth workable icing.
Vanilla extract – used to add flavor.
Food coloring (optional) – if you want to color your royal icing. Gel food coloring is best as it gives the strongest colors and is super concentrated so doesn’t thin out your icing.
Two Ways of Making Royal Icing
I have used this recipe two different ways, and you can do what suits you best. The first and most common method (whipped-method) uses a stand mixer or hand mixer to whip the icing into stiff peaks. This icing is then “thinned” down to the desired consistency by stirring small amounts of water back in. The second method (non-whipped method) is easier but not as versatile. It mixes everything together with a spoon and you are ready to go.
The non-whipped method isn’t as “fluffy” and smooth as the whipped method. But you can pipe the outline of a cookie and you can flood with it, and it will dry in about two hours. I do find the non-whipped method is also more prone to having occasional “craters”, little holes in the dried icing, probably due to bubbles that don’t get totally worked out.
The versatility of the whipped method is that it produces a very stiff, but fluffy and creamy-like icing that can be thinned down with water to whatever consistency you need. The thick stiff icing can be used to pipe decorations like flowers, or create textural and dimensional designs. It can be thinned down to a consistency ideal for writing on cookies, or making royal icing transfers, it can be further thinned down to a consistency ideal for piping and flooding cookies. Really, you can make pretty much any consistency you need with this.

What is the Consistency You Need for Piping and Flooding?
It seems like every cookie decorator has a slightly different answer to that question. Which really just goes to show that preparing royal icing is more of an art than a science. But don’t worry, the more you play with it, the better you will get at knowing how thin or thick you like your royal icing for your application.
When I talk about consistency I use the “seconds test”. This is not very scientific but I will explain. Once the icing is thin enough to flow off a spoon I pour lines of icing off the spoon back into the bowl. The lines will be visible on the surface for a little bit of time but eventually they “melt” back into the rest of the icing. I count how long it takes for the lines to melt back into the rest of the icing – one mississippi, two mississippi… However many seconds it takes to melt back in, say 8 seconds, I will call that an 8 second consistency. I told you it wasn’t very scientific.
The consistency I like for piping around the edge of a cookie and then flooding it, is about a 7-12 second consistency. Some people like it thicker up to 20 seconds.
Let’s Make Royal Icing With Meringue Powder
Method 1 – The Whipped Method
I find a hand mixer to be faster than a stand mixer, so I usually use a hand mixer. If you are using a stand mixer your times might be slightly longer. If using the stand mixer, use the paddle attachment.
In a mixing bowl combine the confectioner’s sugar and meringue powder. Add in the vanilla extract and all the water.
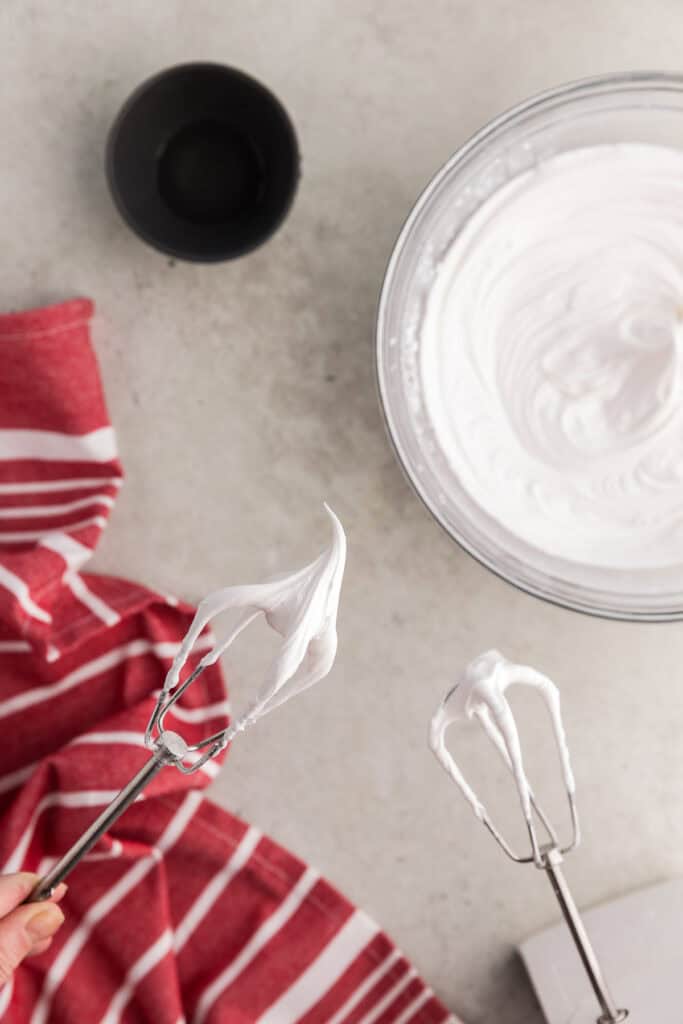
Beat on medium to high speed until stiff peaks form, about 3-5 minutes. Stop once you reach stiff peaks as overbeating can begin to breakdown the icing’s structure.
Alter the consistency of the icing to match your needs. Again if you need some of it for detailed piping you might want to remove some of the thicker icing to a piping bag before thinning out the rest. A little water goes a long way so only add small quantities at a time (like 1/8 tsp) and thoroughly mix it in with a spoon before adding more. Again, a 7-12 second consistency is good for piping and flooding cookies.
If you will be using food coloring to dye the icing, divide the icing into as many bowls as you need different colors. Add drops of food coloring (gel food coloring is best) and mix in thoroughly until you reach your desired color.

Method 2 – The Non-Whipped Method
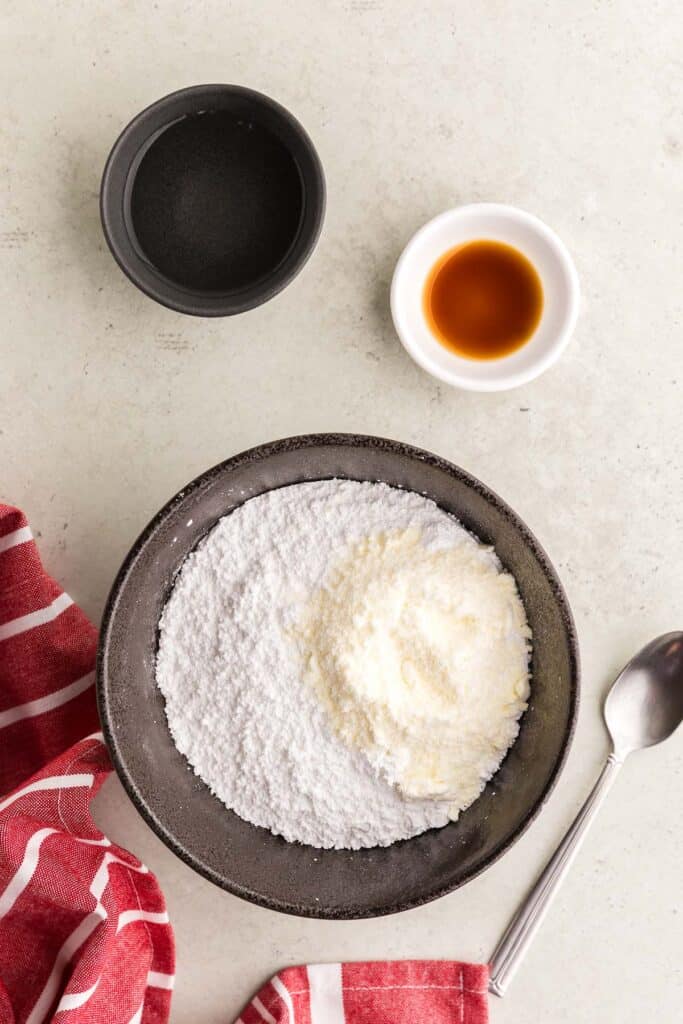
In a bowl mix together the confectioner’s sugar and meringue powder with a spoon.
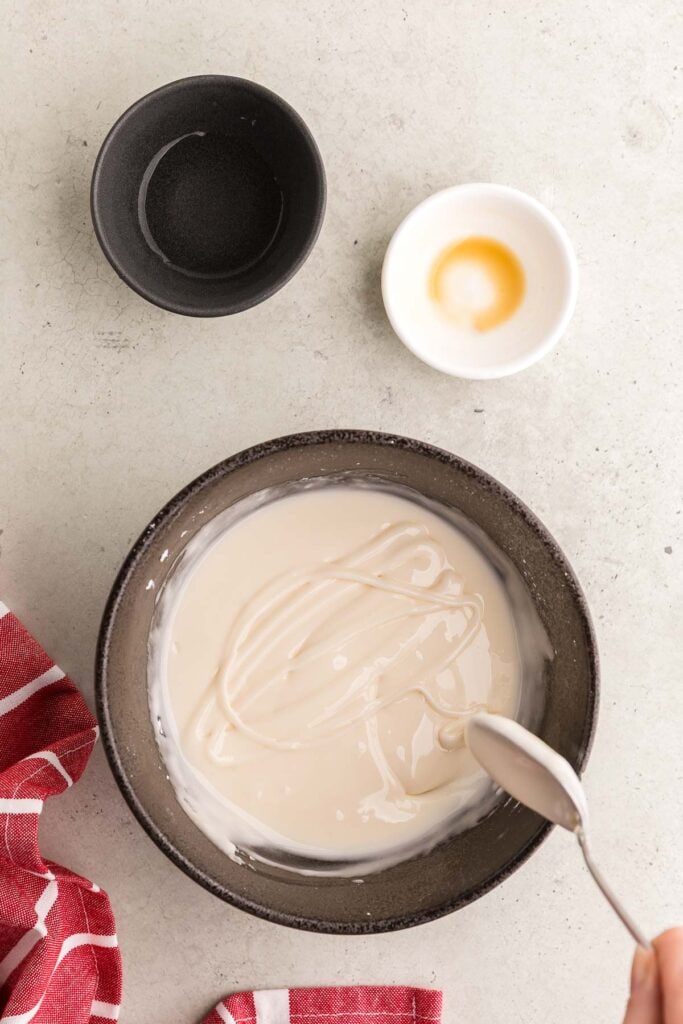
Add in about 2 tablespoons of the water and all of the vanilla extract. Mix together well with a spoon to a smooth texture. Determine if the consistency needs more water. Again, for piping and flooding you should aim for a 7-12 second consistency. Be sure to add the water a little bit at a time so you don’t end up with too thin an icing.
If you do add too much water, you can increase the thickness by adding a spoonful of confectioner’s sugar and stirring it in. Keep adding and stirring until you get to the desired consistency.
Once you are happy with the consistency you can add a bit of food coloring if using and mix it in. I prefer using gel food coloring as it doesn’t thin the icing down. You may want to have a few bowls of different colors depending on how you will be decorating your cookies.

Pro Tips Tricks and Substitutions
- Meringue powder can be found in hobby craft stores like Michaels or on Amazon.
- If you will be using multiple colors on the same cookies, it is good to adjust the consistency of the royal icing as a whole. Then you can divide the proper consistency icing in to different bowls to be dyed. This way all the icing is of the same consistency and will look best on the cookie.
- When filling a piping bag, I place the bag into a cup and roll the top of the bag down over the cup. Pour the icing in with the help of a spoon or rubber spatula, then remove the piping bag from the cup, give the bag a bit of a shake to encourage the icing to move towards the bottom, then twist the top of the bag and seal it closed with a bag clip as close as possible to the top of the icing. When ready to begin piping, snip the bottom of the bag with scissors. Start small, you can always snip more off if you need to.
- If you don’t have piping bags, you can use zipper top bags instead. Just remove as much air as possible from the bag before sealing shut and then snip one of the corners. The size of the piping will be determined by how large or small the snipped corner is. Start small, you can always snip more of the corner off if you need to.
- Many people feel it is good practice to add white food coloring to your icing before adding other colors. I have found adding it or not adding it doesn’t really make much of a difference for me. However, in using the non-whipped method the icing is not as white as the whipped method.
FAQs
How long does royal icing last for? On a cookie, it will stay fresh as long as the cookie stays fresh. If you have leftover icing you can store it in a plastic zipper top bag on the counter or in the fridge for up to 2 weeks. It also freezes well in a zipper top bag for about 3 months. Just let it thaw overnight in the fridge and then let it come to room temperature before using it.
Why is my icing flowing down the sides of my cookies? Sounds like the consistency of the royal icing is too thin. You need to add more icing sugar to it to thicken it back up.
When I pipe my icing, the lines break and are dry looking? This means the consistency is too thick, you need to thin the icing down with a bit of water – just add a couple of drops at at time.
How long does royal icing take to dry? On average it takes about 2 hours to dry, but if you have a thicker than average layer it could take longer and vice versa for a very thin coating.
Can I freeze cookies decorated with royal icing? Yes! royal icing that has completely dried will freeze well on a cookie.

Royal Icing with Meringue Powder
Equipment
- Measuring Spoons
- Measuring Cups
- Mixing bowl
- Stand Mixer or hand mixer
- Piping Bag or zipper top bags (like a Ziploc)
Ingredients
- 2 cups confectioners sugar 226 g
- 1 ½ tablespoons meringue powder 15 g
- 3 ½ tablespoons water divided
- ½ teaspoon vanilla extract
- Food coloring optional
Instructions
Whipped Method
- In a mixing bowl combine the confectioner’s sugar and meringue powder. Add in the vanilla extract and all the water.
- Beat on medium to high speed until stiff peaks form, about 3-5 minutes. Stop once you reach stiff peaks as overbeating can begin to breakdown the icing’s structure.
- Alter the consistency of the icing to match your needs. Again if you need some of it for detailed piping you might want to remove some of the thicker icing to a piping bag before thinning out the rest. A little water goes a long way so only add small quantities at a time (like 1/8 tsp) and thoroughly mix it in with a spoon before adding more. Again, a 7-12 second consistency is good for piping and flooding cookies.
- If you will be using food coloring to dye the icing, divide the icing into as many bowls as you need different colors. Add drops of food coloring (gel food coloring is best) and mix in thoroughly with a spoon until you reach your desired color.
Add Icing to a Piping Bag
- Place the piping bag into a cup and roll the top of the bag down over the cup. Pour the icing in with the help of a spoon or rubber spatula, then remove the piping bag from the cup, give the bag a bit of a shake to encourage the icing to move towards the bottom.
- Twist the top of the bag and seal it closed with a bag clip as close as possible to the top of the icing. When ready to begin piping, snip the bottom of the bag with scissors. Start small, you can always snip more off if you need to.
Non-Whipped Method (Quick but not as versatile)
- In a bowl mix together the confectioners sugar and meringue powder.
- Add in about 2 tablespoons of the water and all of the vanilla extract. Mix together and determine if the consistency needs more water. Add about a 1/4 tsp at a time and mix thoroughly before adding more.
- A good consistency for the icing is if you bring up a spoonful from the bowl and drip it back down in lines, the lines maintain their shape for about 7-12 seconds before “melting” back in with the rest of the icing. This consistency will allow you to pipe and flood a cookie.
Notes
- Meringue powder can be found in hobby craft stores like Michaels or on Amazon.
- If you will be using multiple colors on the same cookies, it is good to adjust the consistency of the royal icing as a whole. Then you can divide the proper consistency icing in to different bowls to be dyed. This way all the icing is of the same consistency and will look best on the cookie.
- When filling a piping bag, I place the bag into a cup and roll the top of the bag down over the cup. Pour the icing in with the help of a spoon or rubber spatula, then remove the piping bag from the cup, give the bag a bit of a shake to encourage the icing to move towards the bottom, then twist the top of the bag and seal it closed with a bag clip as close as possible to the top of the icing. When ready to begin piping, snip the bottom of the bag with scissors. Start small, you can always snip more off if you need to.
- If you don’t have piping bags, you can use zipper top bags instead. Just remove as much air as possible from the bag before sealing shut and then snip one of the corners. The size of the piping will be determined by how large or small the snipped corner is. Start small, you can always snip more of the corner off if you need to.
- Many people feel it is good practice to add white food coloring to your icing before adding other colors. I have found adding it or not adding it doesn’t really make much of a difference for me. However, in using the non-whipped method the icing is not as white as the whipped method.
FAQs
How long does royal icing last for? On a cookie, it will stay fresh as long as the cookie stays fresh. If you have leftover icing you can store it in a plastic zipper top bag on the counter or in the fridge for up to 2 weeks. It also freezes well in a zipper top bag for about 3 months. Just let it thaw overnight in the fridge and then let it come to room temperature before using it. Why is my icing flowing down the sides of my cookies? Sounds like the consistency of the royal icing is too thin. You need to add more icing sugar to it to thicken it back up. When I pipe my icing, the lines break and are dry looking? This means the consistency is too thick, you need to thin the icing down with a bit of water – just add a couple of drops at at time. How long does royal icing take to dry? On average it takes about 2 hours to dry, but if you have a thicker than average layer it could take longer and vice versa for a very thin coating. Can I freeze cookies decorated with royal icing? Yes! royal icing that has completely dried will freeze well on a cookie.
Follow Me On Social Media
If You Liked This Royal Icing Recipe…
If you liked this recipe, please consider rating the recipe and leaving a comment below – I love to hear how people get on with my recipes and I truly make an effort to respond to everyone who takes the time to comment. Other recipes you might enjoy include:


I am definitely going to use this icing when I make the cookies you shared too. It looks so simple.
It really is a simple recipe and it works like a charm. Good luck with your baking and decorating.
I haven’t used royal icing much. Thank you for the wonderful directions and different methods explained. Looking forward to trying this over the holidays with my kids!
Royal icing is so versatile. You and your kids will have fun with it over the holidays I’m sure.