
The warm scent of vanilla and butter filling the house – a sure sign that Christmas sugar cookies are baking. Soft, sweet, and perfectly golden, these cookies are a holiday classic at our house and are perfect for gift giving. Who doesn’t enjoy rolling out festive shapes, piping on royal icing, and playing with sprinkles? These cookies bring a little sparkle and joy to every celebration or cookie gift box.
Although I love eating Christmas sugar cookies, I love making them with family and friends even more. Rolling out the dough and cutting festive shapes is always fun. If your kids are like mine, decorating with icing and sprinkles is the best part. Take a deep breath and don’t worry about the mess – it’s part of the fun.
These days, it’s harder to get my kids into the kitchen, but they still enjoy eating sugar cookies. Now I focus more on decorating and making them special for guests or gifting. I’m by no means an expert decorator, but I hope this post inspires your Christmas cookie making.
If gifting homemade holiday cheer is up your alley, consider adding these Christmas Sugar Cookies to a Holiday Cookies Gift Box. My post goes over how to do this from start to finish. Other holiday cookies you might enjoy include:
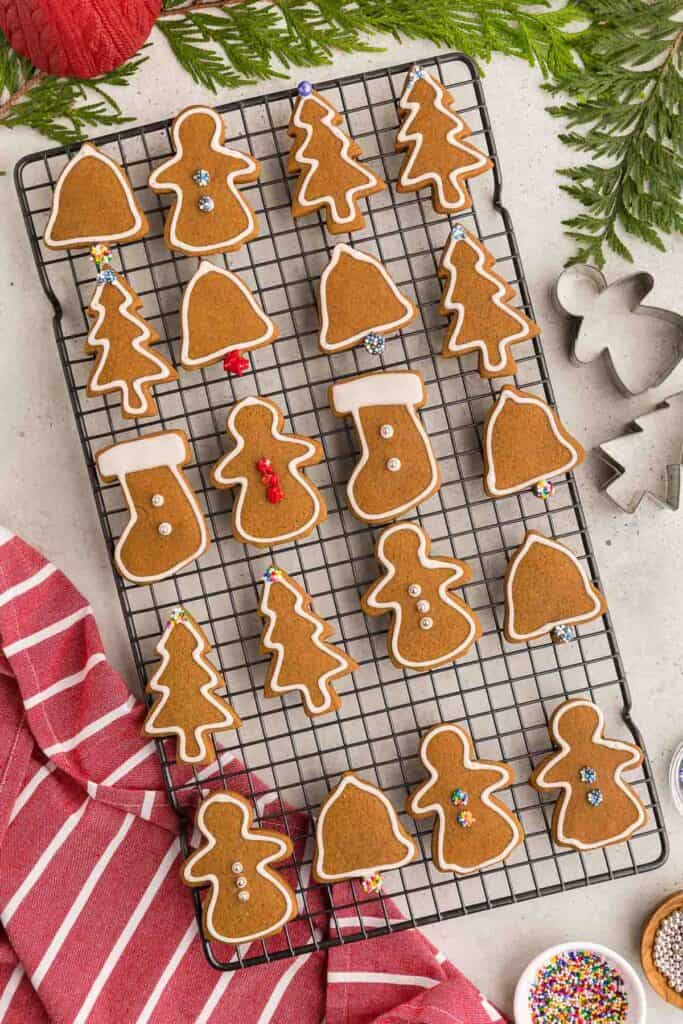
- Gingerbread Cookies
- Chocolate Peppermint Cookies
- Almond Bark
- Christmas Tree Meringues
- Almond Roca or Buttercrunch
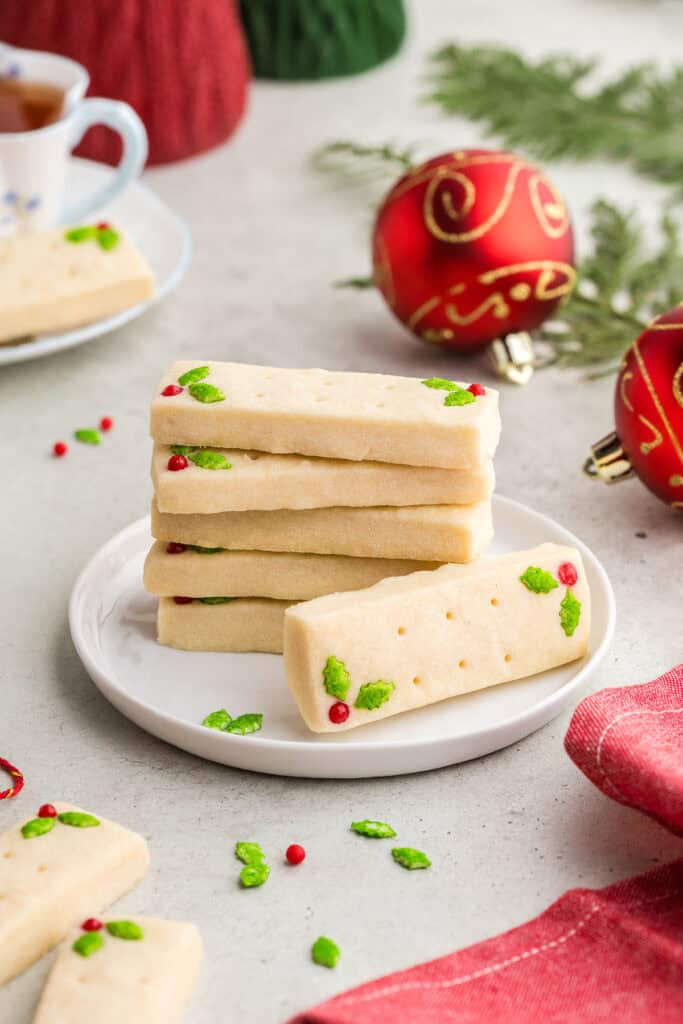
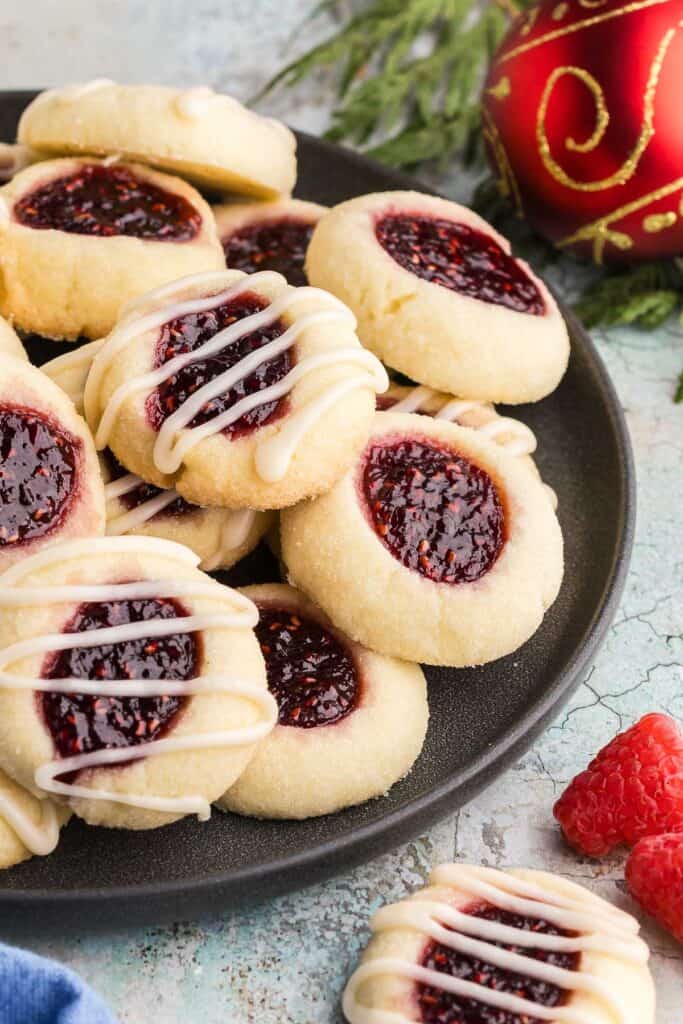
- Raspberry Thumbprint Cookies
- Shortbread Cookies
Why You Will Love Making Christmas Sugar Cookies
- Perfect for kids: Rolling, cutting, and decorating makes this a fun hands-on activity for little helpers.
- Simple ingredients: No complicated steps or fancy tools needed, just classic, cozy baking.
- Soft and buttery: These cookies bake up tender with that nostalgic homemade flavor everyone loves.
- Endless decorating options: From sprinkles to royal icing, you can make them as festive as you like.
- A holiday tradition: A classic cookie, perfect for cookie exchanges, gifting, or cozy family baking days.
- Make ahead friendly: The dough can be chilled or frozen, making holiday prep a breeze.
- Fun, yet refined: Easy to prepare, and can be made impressive enough for gifting or entertaining.
Equipment Needed
Disclosure: as an Amazon affiliate, I receive a small amount of compensation from qualifying purchases at no expense to you. This helps support my work and allows me to bring more yummy recipes your way.
This recipe uses basic baking tools, and a few optional specialty items.
- Measuring Spoons
- Measuring Cups
- Stand Mixer with mixing bowls or hand mixer with a large mixing bowl.
- Cooling Rack
- Plastic Wrap
- Rolling Pin
- Parchment Paper
- Baking Sheet
- Christmas Cookie Cutter Shapes
- Piping Bags (optional)
- Scribe tool
Ingredients
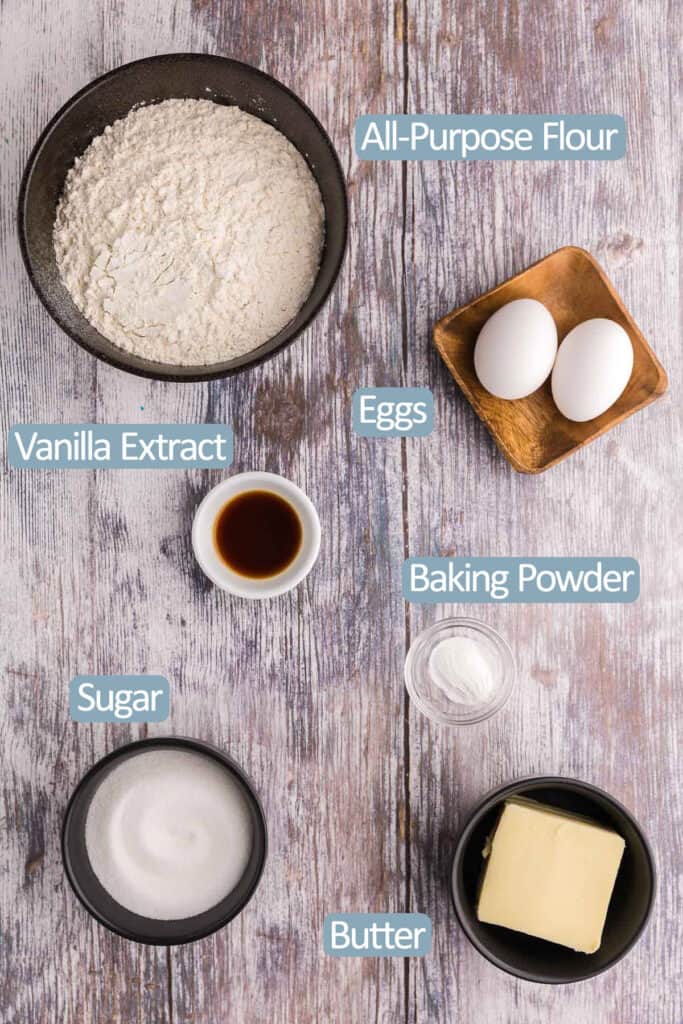
All-purpose flour – provides structure for the cookies.
Baking Powder – a leavening agent to give the cookies a little lift so they aren’t too dense.
Salted Butter (at room temperature) – keeps the cookies moist and adds the buttery flavor. It’s important to be at room temperature so that the butter and sugar can blend together properly.
Granulated Sugar – adds the sweetness we all love in sugar cookies. If decorating with a lot of icing or sprinkles, you can use less sugar in the cookie. See Pro Tips.
Eggs – adds moisture, a bit of leavening, and helps make the dough pliable for easy rolling.
Vanilla Extract – gives these sugar cookies a wonderful vanilla aroma and flavor.
Royal Icing (optional) – to be used to decorate the tops of the cookies after they have cooled. Use your favorite recipe or give mine a try.
Food coloring gel (optional) – to dye the royal icing to whatever color you would like.
Sprinkles and/or small candies (optional) – to decorate the cookies.
How to Make Christmas Sugar Cookies
Full measurements are given in the printable recipe card below.
Making Sugar Cookie Dough
In a large bowl combine together 2 1/2 cups of the all purpose flour and baking powder. Set aside.
Using a stand mixer or hand mixer, add the room temperature butter and sugar. Beat together until creamy – about two minutes.
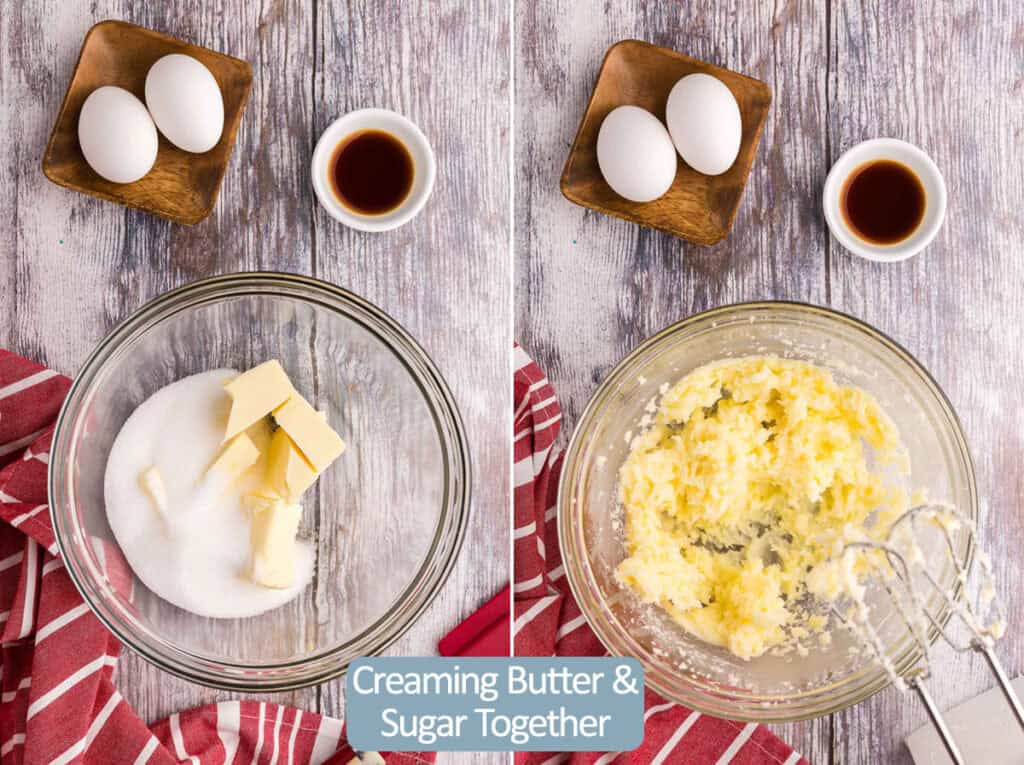
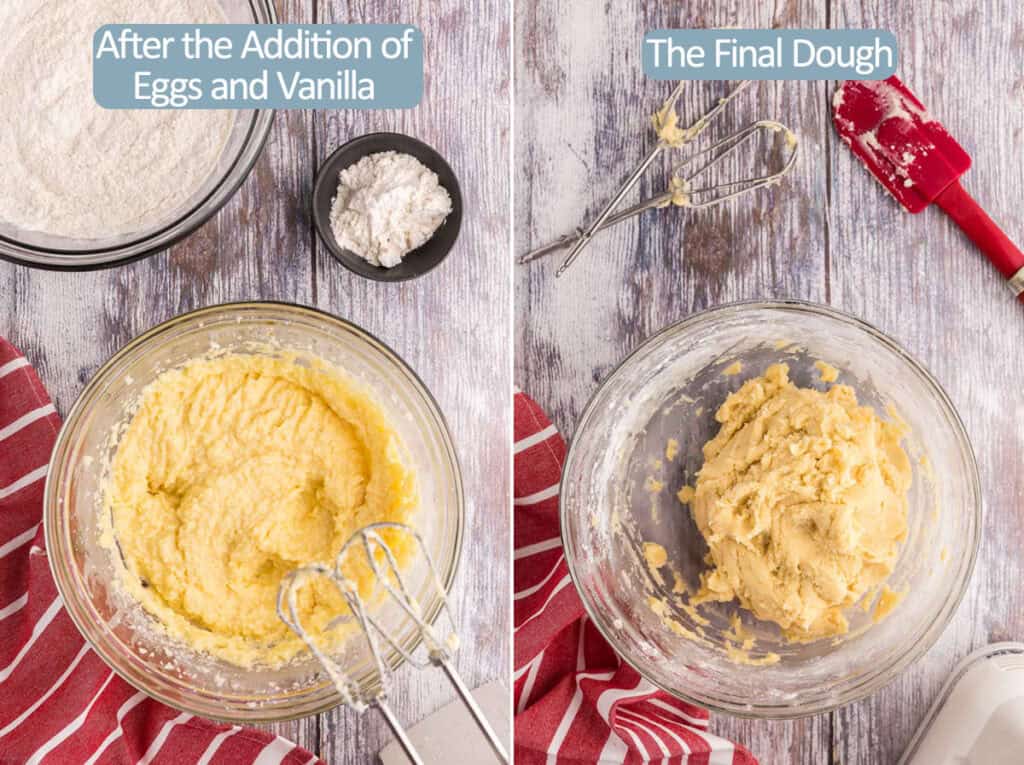
Beat in the 2 eggs and the vanilla extract for another minute to get a homogenous mixture.
Add the flour mixture to the butter mixture in three increments, incorporating the dry ingredients into the wet ingredients gently with the blender each time. If the dough is still too sticky you can add a tbsp of flour at a time until it is no longer sticky. I find I use a total of 2 3/4 cups of flour usually, but this might be different for you.
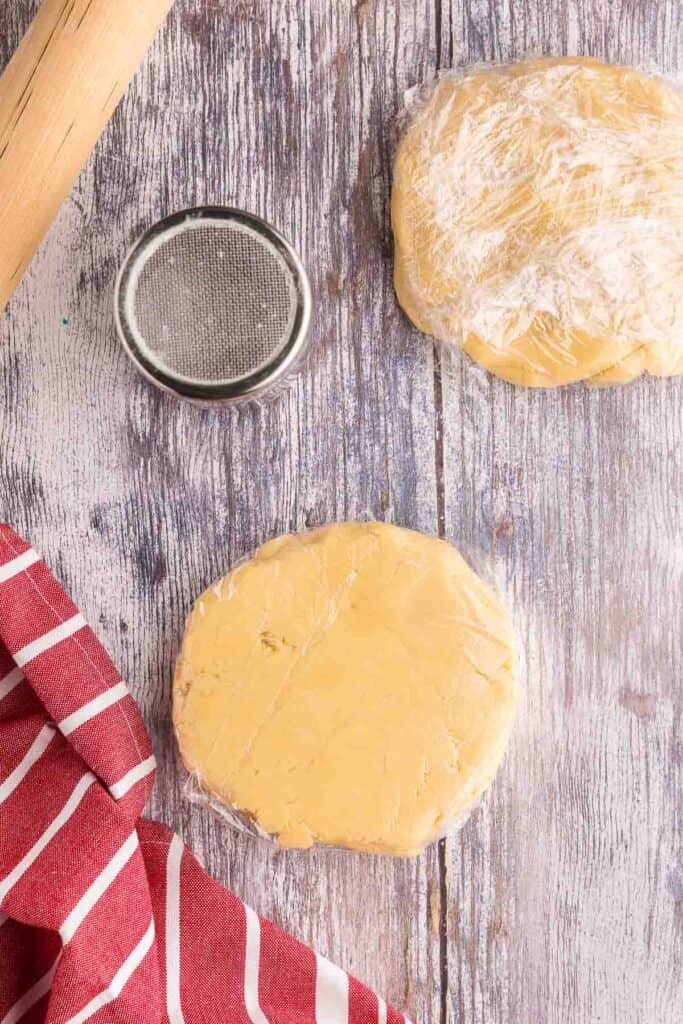
Divide the dough into two balls and then flatten each one into a disc about 2” thick. Wrap each disc with plastic wrap and place in the fridge to chill for 1 hour (or up to 3 days) (dough can also be frozen at this point). You can also speed up the chill time by placing the discs in the freezer for 30 minutes.
Cutting out the Shapes
Bring out one disc of dough from the fridge. Sprinkle your worksurface and rolling pin with a dusting of flour. Place the disc down on the floured surface. At this point, the dough is quite cold and difficult to manipulate. Begin by smacking the dough with the rolling pin (not a typical baking term I know, but you just need to bring the rolling pin down on the dough with a “smack”). I start in the middle and smack it all around. This helps to warm up the dough fairly quickly, and after about 20 smacks it will be easier to roll the dough out.
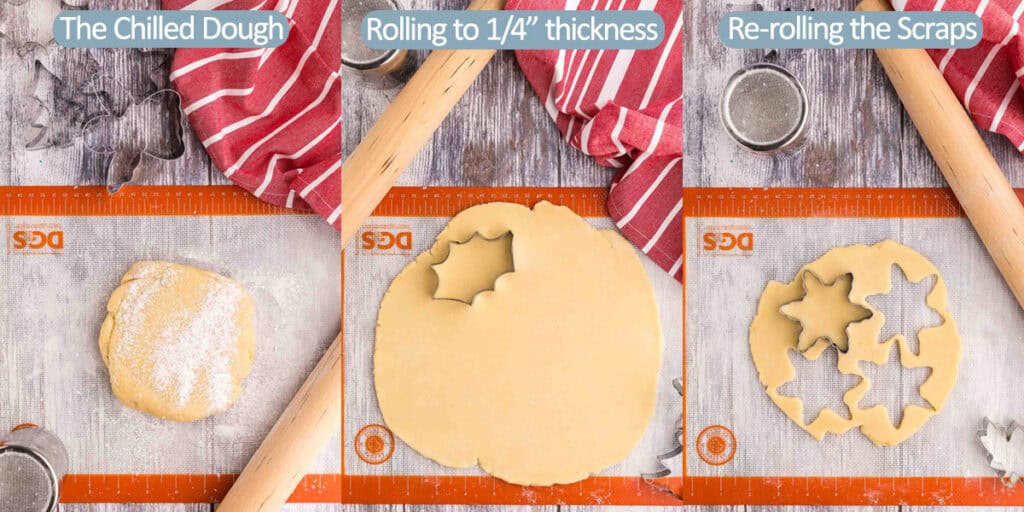
Roll the dough out to about ¼” thickness.
With cookie cutters, cut out the shapes you would like and transfer the shapes to a parchment-lined baking sheet, leaving about an inch of space between each cookie. Cover the baking sheet with plastic wrap and place back in the fridge to chill for an hour, or 30 minutes in the freezer. You can recombine the scrapes of cookie dough and roll out again to ¼” thick and cut out more shapes until all the dough is used up.
Preheat oven to 375 F.
Baking the Cut Out Sugar Cookies
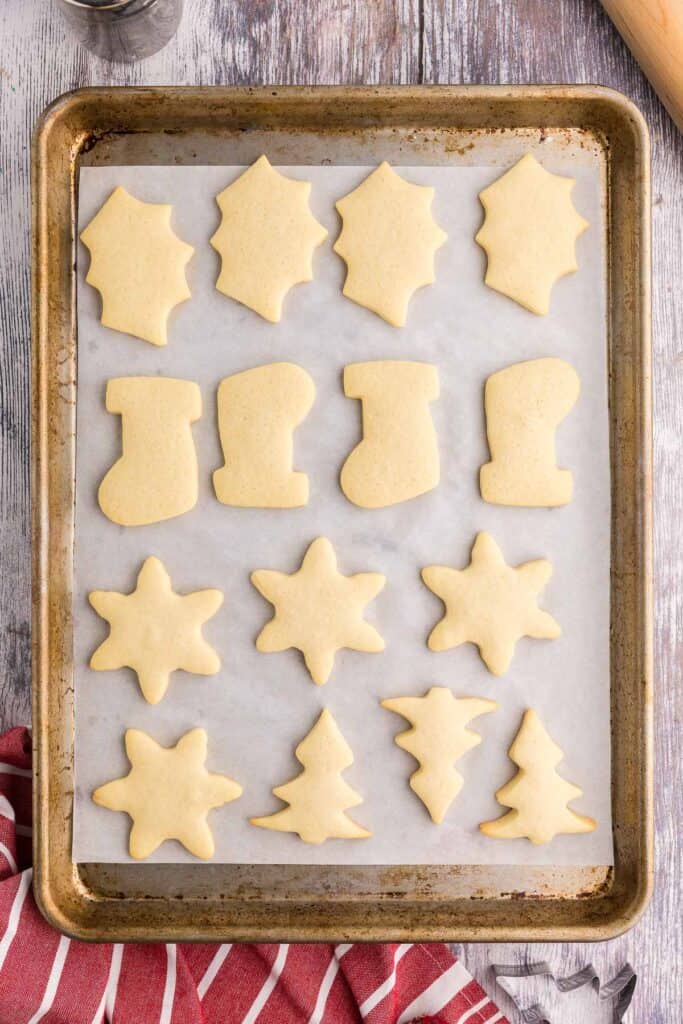
After cookies have chilled, remove the plastic wrap and place in the oven to bake for 10-12 minutes, just until the edges begin to lightly brown. Let the cookies cool for about 5 minutes on the pan and then remove them with a spatula to finish cooling on a cooling rack. See Pro Tips to learn more about browning.
Cookies can be served as is or they can be decorated as in the next step.
Decorating Christmas Sugar Cookies
What makes a sugar cookie a Christmas sugar cookie really comes down to two things. The shape of the cookie cutter and how you use icing and/or sprinkles to decorate the cookie.
The shape of the cookie cutter sets the stage for what the cookie will be about. But what you do on top of the cookie can take it from ordinary to extraordinary. Decorating can be short and sweet or you can go to town on the details to make some amazing designs. Its really up to you.
Deciding on a Design
I like to trace out my cookie shapes on a piece of paper and then start drawing ideas of how I want to decorate. It allows me to get a good idea of the final product, see what I like, what I thought I liked, and what I don’t like, without messing up a single cookie!
Once I know what I want the cookies to look like, I figure out which colors I will need (I try to keep it to a minimum), and how much of each color. Portion out the royal icing into small bowls and color accordingly with food coloring gel. You only need to add a few drops at a time, mix in completely and add more if needed. Once you are happy with the color add the colored royal icings to separate piping bags, twist the end and seal it off with a clip. No need to cut off the tip until you are ready to start piping and flooding. See Pro Tips about piping bags and alternatives.
With all the icing ready, now make sure you have the sprinkles you need. I like to put these in pinch bowls which makes it easy to take out a bit at a time to sprinkle on the cookies. You can use tweezers if you want to be precise with larger sprinkle placement.
Piping and Flooding Sugar Cookies – Basics 101
Piping
There are different techniques involved with decorating cookies. For piping the outline and flooding the middle I try to keep things simple, so I make my royal icing a consistency that can be used to both pipe and flood. A good consistency for the icing is if you bring up a spoonful from the bowl and drip it back down in lines, the lines maintain their shape for about 6-10 seconds before “melting” back in with the rest of the icing. This consistency will allow you to pipe and flood a cookie like a pro.
Piping is the technique of squeezing royal icing in a thin, steady line that holds its shape. To outline a cookie, start by holding your piping bag at about a 45 degree angle, with the tip just touching the surface. Gently squeeze the bag to begin the flow of icing. As the icing starts coming out, lift the tip slightly – about a 1/2 inch above the cookie and let the icing fall naturally onto the surface. Guide the “string” of icing along the edge of the cookie, moving your hand smoothly as the icing lays down. Avoid dragging the tip directly against the cookie; instead, allow the icing to fall into place from above. This helps create clean, even lines and prevents breaks or uneven edges. It takes a bit of practice but after a few cookies you’ll get the feel for how to move the “string” of icing around in a single fluid motion.
Flooding
After the outline has been piped on, its time to flood the cookie. Using the same icing (or slightly thinned icing if necessary), fill the space inside the piped outline with an even layer of icing. Don’t worry if there are small gaps or uneven areas at first. After flooding, use a toothpick or scribe tool with a gentle back and forth motion to spread the icing around filling in any gaps and blending it smoothly against the piped border. This helps create a clean, even surface that will dry nicely.
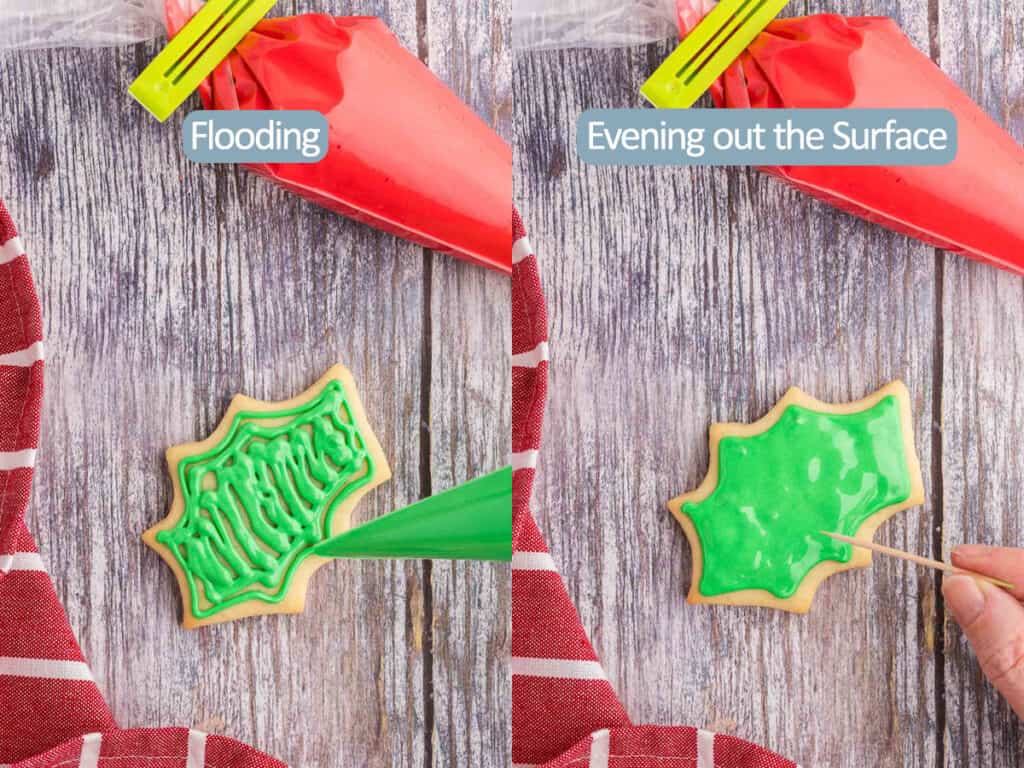
Using this piping and flooding method, you will end up with a cookie with a clean solid surface of one icing color. You can add sprinkles at this point before the icing dries if you would like. If using colored sugar to decorate, wait about 45min- 1 hour before sprinkling it on. Wet icing can cause the dye on the sugar to bleed. If the icing is a bit dry, the sugar will still stick, but there will be less chance of color bleed.
Set the cookies aside to dry. They will need at least 2 hours to harden up. But if you plan on stacking them, you might want to give them more like 4 hours or even more.
Block Flooding
Block flooding is a technique that combines outlining and flooding in stages to create clearly defined sections, even when using the same color of icing.
Start by piping the outline of one section of your cookie, then flood the inside with icing. Use a toothpick or scribe tool to spread the icing evenly, just as you would when flooding a full cookie. Allow this section to dry for at least an hour or until it is mostly set.
Now pipe the outline for the next section – using the same or a different color – and position it right up against the edge of the dried icing from the first section. Because the first section has set, the two areas won’t blend together, leaving a visible line of separation which adds dimension to the cookie. Flood the new section and use your scribe to smooth it out for a clean defined finish. If you will be doing multiple sections on one cookie you can pipe and flood mutliple sections at a time as long as they are not directly next to each other. This will save you time.
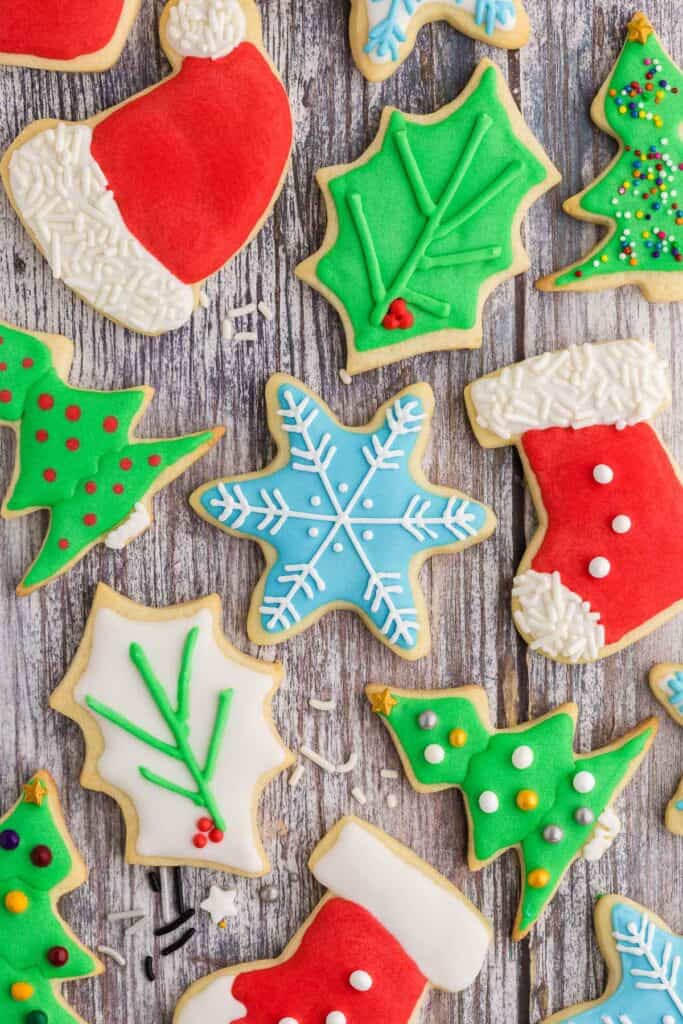
Christmas Trees
The Christmas trees I made used the block flooding method. I piped and flooded the top and bottom portion and then added sprinkles and a candy star on the top. I piped red royal icing as “balls” on a few of the cookies while the icing was still wet. As you can see the red icing melts into the green icing but keeps its shape. I left the middle portion of the Christmas trees blank until the icing in the top and bottom sections had nearly dried (about an hour).
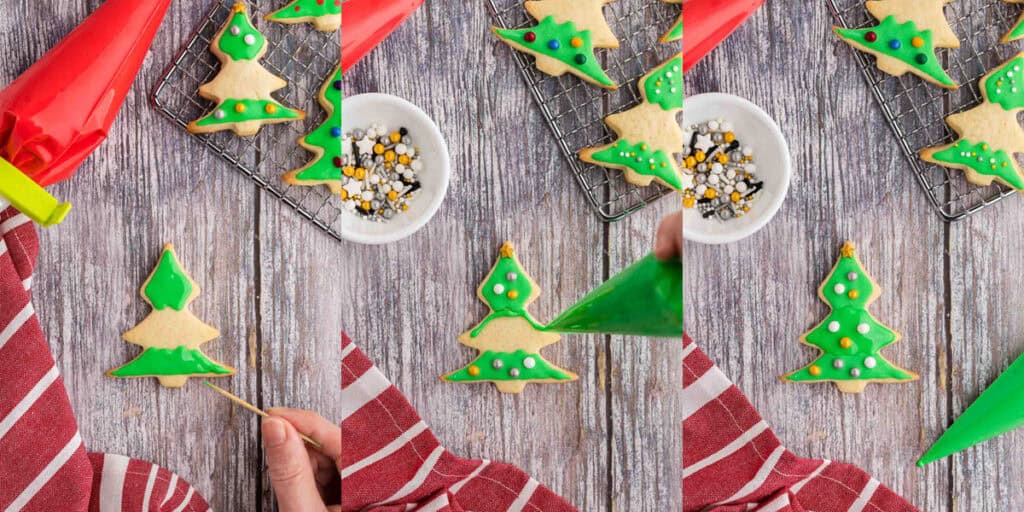
Once the top and bottom sections were fairly dry, I piped and flooded the middle section making sure to butt it right up to the dried icing so there were no gaps. I then added decorations or more red royal icing to the wet icing. Cookies were set aside to dry for two more hours.
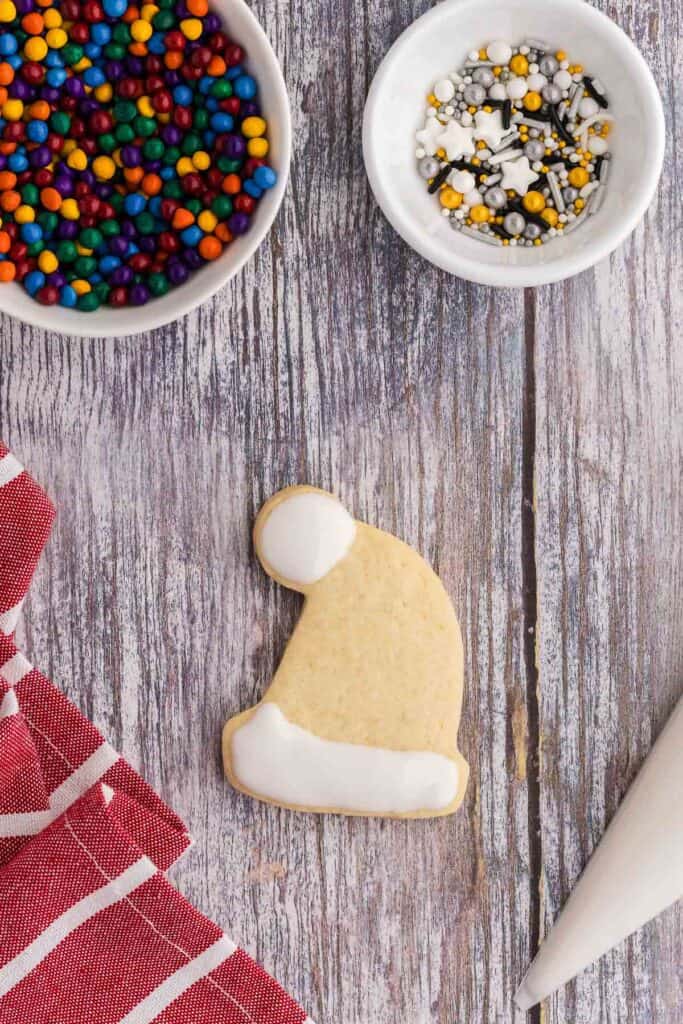
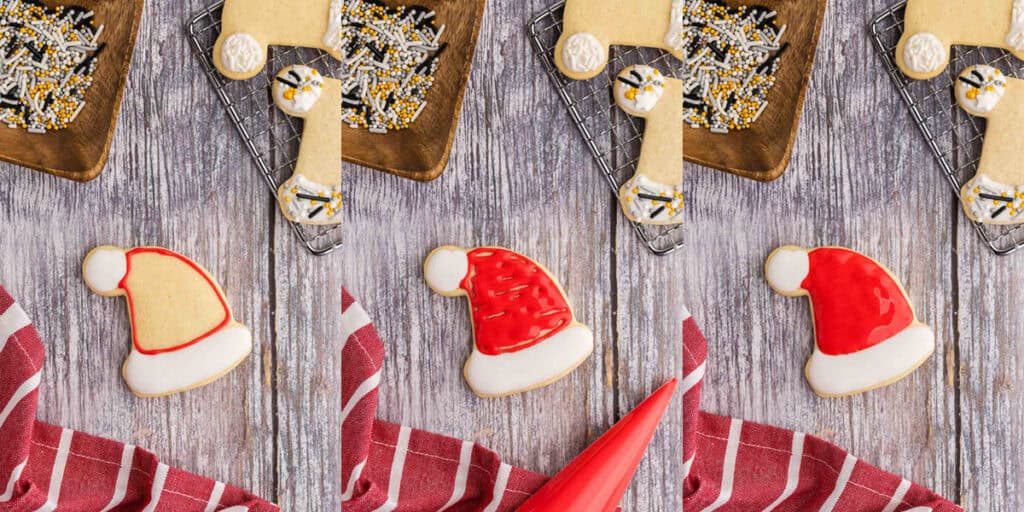
Christmas Stockings
For the Christmas stockings, pipe and flood white royal icing for the toe and top trim. For some of the stockings I made a squiggly shape at the toe, just for fun. You can leave this to dry or you can add some sprinkles to gussy it up. Set aside to dry for about an hour.
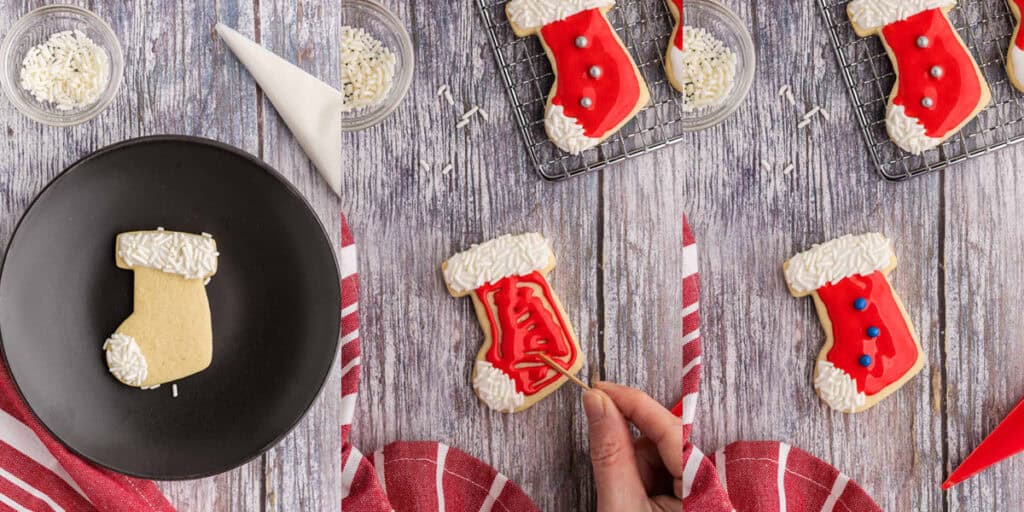
Use the red icing to pipe and flood the section between the two white sections. To some I added colored mini chocolate balls to make it look like buttons, and to others I used medium sized pearl sprinkles. And some I just left plain. Set aside to dry for about 2 hours.
Snowflakes
To make snowflakes, pipe and flood the cookie with the background color you want. Let the cookie dry for 2 hours.
Using another color (can use the same color if you want), pipe on the design overtop of the dry flooded royal icing. This is where it is helpful to draw the design on paper before you begin piping so you know exactly how to make the design. When piping a design you may need to thicken the icing you are using. You can do this by emptying the piping bag into a bowl and add some confectioner’s sugar and stirring in until you get the consistency you want.
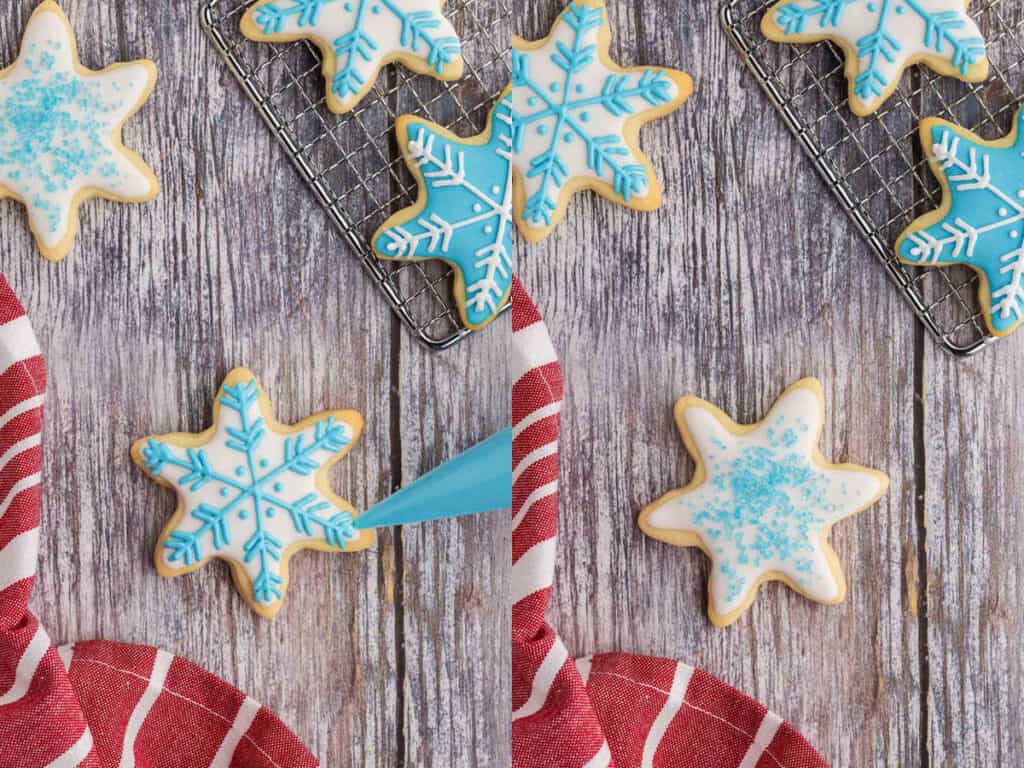
If you don’t want to pipe on a design you can also decorate the flooded cookie with colored sugar and or sprinkles.
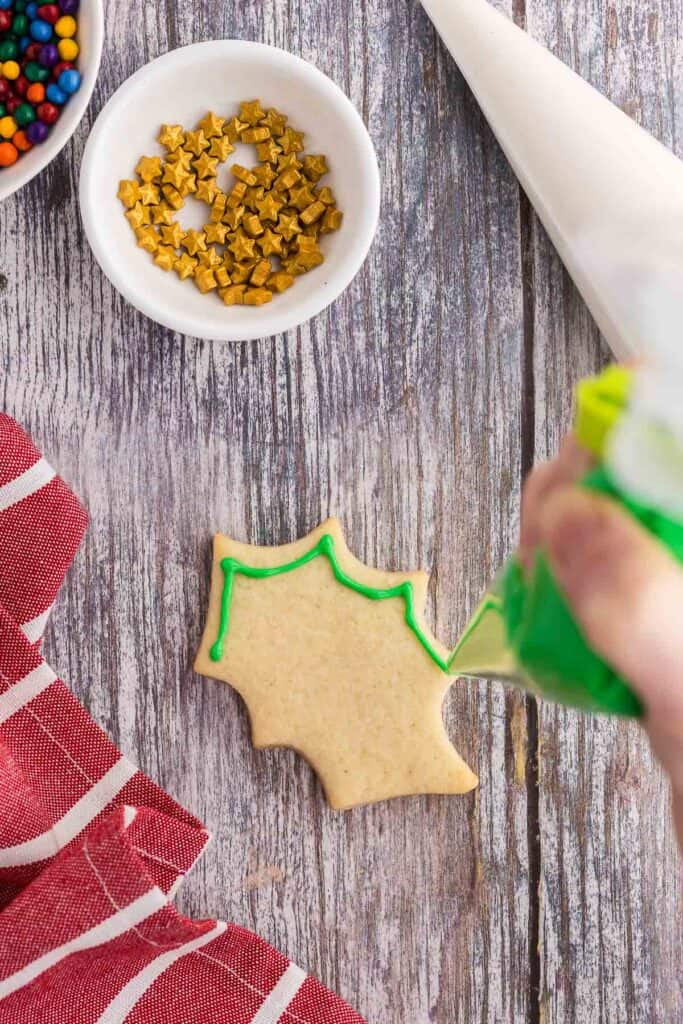
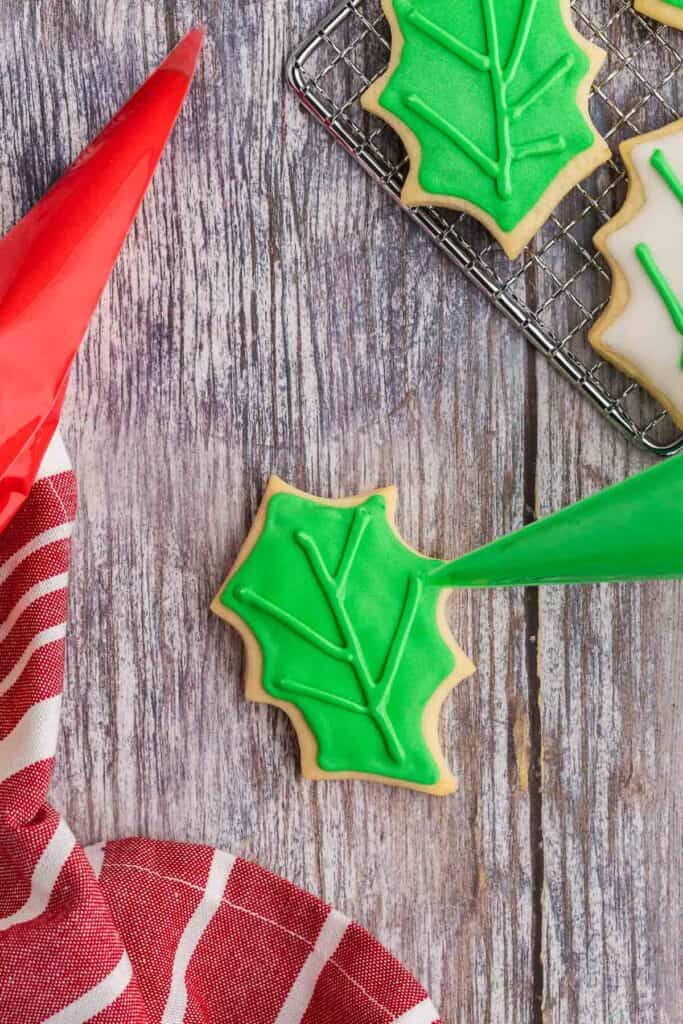
Holly Leaves
The holly leaves were decorated with the same procedure as the snowflakes above. Pipe the outline and flood the cookie to form the base color. Let the icing dry for 2 hours, then pipe the design on top of the dried icing (with a thicker royal icing if needed).
Pro Tips Tricks and Substitutions
- If you aren’t going to add an icing or sprinkles you may want to use 1 cup of granulated sugar in the cookie recipe. If you plan on decorating with icing and sprinkles then I recommend using less sugar in the cookie itself and only add 3/4 cups sugar.
- Don’t put cut out sugar cookie shapes onto a hot baking sheet. It will cause the cookies to begin to melt and spread out, and you will lose definition in their shape.
- The amount of browning on your sugar cookies will depend on a few factors. The thicker your cookie, the longer it will take to brown, so it often does not look as brown as a thinner cookie. The color of baking sheet you use will also have an effect on the browning of the bottom of the cookie. When I use a silver sheet pan, my cookies have just the slightest browning, but if I use a darker colored sheet pan I get a lot more browning.
- Make sure the cookies have completely cooled before you attempt to add icing, or the icing will melt and not hold it’s shape.
- When piping and flooding cookies, you can purchase piping bags or just use a ziploc bag, or even a reasonable sized clean plastic bag like a bread bag. You don’t need to use piping tips to pipe a straight line, but feel free to use them with your piping bag if you would like.
FAQS
About making and decorating
Do I have to pipe the outline, can’t I just flood the whole cookie? The purpose of piping the outline is to form a smooth border around the edge of the cookie. This border serves two functions: it will contain the flood icing preventing it from sliding off the edge of the cookie especially if the flooding icing is quite thin. And 2, even if the flooding icing is fairly thick and wouldn’t flow off the cookie, it would be very hard to make a uniform clean edge of icing on the cookie that would look as nice as a piped edge.
How come my sugar cookies are spreading? To prevent spreading and keeping crisp edges, it helps to chill the dough before and after cutting out the shapes. If you don’t you may get a little spreading. Also if you place the cookie dough shapes on to a warm baking sheet, they will begin to spread immediately. Another possibility is you didn’t add enough flour.
My royal icing isn’t holding its shape – what’s wrong? If you’re royal icing isn’t thick enough, it won’t hold it’s shape. Just stir in more icing sugar until you get a usable consistency. Be sure to stir it in well to prevent clumps.
My royal icing won’t flow well – what’s wrong? If the icing is too thick, it won’t flow well, and it will be difficult to get it to have a smooth flat surface. Best to water it down a bit with water, you should only add a few drops at a time, a little goes a long way.
About Storing and Serving
Can I make these cookies ahead of time? Yes! You have two options. You can make the dough ahead of time and leave it in the fridge for up to five days, or you can place it in the freezer for up to three months in a zipper top bag. Thaw overnight in the fridge then continue you on with the recipe and rolling out the dough. OR you can freeze the finished cookies in a zipper top bag for up to three months in the freezer. Just make sure the icing has hardened before you stack the cookies on top of each other.
What to serve with Sugar Cookies? Nothing beats a tall glass of milk! But these also go great with tea and coffee. They can also be served alongside other Christmas cookies in a Christmas cookie spread or added to a cookie gift box.

Christmas Sugar Cookies
Ingredients
- 2 ½ – 2 ¾ cups all-purpose flour (more for dusting work surface) (320-350g)
- 1 tsp baking powder
- ¾ cup butter at room temperature (170g)
- ¾ – 1 cup granulated sugar (155-205g)
- 2 eggs
- 2 tsp vanilla extract
- Royal Icing optional
- Food Coloring optional
- Sprinkles optional
Instructions
- In a large bowl combine together 2½ cups of the all purpose flour and baking powder. Set aside.
- Using a stand mixer or hand mixer, add the room temperature butter and sugar. Beat together until creamy – about two minutes. See Notes on how much sugar to add.
- Beat in the 2 eggs and the vanilla extract for another minute to get a homogenous mixture.
- Add the flour mixture to the butter mixture in three increments, incorporating the dry ingredients into the wet ingredients gently with the blender each time. If the dough is still too sticky you can add a tbsp of flour at a time until it is no longer sticky. I find I end up using 2¾ cups of flour in total.
- Divide the dough into two balls and then flatten each one into a disc about 2” thick. Wrap each disc with plastic wrap and place in the fridge to chill for 1 hour (or up to 3 days) (dough can also be frozen at this point). You can also speed up the chill time by placing the discs in the freezer for 30 minutes.
- Bring out one disc of dough from the fridge. Sprinkle your worksurface and rolling pin with a dusting of flour. Place the disc down on the floured surface. At this point, the dough is quite cold and difficult to manipulate. Begin by smacking the dough with the rolling pin (not a typical baking term I know, but you just need to bring the rolling pin down on the dough with a “smack”). I start in the middle and smack it all around. This helps to warm up the dough fairly quickly, and after about 20 smacks it will be easier to roll the dough out.
- Roll the dough out to about ¼” thickness.
- With cookie cutters, cut out the shapes you would like and transfer the shapes to a parchment-lined baking sheet, leaving about an inch of space between each cookie. Cover the baking sheet with plastic wrap and place back in the fridge to chill for an hour, or 30 minutes in the freezer. You can recombine the scrapes of cookie dough and roll out again to ¼” thick and cut out more shapes until all the dough is used up.
- Preheat oven to 375 F.
- After cookies have chilled, remove the plastic wrap and place in the oven to bake for 10-12 minutes, just until the edges begin to lightly brown. Let the cookies cool for about 5 minutes on the pan and then remove them with a spatula to finish cooling on a cooling rack. See Pro Tips to learn more about browning.
- Cookies can be served as is or they can be decorated as outlined in detail in the blog post above.
Notes
- If you aren’t going to add an icing or sprinkles you may want to use 1 cup of granulated sugar in the cookie recipe. If you plan on decorating with icing and sprinkles then I recommend using less sugar in the cookie itself and only add 3/4 cups sugar.
- Don’t put cut out sugar cookie shapes onto a hot baking sheet. It will cause the cookies to begin to melt and spread out, and you will lose definition in their shape.
- The amount of browning on your sugar cookies will depend on a few factors. The thicker your cookie, the longer it will take to brown, so it often does not look as brown as a thinner cookie. The color of baking sheet you use will also have an effect on the browning of the bottom of the cookie. When I use a silver sheet pan, my cookies have just the slightest browning, but if I use a darker colored sheet pan I get a lot more browning.
- Make sure the cookies have completely cooled before you attempt to add icing, or the icing will melt and not hold it’s shape.
- When piping and flooding cookies, you can purchase piping bags or just use a ziploc bag, or even a reasonable sized clean plastic bag like a bread bag. You don’t need to use piping tips to pipe a straight line, but feel free to use them with your piping bag if you would like.
Follow Me On Social Media
If You Liked This Christmas Sugar Cookies Recipe…
If you liked this recipe, please consider rating the recipe and leaving a comment below – I love to hear how people get on with my recipes and I truly make an effort to respond to everyone who takes the time to comment. Other recipes you might enjoy include:
These Christmas sugar cookies came out so soft and buttery, just like the ones I grew up with. The dough was easy to roll and cut, and they held their shape perfectly. They’re definitely going on my yearly holiday baking list.
Sounds great! Glad you enjoyed them.
How perfect! Saving this recipe to make them over the holidays! Love it!
Good idea! Hope you and your family and friends enjoy them.
I love making holiday cut outs and these are so good and easy to make!
Thanks for leaving a rating and comment Tina. You are exactly right, easy and delicious!
I love a good sugar cookie recipe. This one sounds amazing. Adding it to my must bake list!
Sounds good Misty, let me know how they turn out.
These are so fun! I can’t wait to make them!
I love making Christmas sugar cookies…well any sugar cookie really. They are fun and delicious.
These Christmas sugar cookies sound so fun and festive! Soft, sweet, and perfect for decorating with all the sprinkles. I’m excited to bake and share them this holiday season!
Your friends and family will be happy if you do for sure!
I love how easy these were to roll out! I ended up decorating with sprinkles (royal icing is my arch nemesis) and they were perfect. Looking forward to making them again closer to Christmas!
Sugar cookies are excellent year round for any occasion! Check out my royal icing recipe if you want one that’s not too hard, I have two ways of making it that might work well for you. But sprinkles are a great option too.
Wow, I loved how simple these were to bake. And the icing recipe was easy to work with, I have had some recipes in the past where the lines did not come out quite right, and this recipe was perfect. It will definitely be my go to! Thanks for the great baking recipes.
Hi Eva, glad you you enjoyed this recipe. It has been my go to for years.