
Rich chocolate and cool peppermint make these cookies a must-bake for the holiday season. Each bite delivers fudgy chocolate goodness with a refreshing hint of mint, finished with a sprinkle of crushed candy canes for a touch of Christmas sparkle. Perfect for cookie exchanges, gifting, or simply enjoying with a mug of hot cocoa, these Chocolate Peppermint Cookies capture the spirit of the season in every bite.

Honestly, these cookies are delicious enough to enjoy any time of year – the only challenge is finding candy canes in July. But you can easily swap in round peppermints, which are available year-round, or add a touch of peppermint extract to the melted white chocolate to make up for the missing minty flavor.
If gifting homemade holiday cheer is up your alley, consider adding these Chocolate Peppermint Cookies to a Holiday Cookies Gift Box. My post goes over how to do this from start to finish. Other holiday cookies you might enjoy include:
- Christmas Sugar Cookies
- Gingerbread Cookies
- Almond Bark
- Christmas Tree Meringues
- Almond Roca or Buttercrunch
- Raspberry Thumbprint Cookies
- Shortbread Cookies
Why You Will Love These Chocolate Peppermint Cookies
- Rich and Fudgy Texture – soft in the center with just the right amount of chew.
- Perfect Holiday Flavor – the blend of chocolate and peppermint instantly feels like Christmas.
- Beautifully Festive – a dipping of white chocolate and a sprinkling of crushed candy canes make them sparkle on any cookie tray.
- Easy to Make – no complicated steps or chilling required, so you can bake and enjoy them quickly.
- Great For Gifting – they look impressive and travel well for cookie swaps or holiday boxes.
- Customizable – adjust the mint flavor or swap candy canes for peppermints if making them outside the holidays.
- Crowd-pleasing – chocolate lovers and mint fans alike will be reaching for seconds.
Equipment Needed
Disclosure: as an Amazon affiliate, I receive a small amount of compensation from qualifying purchases at no expense to you. This helps support my work and allows me to bring more yummy recipes your way.
This recipe uses the following baking tools, and a few standard kitchen items not listed.
- Measuring Spoons
- Measuring Cups
- Stand Mixer with mixing bowls or hand mixer with a large mixing bowl.
- Cooling Rack
- Parchment Paper
- Baking Sheet
- Pyrex Measuring Cup
Ingredients
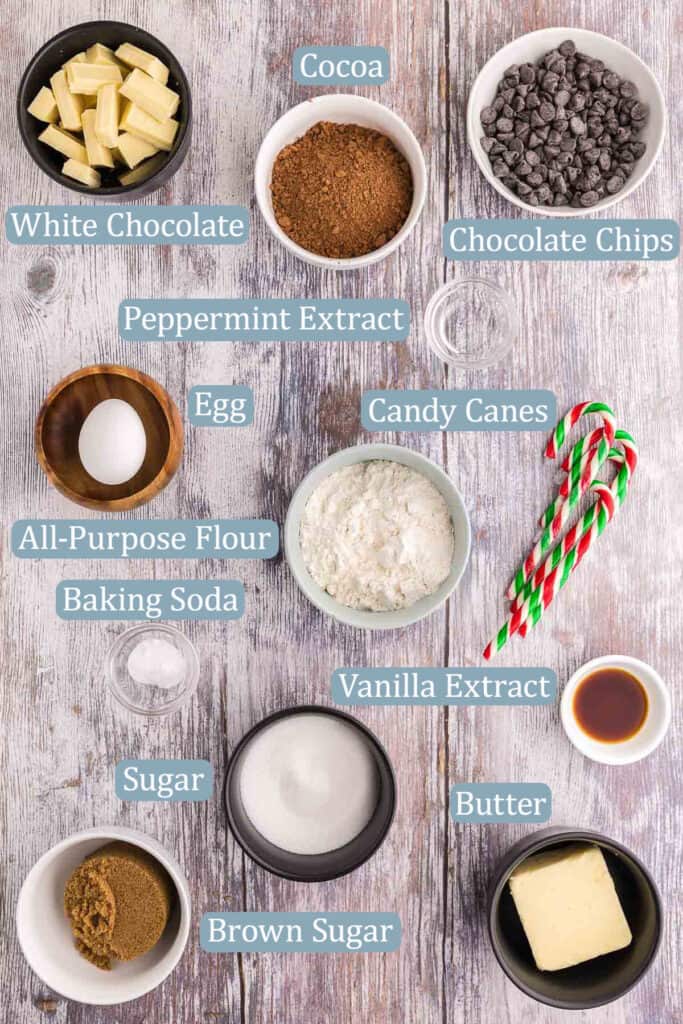
- Salted Butter – Adds moisture to the cookies and buttery flavor. Room temperature is important so that the butter and sugar can properly combine together.
- Brown Sugar – adds sweetness and a little more depth in flavor.
- Granulated White Sugar – adds sweetness.
- Egg – helps to provide moisture, structure, and little bit of leavening to the cookies.
- Vanilla Extract – enhances the chocolate flavor.
- Peppermint Extract – gives the cookies that nice peppermint flavor. A little goes a long way.
- All-Purpose Flour – provides structure for the cookies
- Natural Cocoa Powder – brings the chocolate flavor and it’s acidity helps to activate the baking soda.
- Baking Soda – the main leavening agent in the recipe to give the dough a little lift.
- Chocolate Chips – I used semi-sweet, but you could use white chocolate for more contrast and visual appeal.
- White Chocolate – For dipping in after the cookies are baked (optional)
- Crushed Candy Canes – For sprinkling on top (optional)
How To Make Chocolate Peppermint Cookies
Making the Cookie Dough
Preheat oven to 350F.
In a mixing bowl combine the flour, cocoa powder, and baking soda. Set the bowl aside.
In the bowl of a stand mixer or hand held mixer beat the butter with the brown and white sugar for at least 2 minutes. The mixture should be creamy. Use a rubber spatula to clean the edges of the bowl as necessary.
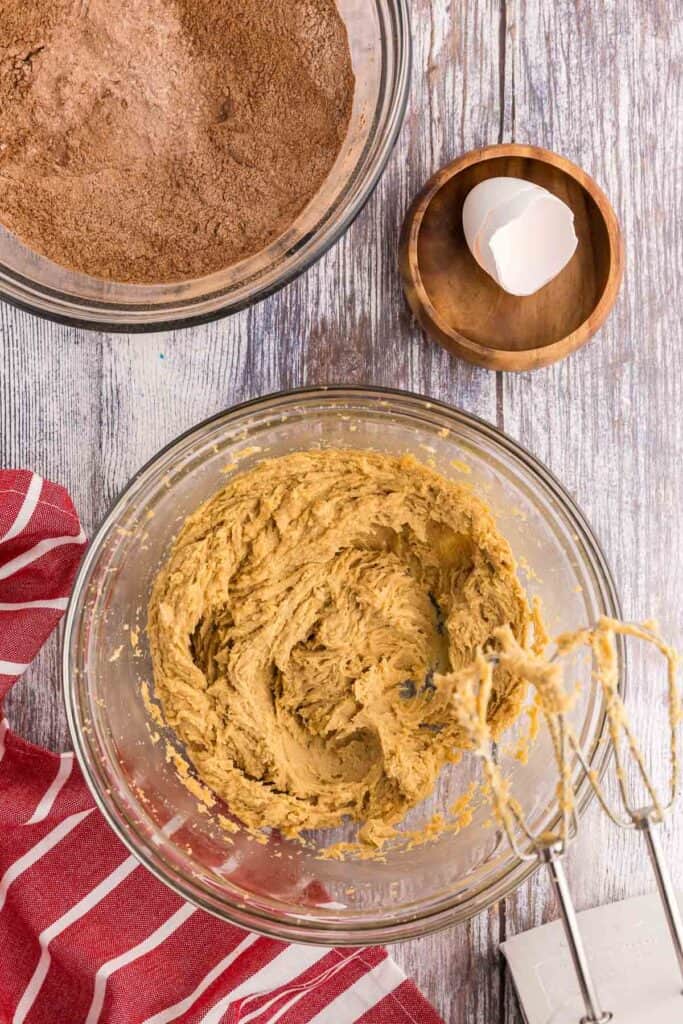
Add in the egg, vanilla extract and peppermint extract. Beat to combine for about a minute, it should almost be fluffy.
Add in half of the dry ingredients and beat to combine. Add in the other half of the dry ingredients and again beat to combine. Things can get a little dusty, so keep the mixer on a lower speed or use a spoon to get things started. The dough will be very thick – this is perfect
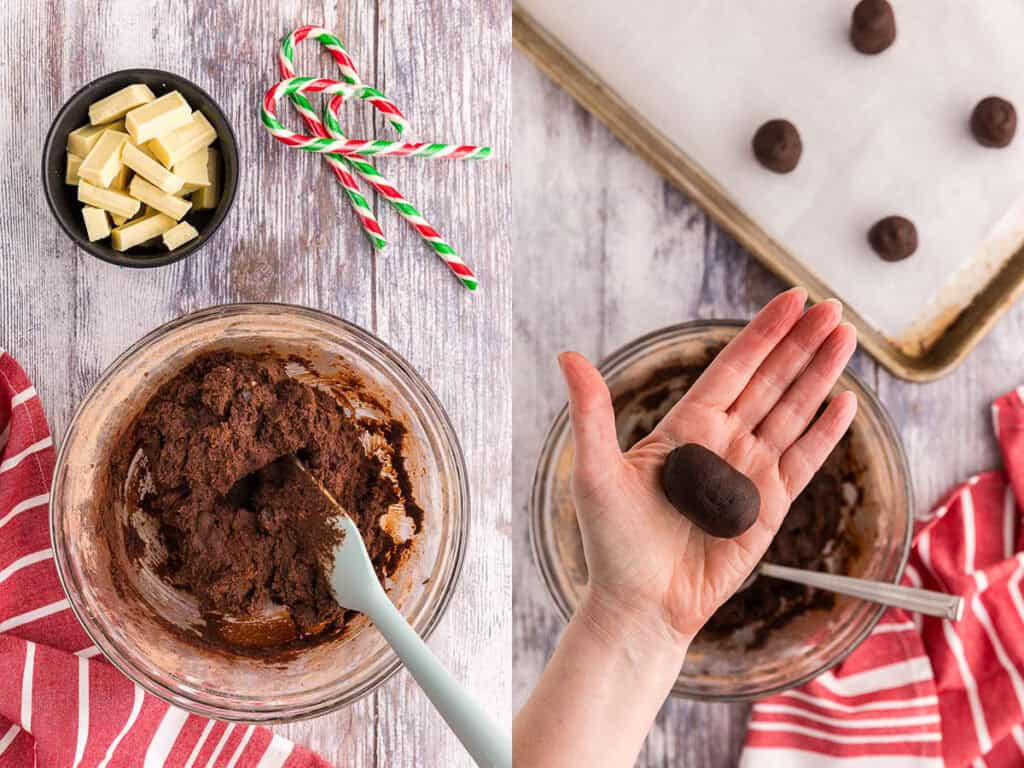
Add in the chocolate chips of your choice and stir through with a spoon. No need to chill this dough to prevent spreading (saving time during the holidays is always welcome at my house).
Take about 1.5 tablespoons of dough (about 30g) and roll it in your hands to form a column shape – sort of like a ball but it is slightly taller than it is wide. See Pro Tips and Tricks. Place the columns on a parchment lined baking sheet about 2 inches apart.
Baking the Cookies
Bake for 12-14 minutes. The surface will look a little cracked and more matte than shiny.

If you don’t want to dip in white chocolate then you need to sprinkle the warm cookies with crushed candy cane immediately in order for them to stick.
Allow the cookies to cool on the pan for about 5 minutes and then remove to a cooling rack to finish cooling completely. Cookies must be completely cooled before dipping in the white chocolate.
Dipping in Melted Chocolate
Chop the white chocolate into small chunks. Place in a microwave safe bowl. I like to use a 2 cup pyrex measuring cup. Microwave on high for 30 seconds. Give it a stir even though it will look like nothing has melted yet. Stirring will help prevent hot spots. Give it another 20 seconds in the microwave and stir. After one more 20 minute pulse in the microwave and a lot of stirring most of the chocolate should be melted. Another 10 seconds to help make it a little more fluid for dipping. Your times may need to be adjusted slightly based on the power of your microwave. See Pro Tips.
Dip cookies half way into the white chocolate then lay the cookie down on parchment paper. Immediately sprinkle with crushed candy cane. Repeat with the remaining cookies. Set aside to let the chocolate harden. The hardening process can be speeded up by placing the tray in the fridge for about an hour.

Pro Tips and Tricks and Substitutions
- Use natural cocoa powder as opposed to Dutch Processed for best results in this recipe. As baking soda is the leavening agent it needs the acidity in the natural cocoa powder to activate it.
- No need to chill the dough. When the cookies are rolled into a column it helps alleviate too much spreading, so you can save time by not chilling the dough.
- I used semi-sweet chocolate chips but they could be substituted with any chocolate chips you like, white chocolate chips would give a nice color contrast to the dark cookie.
- You can use any melted chocolate you like to dip the cookie in. I used white chocolate for the color contrast, and I’m a fan of white chocolate.
- When melting chocolate in the microwave you don’t want to heat it too fast. Chocolate can seize if overheated (at surprisingly low temperatures). The cocoa butter separates from the solids turning the mixture thick, dull, and grainy instead of smooth and glossy.

FAQs
- How do I keep the white chocolate from seizing or burning? The key is to go slow. Use short bursts in the microwave followed by thorough stirring to avoid any hotspots. Once the chocolate is melted you are ready to go. If it still seems a bit thick, another 10 seconds can make it just warm enough to be more fluid.
- Can I make these cookies ahead of time? Yes, these cookies stay fresh for 4-5 days in an airtight container on the counter, or if you need to store them longer I would recommend placing them in an airtight container or zipper top bag in the freezer for up to 3 months.
- Can this dough be frozen? Yes, you could make this recipe up to and including the chocolate chips being added and then freeze the dough in a zipper top bag for up to 3 months. When ready to use defrost the dough in the fridge overnight.
- How do I crush the candy canes? I used a knife to chop the candy canes on a cutting board, but you could also place them in a bag and gently smash them with a rolling pin. It might help to cover the bag with a kitchen cloth to help decrease the chances of the sharp candy cane edges cutting the bag open.

Chocolate Peppermint Cookies
Ingredients
Cookie Dough
- ½ cup salted butter (115g) at room temperature
- ½ cup brown sugar (110g) lightly packed
- ½ cup granulated sugar (105g)
- 1 large egg
- 1 ½ tsp vanilla extract
- 1 tsp peppermint extract
- 1 cup all-purpose flour (124g) (spoon and level)
- ⅔ cup natural cocoa powder (52g) not dutch processed
- ¾ tsp baking soda
- ¾ cup chocolate chips semi-sweet or white chocolate
For Garnish (optional)
- 6 oz White chocolate
- 3 Candy Canes
Instructions
Making The Cookie Dough
- Preheat oven to 350F.
- In a mixing bowl combine the flour, cocoa powder, and baking soda. Set the bowl aside.
- In the bowl of a stand mixer or hand held mixer beat the butter with the brown and white sugar for at least 2 minutes. The mixture should be creamy.
- Add in the egg, vanilla extract and peppermint extract. Beat to combine for about a minute, it should almost be fluffy.
- Add in half of the dry ingredients and beat to combine. Add in the other half of the dry ingredients and again beat to combine. Things can get a little dusty, so keep the mixer on a lower speed or use a spoon to get things started. The dough will be very thick – this is perfect
- Add in the chocolate chips of your choice and stir through with a spoon.
- No need to chill this dough to prevent spreading.
- Take about 1.5 tablespoons of dough (30g) and roll it in your hands to form a column – sort of like a ball but it is slightly taller than it is wide. See Notes. Place the columns on a parchment lined baking sheet about 2 inches apart.
Baking The Cookies
- Bake for 12-14 minutes. The surface will look a little cracked and more matte than shiny.
- If you don’t want to dip in white chocolate then you need to sprinkle the warm cookies with crushed candy cane immediately in order for them to stick.
- Allow the cookies to cool on the pan for about 5 minutes and then remove to a cooling rack to finish cooling completely. Cookies must be completely cooled before dipping in the white chocolate.
Dipping In Melted Chocolate
- Chop the white chocolate into small chunks. Place in a microwave safe bowl. I like to use a 2 cup pyrex measuring cup. Microwave on high for 30 seconds. Give it a stir even though it will look like nothing has melted yet. Stirring will help prevent hot spots.
- Give it another 20 seconds in the microwave and stir. After one more 20 minute pulse in the microwave and a lot of stirring most of the chocolate should be melted. Another 10 seconds in the microwave to help make it a little more fluid for dipping. See Notes. Your times may need to be adjust depending on the power of your microwave.
- Dip cookies halfway into the white chocolate then lay the cookie down on parchment paper. Immediately sprinkle with crushed candy cane. Repeat with the remaining cookies. Set aside to let the chocolate harden. The hardening process can be speeded up by placing the tray in the fridge for about an hour.
Notes
- Use natural cocoa powder as opposed to Dutch Processed for best results in this recipe. As baking soda is the leavening agent it needs the acidic natural cocoa powder to activate it.
- No need to chill the dough. When the cookies are rolled into a column it helps alleviate too much spreading, so you can save time by not chilling the dough.
- I used semi-sweet chocolate chips but they could be substituted with any chocolate chips you like, white chocolate chips would give a nice color contrast to the dark cookie.
- You can use any melted chocolate you like to dip the cookie in. I used white chocolate for the color contrast, and I’m a fan of white chocolate.
- When melting chocolate in the microwave you don’t want to heat it too fast. Chocolate can seize if overheated (at surprisingly low temperatures). The cocoa butter separates from the solids turning the mixture thick, dull, and grainy instead of smooth and glossy.
Follow Me On Social Media
If You Liked This Chocolate Peppermint Cookies Recipe…
If you liked this recipe, please consider rating the recipe and leaving a comment below – I love to hear how people get on with my recipes and I truly make an effort to respond to everyone who takes the time to comment. Other recipes you might enjoy include:


These cookies are beautiful and festive! I love the white chocolate with the chocolate cookie. Saving this to make over the holidays! Thanks for the great recipe!
Enjoy them over the holidays. Let me know how they turn out.
I start craving chocolate and peppermint together this time of the year so I knew I needed to try these cookies! Love the combo of the vanilla and peppermint extract in the cookie dough – perfectly balanced flavor!
Glad you loved the flavor! My son thinks they are the best!
I’m saving this recipe for the holidays. I can’t wait to try it.
Let me know how they turn out for you. Good luck with your Christmas baking.
The chocolate and peppermint is a match made in heaven! Yum!!
My son totally agrees with you. They are his favorite!
Omg perfect cookies to make for the holidays, I’m planning to make them over the weekend, thanks for sharing this wonderful recipe!
Your welcome. I hope you enjoy them as much as my family does.
I love the crunch of the candy cane with the richness of the soft cookies. Definitely be making these for my holiday box.
Your friends and family will be so happy that you did! Good luck with your Christmas baking.
I can’t wait to make these! They are on my list! Thank you!
Let me know how they turn out! Enjoy.
I made these to freeze the dough for closer to the holidays, but I wanted to bake 1 to test it in my oven. My little guy loved them so much he begged me to bake them. So I will need to whip up another batch for my freezer! So good, thank you!
Glad your little guy approved!
These Chocolate Peppermint Cookies sound absolutely perfect for the holidays! The crushed candy canes add the ideal Christmas sparkle!
Yes I agree! Nothing says Christmas like peppermint.