
I think my mom’s favorite Christmas candy would have to be Almond Roca. It would always make an appearance at our house around the holidays, and I remember finding a tin of them stashed in the closet one time. Yes, this is when I learned that parents don’t always share everything! But I can’t blame her, they’re just that delicious! These days, I make my own, and you can too with this easy recipe that tastes identical to the original. Buttery toffee, melted chocolate, and crunchy almonds, a homemade candy that’s perfect for holiday gifting or snacking on in your closet.

Almond Roca is also sometimes called buttercrunch – not to be mixed up with a lettuce variety of the same name (people probably don’t mix it up often). I think the main difference is the shape (talking about the candy not the lettuce 😜). The Almond Roca brand sells its candy as small logs, like the ones I show in this post, while buttercrunch is typically served in chunks or shards broken from a thin slab. You can use this recipe to make either version — the neat little logs or rustic shards.
If gifting homemade holiday cheer is up your alley, consider adding this Almond Roca to a Holiday Cookies Gift Box. My post goes over how to do this from start to finish. Other holiday cookies you might enjoy include:
- Christmas Sugar Cookies
- Gingerbread Cookies
- Almond Bark
- Christmas Tree Meringues
- Chocolate Peppermint Cookies
- Raspberry Thumbprint Cookies
- Shortbread Cookies
Why You Will Love This Almond Roca Recipe
- Simple Ingredients: You only need a handful of pantry staples like butter, sugar, chocolate, and almonds.
- Perfect Texture: Crisp, buttery toffee with a smooth layer of chocolate and a satisfying almond crunch.
- Better than store-bought: Homemade Almond Roca has a fresher flavor and rich buttery taste. Hey homemade is always better!
- Great for gifting: Wrap pieces in cellophane or pack in tins for an easy, homemade holiday gift.
- Keeps well: This candy stores beautifully for weeks, making it deal for advance holiday prep.
- Customizable: Use different nuts, a sprinkle of sea salt, or a different chocolate for your own twist.
- Naturally Gluten Free.

Equipment Needed
Disclosure: as an Amazon affiliate, I receive a small amount of compensation from qualifying purchases at no expense to you. This helps support my work and allows me to bring more yummy recipes your way.
This recipe uses the following baking tools, and a few standard kitchen items not listed.
- Measuring Cups
- Good Quality 2 Qt Heavy Saucepan
- Candy Thermometer
- Parchment Paper
- Baking Sheet
- Pyrex Measuring Cup
- Rod shaped Silicone Molds (usually used for making ice cubes)
Ingredients
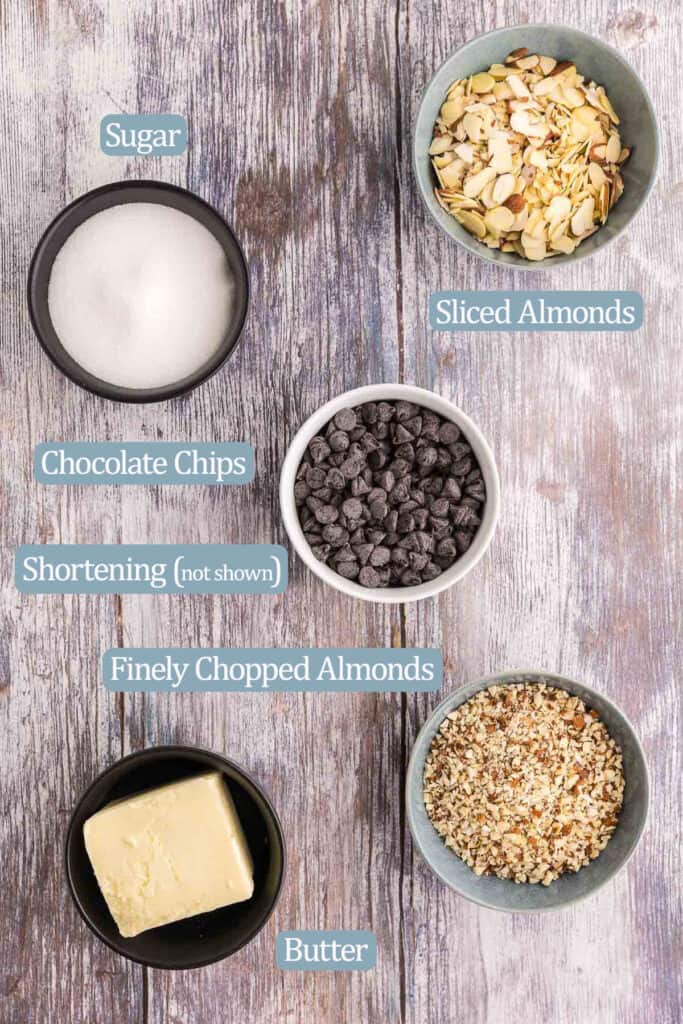
Salted Butter – One of two ingredients used to make the toffee – it is a must. I use salted butter because the salt acts as a stabilizer helping to prevent the butter and sugar from separating.
Granulated White Sugar – The other must have ingredient to make the butter toffee.
Sliced Almonds – Added to the hot toffee to give a nutty bite. Could be replaced with any nut of your choice.
Chocolate Chips – Melted to form a layer of chocolate around the toffee. Could use your favorite solid chocolate bar too. I like a dark or semi-sweet chocolate, but milk or white could be used too.
Finely Chopped Almonds – Used for the final coating on top of the melted chocolate.
How to Make Your Own Almond Roca
Making the Toffee
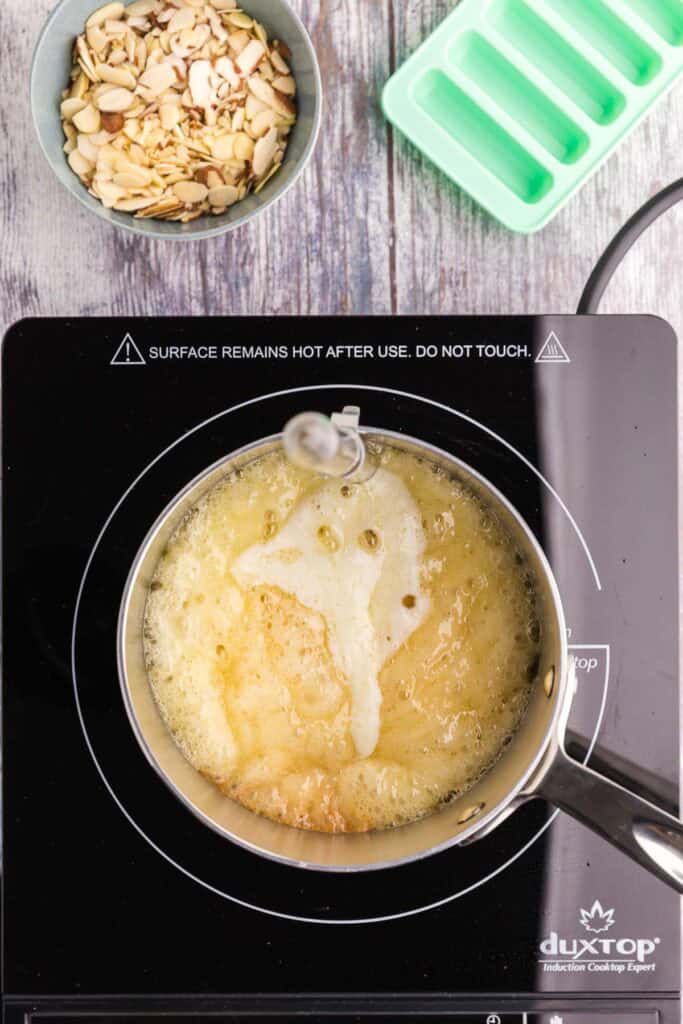
In a heavy bottom saucepan heat the butter and sugar over medium/low heat with occasional stirring.
Once the butter is melted and the sugar is fully dissolved, increase the heat to medium. It’s ok to stir occasionally to help distribute the heat.
Once the mixture comes to a gentle boil, place a candy thermometer in the pot and let the mixture gently boil away. You want to stir the candy mixture as little as possible at this point so as not to encourage the sugar to crystallize and form a grainy texture. If it’s boiling gently it will be fine…resist the temptation.
Keep an eye on the thermometer. Bring the butter-sugar mixture to the “hard crack stage” (about 10-12 minutes) which is 310F. This temperature assumes you are at sea level. See Pro Tips for details on how to adjust for different altitudes. Your sugar-butter mixture will turn from a light yellow color to a brown toffee color as it gets closer to the end point.
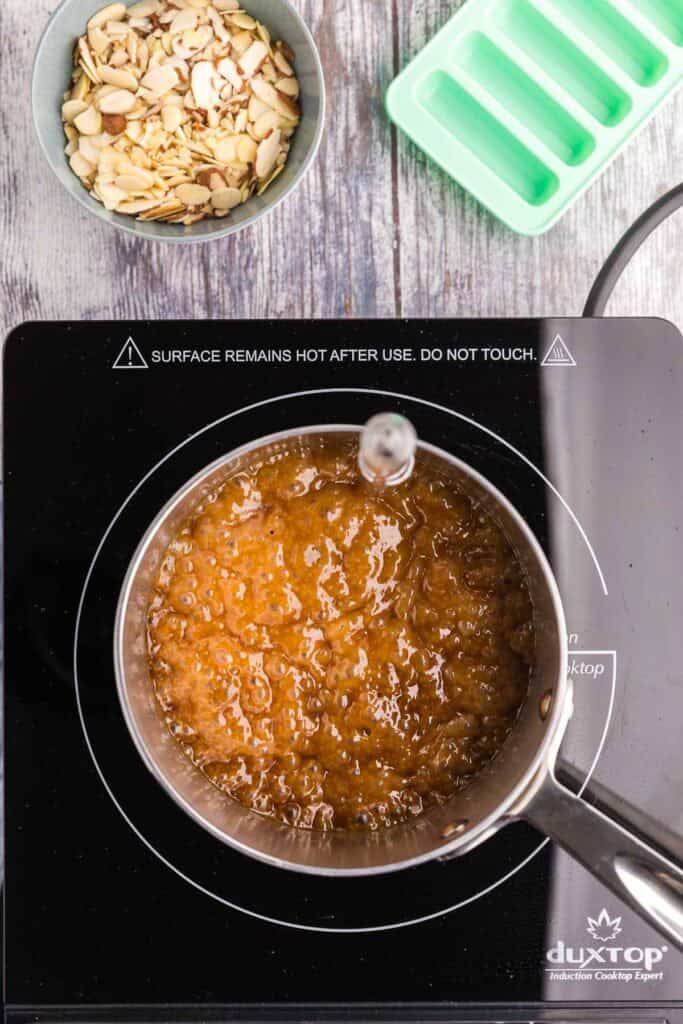
Once at 310F remove the pan from the heat. Be careful the mixture is very hot!!! Stir in the sliced almonds and allow it cool off the heat for a couple of minutes.
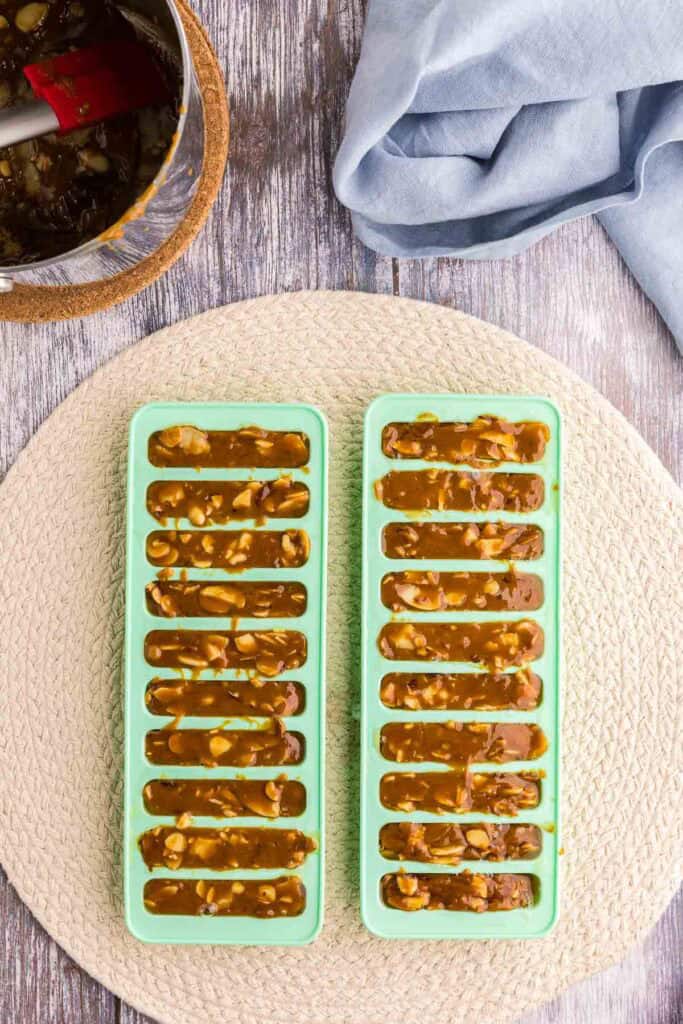
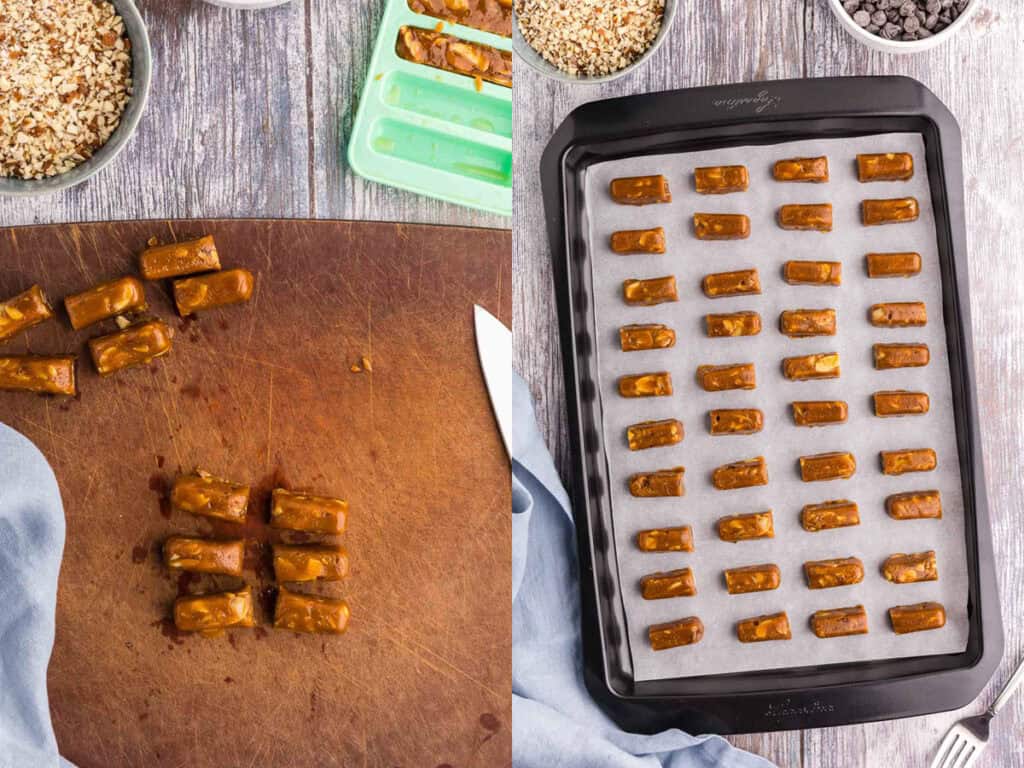
Pour into silicone molds. Again, be careful not to touch the toffee as it is VERY hot!. Use a rubber spatula to help push the toffee into the molds as cleanly as possible. Then set the molds aside to cool.
Assembling the Almond Roca
Once the toffee has cooled for about 20 minutes, it should be firm but still soft enough to cut without shattering. Remove the toffee from the molds and cut into logs. If the toffee has lots of excess butter you can use a paper towel to dab the excess. I cut my logs in half so they were about 1.5 inches long. See Pro Tips about cutting and lengths.
Place the logs on parchment paper and allow them to fully cool, about 30 more minutes.
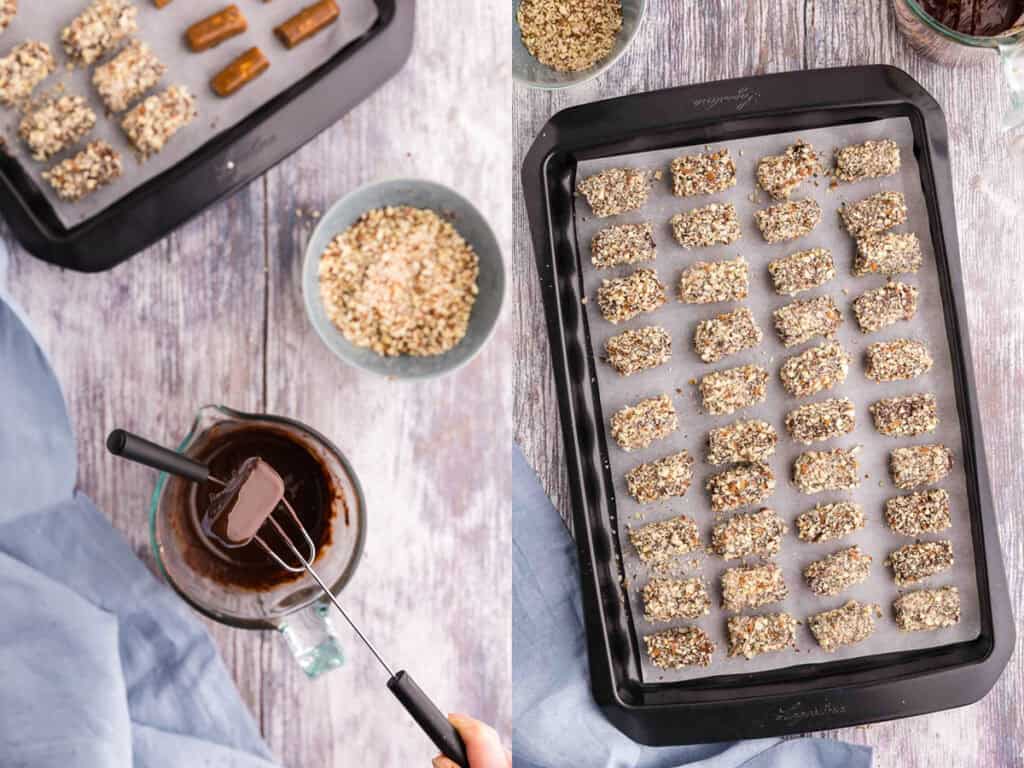
Once toffee is fully cool, cut up your chocolate into small chunks, and place in a microwave safe bowl or cup along with the shortening. I like to use a 2 cup pyrex measuring cup.
Place in the microwave for 30 seconds. Give the chocolate a good stir, even though it probably doesn’t look like anything melted. Heat in microwave for another 30 second burst and stir again. Finally another 20 second burst followed by a good stir. If more heat is needed give it 10 second bursts with stirring after until you have a fluid chocolate mixture.
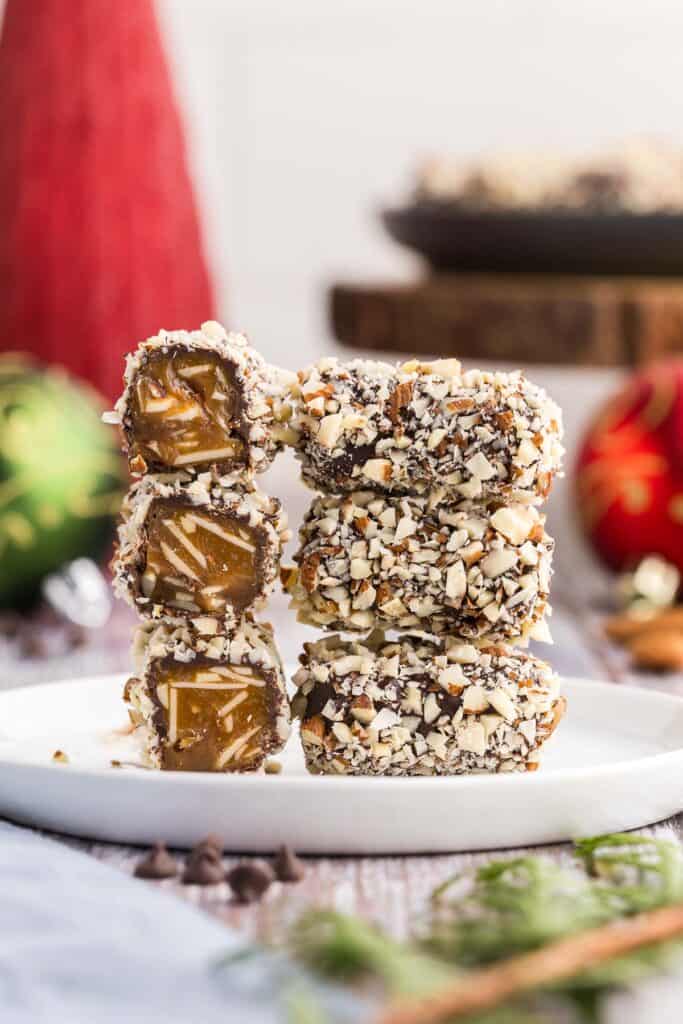
Lower one toffee piece into the chocolate and completely enrobe it. Remove with a fork and shake off excess chocolate. Place the chocolate covered toffee into a bowl with the finely chopped almonds. Completely cover with the almonds by rolling it around and then place it onto a parchment paper-lined baking pan to completely set. Repeat with the rest of the toffees.
Place the baking pan in the fridge to help the chocolate set for at least 20 minutes – and you are done!
Almond Roca can be stored in the fridge or on the counter, but it is normally served at room temperature. Enjoy!
Pro Tips and Tricks
- If you are cooking at sea level, water boils at 212F (100C), and you will need to bring the temperature of your boiling sugar-butter mixture to 310F (154C). If you live at higher altitudes, you will find that water boils at a lower temperature due to the decrease in atmospheric pressure. What the actual temperature is will depend on your altitude. I suggest you boil water in a pan, and measure the temperature of this water. If it is say 200F, then you know that your water boils 12F less than at sea level. This means you will have to subtract 12F from 310F to reach the hard crack stage at your altitude. So bring your sugar-butter mixture only to 298F.
- Keep an eye on the thermometer, you don’t want to go over 310F or you risk burning the sugar and butter and having to start all over.
- Different ice cube stick molds will produce different sizes of toffee logs, some are longer than others. But if you can cut pieces that are about 1″ to 1.5″ max you will make a good serving size of almond roca. When cutting, if the pressure of the knife changes the shape of the log you can gently reshape it with your fingers. If the shape is changing a lot then the toffee is still too warm to cut, let it cool a little longer and try again.
FAQs
Can I make almond roca without a candy thermometer? Yes and No. People have done it, and they use the color change of the butter sugar mixture to indicate when to stop, however, I find this color change happens before 310F. So you risk the possibility of taking the toffee off the heat too early, or leaving it on too long and burning it. So yes, it can be done, but your chances of it not working out perfectly increase a lot.
How should I store almond roca? Almond roca will store in an airtight container at room temperature for up to 3 weeks. You can refrigerate it in an airtight container to last even longer. And if you want, you could place them in a zippertop bag in the freezer for up to 3 months. This allows you to plan gift giving well in advance.
The chocolate isn’t sticking to the toffee…what should I do? Two reasons why the chocolate may not stick. If the toffee is too warm, the chocolate could have troubles sticking and setting up. If the surface of the toffee has a lot of butter on it, the chocolate won’t be able to stick well. Use a paper towel to dab excess butter off.

Almond Roca
Ingredients
- 1 cup salted butter 225g
- 1 cup granulated white sugar 210g
- 1 cup sliced almonds 100g
- 1 cup chocolate chips 178g or 6.3 oz
- 1 tbsp + 1 tsp shortening
- 1 ⅓ cup finely chopped almonds 153g
Instructions
- In a heavy bottom saucepan heat the butter and sugar over medium/low heat with occasional stirring.
- Once the butter is melted and the sugar is fully dissolved, increase the heat to medium. It’s ok to stir occasionally to help distribute the heat.
- Once the mixture comes to a gentle boil, place a candy thermometer in the pot and let the mixture gently boil away. You want to stir the candy mixture as little as possible at this point. If it’s boiling gently it will be fine…resist the temptation.
- Keep an eye on the thermometer. You want to bring the butter sugar mixture to the “hard crack stage” (about 10-12 minutes) which is 310F. This temperature assumes you are at sea level. See Notes for details on how to adjust for different altitudes.
- Once at 310F remove the pan from the heat. Be careful the mixture is very hot!!! Stir in the sliced almonds and allow it cool off the heat for a couple of minutes.
- Pour into silicone molds. Again, be careful not to touch the toffee as it is VERY hot!. Use a rubber spatula to help push the toffee into the molds as cleanly as possible. Then set the molds aside to cool.
- Once the toffee has cooled for about 20 minutes, it should be firm but still soft enough to cut without shattering. Remove the toffee from the molds and cut into small 1 inch to 1.5 inch logs. If the toffee has lots of excess butter you can use a paper towel to dab the excess. See Notes about cutting and lengths.
- Place the logs on parchment paper and allow them to fully cool, about 30 more minutes.
- Once toffee is fully cool, cut up your chocolate into small chunks, and place in a microwave safe bowl or cup along with the shortening. I like to use a 2 cup pyrex measuring cup.
- Place in the microwave for 30 seconds. Give the chocolate a good stir, even though it probably doesn’t look like anything melted. Heat in microwave for another 30 second burst and stir again. Finally another 20 second burst followed by a good stir. If more heat is needed give it 10 second bursts with stirring after until you have a fluid chocolate mixture.
- Place one toffee piece into the chocolate and completely enrobe it. Remove with a fork and shake off excess chocolate. Place the chocolate covered toffee into a bowl with the finely chopped almonds. Completely cover with the almonds by rolling it around and then place it onto a parchment paper-lined baking pan to completely set. Repeat with the rest of the toffees.
- Place the baking pan in the fridge to help the chocolate set for about 20 minutes.
- Almond Roca can be stored in the fridge or on the counter, but it is normally served at room temperature. Enjoy!
Notes
- If you are cooking at sea level, water boils at 212F (100C), and you will need to bring the temperature of your boiling sugar-butter mixture to 310F (154C). If you live at higher altitudes, you will find that water boils at a lower temperature due to the decrease in atmospheric pressure. What the actual temperature is will depend on your altitude. I suggest you boil water in a pan, and measure the temperature of this water. If it is say 200F, then you know that your water boils 12F less than at sea level. This means you will have to subtract 12F from 310F to reach the hard crack stage at your altitude. So bring your sugar-butter mixture only to 298F.
- Keep an eye on the thermometer, you don’t want to go over 310F or you risk burning the sugar and butter and having to start all over.
- Different ice cube stick molds will produce different sizes of toffee logs, some are longer than others. But if you can cut pieces that are about 1″ to 1.5″ max you will make a good serving size of almond roca. When cutting, if the pressure of the knife changes the shape of the log you can gently reshape it with your fingers. If the shape is changing a lot then the toffee is still too warm to cut, let it cool a little longer and try again.
Follow Me On Social Media
If You Liked This Almond Roca Recipe…
If you liked this recipe, please consider rating the recipe and leaving a comment below – I love to hear how people get on with my recipes and I truly make an effort to respond to everyone who takes the time to comment. Other recipes you might enjoy include:


I did a test run of these for my holiday cookie boxes and they are so addictive. You cannot just eat one piece.
Yes, alas that is one of the downsides to delicious candies.
I looooove these! Making them for my Christmas party!
Your guests will be happy that you did!
I was so excited to try these because I love toffee! I ended up using hazelnuts instead because I’m not the biggest almond fan and they were incredible. Definitely making these again soon!
Hazelnuts sound delicious! I should try that too!
Made a small batch and it vanished in minutes, buttery and tasty, holiday gift idea solved!
Great for holiday gifting!
My Favorite candy ever! I can not wait to try these soon! Thank you!
They are delicious! ENjoy!
These were amazing. They did not last long in my house!
lol, they don’t last long in my house either. That’s why you have to hide some in your closet 😜
I have never heard of these before but they sound amazing, cant wait to make them!
They really are yummy! I hope you enjoy them.
I totally get why your mom hid them! I’m definitely saving this recipe to make my own identical version!
Thanks for commenting Madhu! Yes, these are delicious, I hope you have a good hiding spot lol!