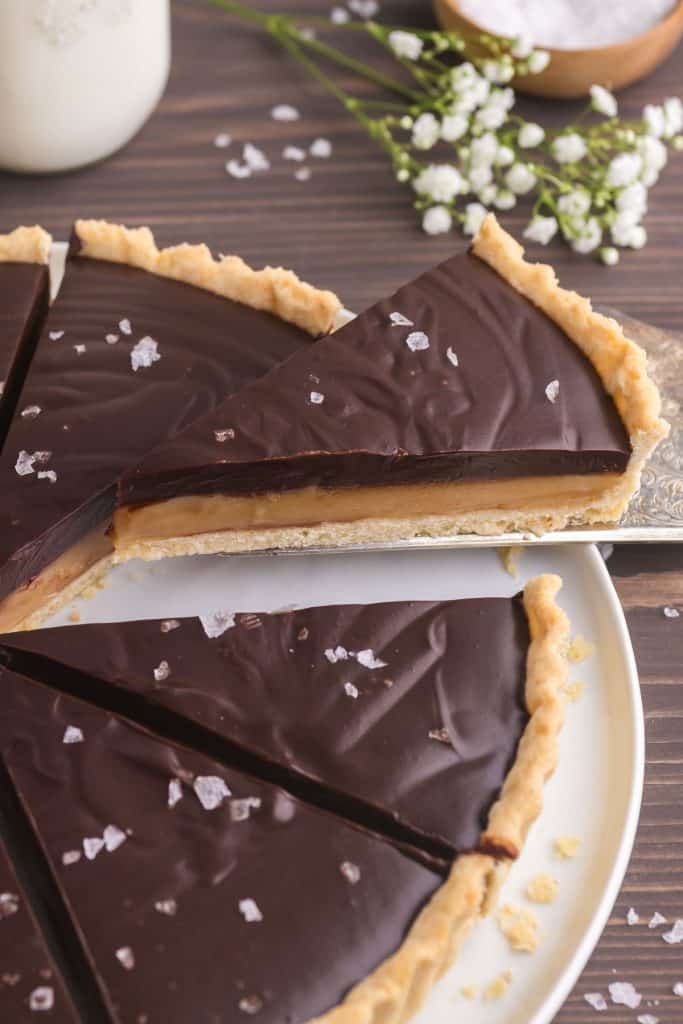
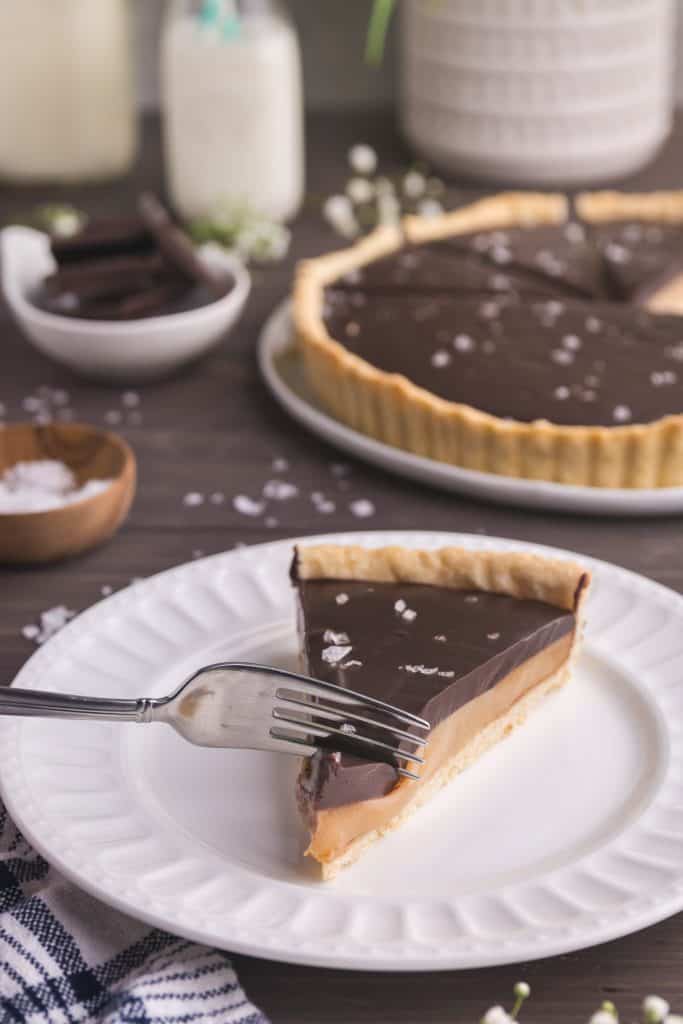
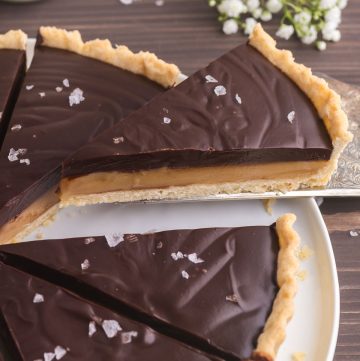
Chocolate Caramel Tart
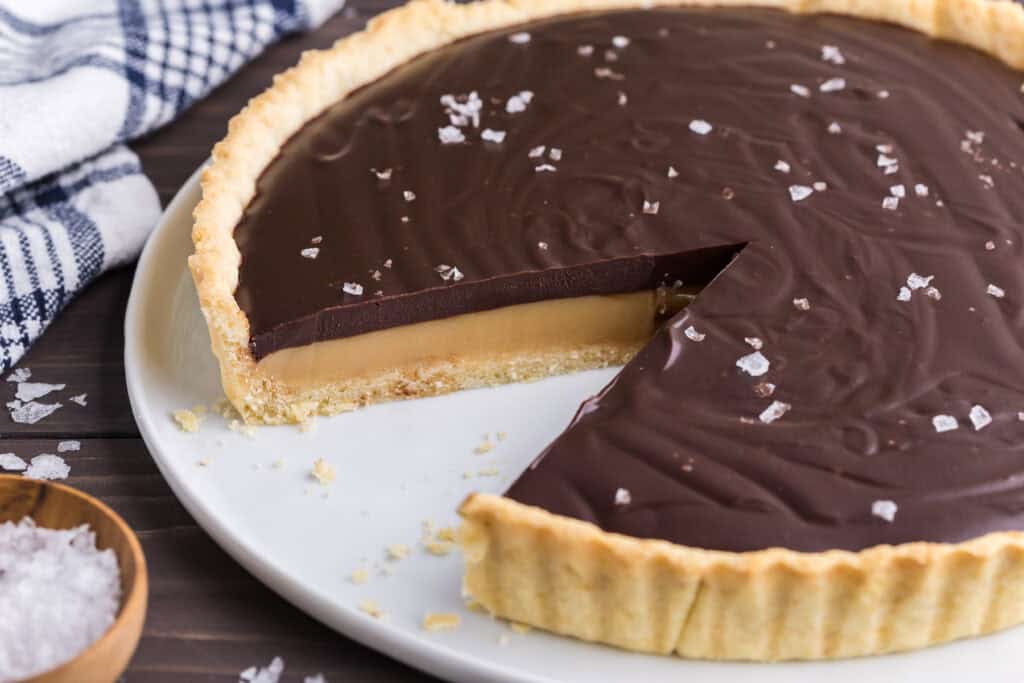
This chocolate caramel tart is a dessert that will wow your family and friends. It's beautiful to look at with its smooth silky chocolate, buttery caramel, and crisp cookie-like crust. But for all it's elegance, it is not hard to make. The caramel process, which normally is a little tricky to get the right consistency, requires no thermometers because we are using a kitchen hack that utilizes condensed milk, and sets up to a perfect thickness. And if making tart shells isn't your thing, you can always purchase a premade shell - easy peasy!
I have a deep love for chocolate, which is likely evident from the types of recipes featured on my blog. Typically, I'm not drawn to overly sweet desserts, and at first glance, I thought this one might be too sugary for my taste. However, I was pleasantly surprised by the outcome. It was so satisfying that I found myself craving more-and even waking up the next morning wondering if it was too early to have dessert, which apparently it wasn't 😜.
Why This Recipe Works
This tart shell is quick and straightforward. Tart shells can be finicky, keeping them cold, rolling them and chilling them in and out of the fridge with an hour rest here and there. This tart shell is a little different, keep the butter cold to begin with but after that, there's no chilling the dough, just straight into the oven. As mentioned above, you can buy a premade pie/tart shell and prebake it to make life even easier, no judgement here.
Caramel is easy to make and get right. Making caramel with sugar, butter, and cream is great, but it is finicky and requires the temperature to watched very carefully in order to get the final outcome just right. This caramel is made with condensed milk, and all you need to be able to do is watch for when it begins to bubble - done!
All ingredients are easily found in the grocery store, or you may have most of them in your cupboard already.
Equipment Needed
Disclosure: as an Amazon affiliate, I receive a small amount of compensation from qualifying purchases at no expense to you. This helps support my work and allows me to bring more yummy recipes your way.
- For best results a 9" tart pan with a removable bottom.
- Food Processor
- Rolling Pin
- Small to medium sized saucepan
- Medium sized heat proof mixing bowl
Ingredients
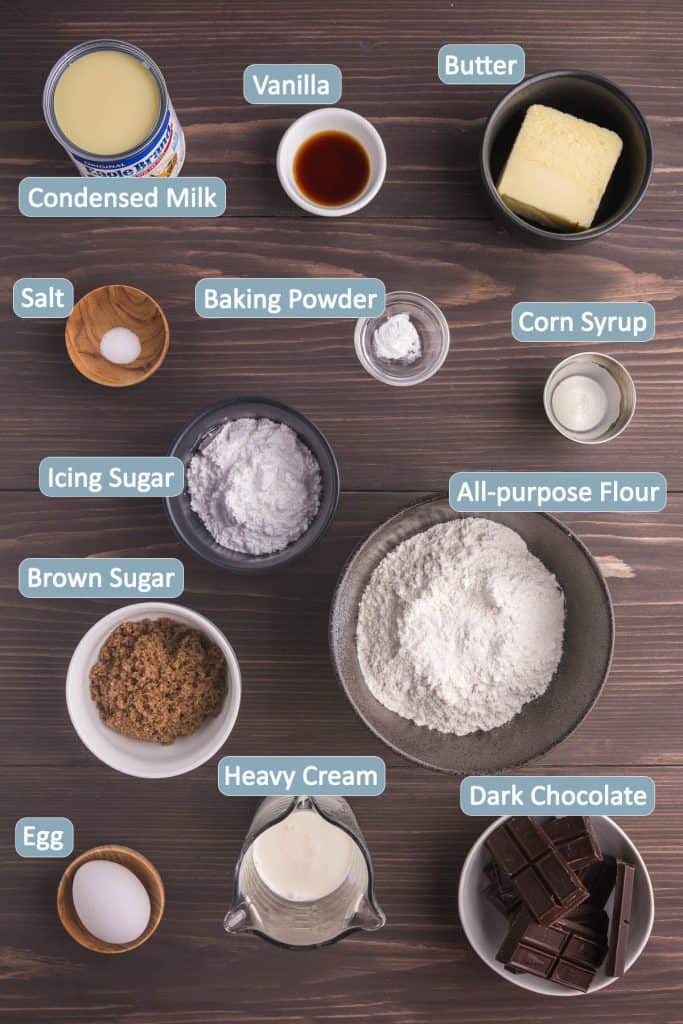
Tart Shell
1½ cups all-purpose flour (190g)
⅓ cup powdered sugar (icing sugar) (40g)
¼ teaspoon baking powder
⅛ teaspoon table salt
½ cup unsalted butter cold (113g), cut into small cubes
1 large egg
1½ teaspoons vanilla extract
Caramel Filling
½ cup unsalted butter (115g)
⅓ cup brown sugar (60g)
3 tablespoons corn syrup (55g)
1 can sweetened condensed milk (300mL)(395g)
1½ teaspoon vanilla extract
⅛ teaspoon salt (optional - don't need to add if you garnish with flaked salt)
Chocolate Ganache
8 oz dark chocolate (I used semi-sweet)
½ cup heavy cream
2 tablespoons corn syrup (36g)
1 teaspoon vanilla extract
Garnish with sea salt flakes if desired
Instructions
Tart Shell
- Preheat oven to 350F.
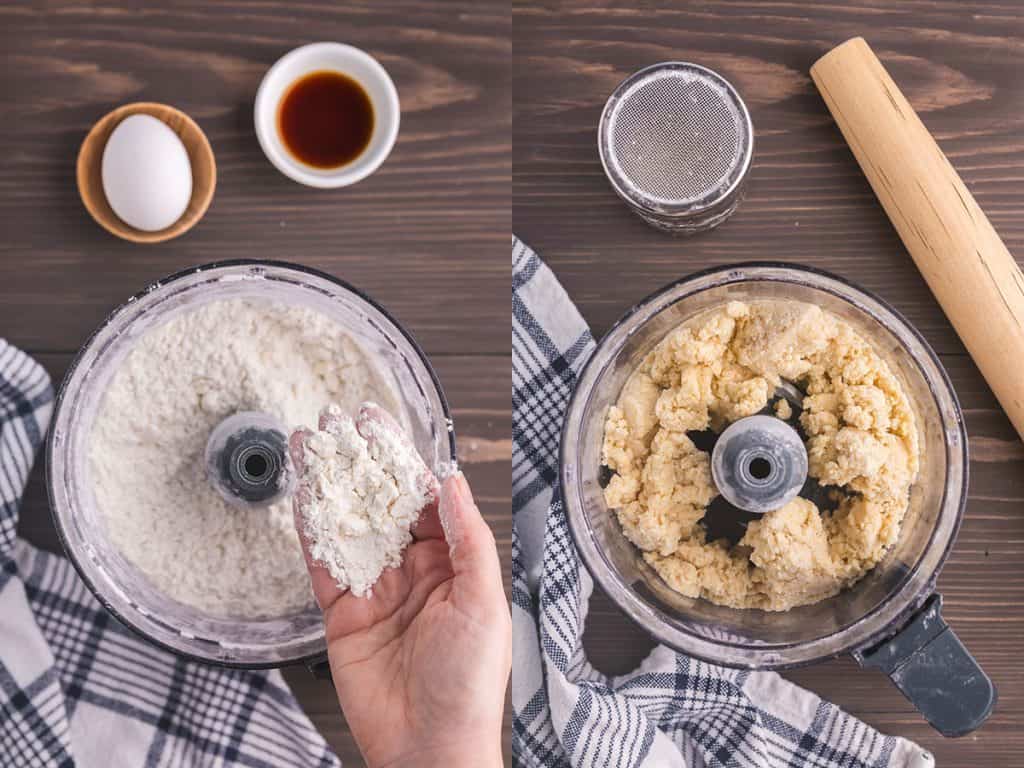
- In a food processor quickly pulse the flour, powdered sugar, baking powder, and salt together.
- Add in the cold butter cubes and keep pulsing until you get a coarse meal texture, about 6 pulses. It's ok if you have a few pea size chunks of butter covered in flour.
- Add in the egg and vanilla extract, pulse until a smooth dough forms.
- Empty dough onto a very lightly floured large piece of parchment paper. Flatten the dough into a disk with your hands.
- Cover the dough disk with another large piece of parchment paper which has the side facing the dough lightly floured.
- Use a rolling pin to roll the dough out between the two pieces of parchment until the dough is ¼" to an ⅛" thick and at least a little over an inch wider than your tart pan on all sides. The floured parchment pieces should not stick too strongly to the dough, you can add more flour if necessary.
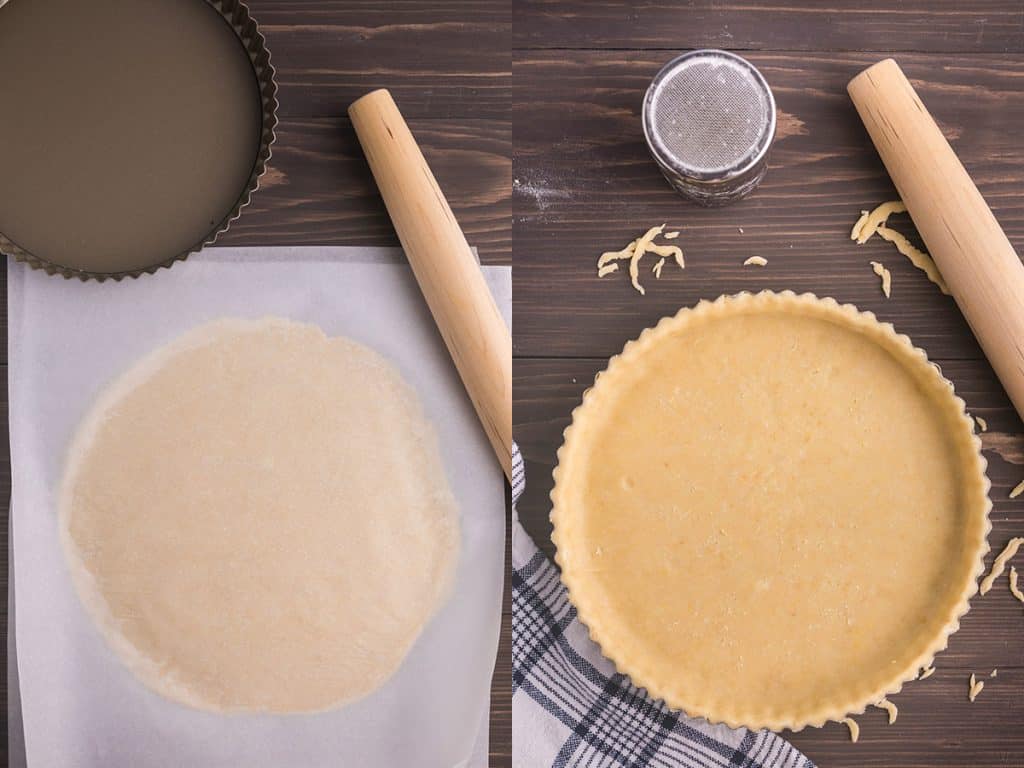
- Remove one of the parchment pieces and transfer the dough carefully into a 9" fluted tart pan with the dough touching the pan and the last piece of parchment laying on top. Gently remove this last piece of parchment and gently press the dough into the pan making sure the bottom edge and side edges are pressed in gently.
- Remove the excess dough on the top by rolling the rolling pin over the edges.
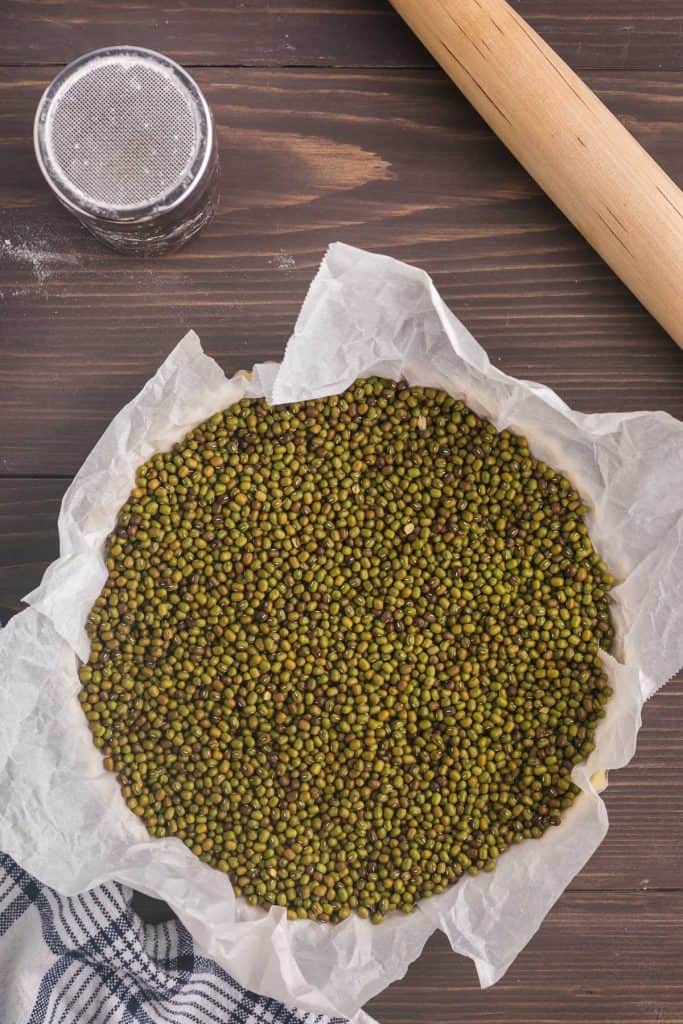
- You can use a fork to dock the bottom of the tart shell all over if you want which helps to prevent the centre from rising during baking.
- Scrunch up a piece of parchment paper then unscrunch it and place in the tart shell. Fill the tart with pie weights or dry rice, or dry beans (see note 1). Place in the oven and bake for 20 minutes, remove parchment paper and beads/beans/rice and bake another 5-10 minutes until lightly browned.
- Remove from the oven and allow to cool on a cooling rack
Caramel Filling
- Turn oven down to 325 F
- In a medium sized saucepan add the butter, brown sugar, and corn syrup. Gently stir over medium heat allowing the butter to melt and the sugar to dissolve (about 2.5-3minutes). Once it starts to bubble around the edges pour in the condensed milk. Stir constantly as you do not want the sugars to burn. Continue stirring and cooking for 2-4 minutes, until the mixture begins to bubble again. Remove from the heat.
- Stir in the vanilla, and salt if using. See Note 2.
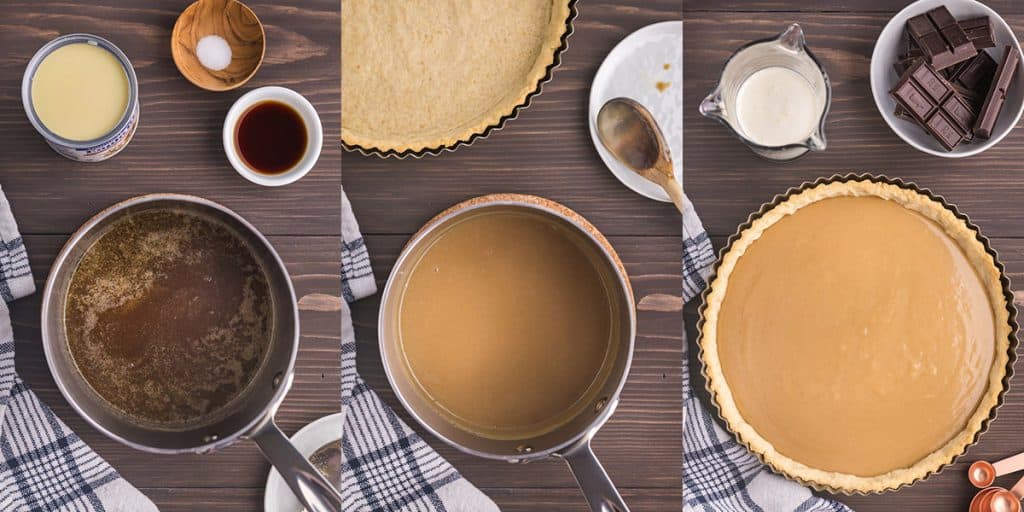
- Pour into the cooled tart shell. Place in the oven and bake for 12 minutes.
- Remove from oven and allow to cool to room temperature on a cooling rack about 1.5 hours. See Note 3.
Chocolate Ganache
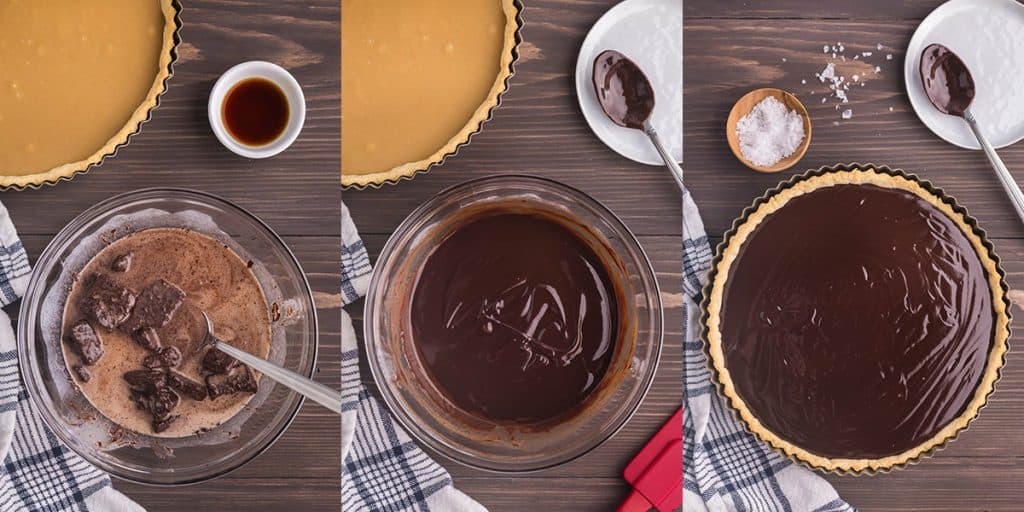
- Place chopped chocolate, heavy cream, and corn syrup into a heatproof bowl and place in the microwave. Heat for 30 seconds and then stir. Heat for another 30 seconds and stir stir stir. Often the warmth from the cream is enough at this point to melt the remaining chocolate chunks if you just keep stirring, but if necessary, continue heating and stirring in 15 second increments. See Note 4.
- Pour on top of the cooled caramel and tilt the tart around to allow the ganache to cover the entire tart. Place in the fridge to set for at least two hours or overnight. The time will depend on how warm your ganache is when you poured it on.
- The tart can be served directly from the fridge. Sprinkle with flaked sea salt to garnish (optional). For clean slices run your knife under warm water and wipe dry before cutting into tart each time. Enjoy!
Notes
- Pie weights prevent the tart shell from puffing up while you bake it. Anything that is relatively heavy and small so it can fit in the nooks and crannies can be used, like dry rice or dry beans.
- If you plan to add flaked sea salt to the top of the tart as a garnish you don't need to add salt to the caramel.
- The caramel will still be a little jiggly when it comes out of the oven but will solidify more as it cools.
- You don't want to overheat your ganache or it can become grainy. Best to go slow and err on the side of caution.
- Best to add the flaked sea salt just before serving. If placed on the warm ganache it starts to dissolve.
FAQs
What should I serve with this chocolate caramel tart? Because this tart is salty and sweet, it goes great with unsweetened or lightly sweetened whipping cream. Or you could put a scoop of vanilla ice cream on top or on the side.
What sort of occasion would you serve this tart at? This extra special dessert would be perfect for Thanksgiving or Christmas dinner or anytime you are aiming to wow your guests.
Can I use a premade pie crust/tart shell? You can if you need to save time, just make sure you prebake it before adding the caramel filling (follow the directions on the box).
How should I store leftovers? Keep the tart in the fridge covered loosely with plastic wrap or in an airtight container for up to 4 days. You can also freeze this tart as a whole or in slices wrapped in plastic wrap and placed inside a Ziploc bag for up to three months. If you are going to freeze I recommend not adding the flaked sea salt until you are ready to serve. Let it thaw overnight in the fridge before serving.
If You Liked This Chocolate Caramel Tart Recipe...
If you liked this recipe, please consider rating the recipe and leaving a comment below - I love to hear how people get on with my recipes and I truly make an effort to respond to everyone who takes the time to comment. Other recipes you might enjoy include:
Chocolate Caramel Tart
Ingredients
Tart Shell
- 1 ½ cups all-purpose flour (190g)
- ⅓ cup powdered sugar (40g)
- ¼ teaspoon baking powder
- ⅛ teaspoon table salt
- ½ cup cold unsalted butter, cut into cubes (113g)
- 1 large egg
- 1 ½ teaspoons vanilla extract
Caramel Layer
- ½ cup unsalted butter (115g)
- ⅓ cup brown sugar (60g)
- 3 tablespoons corn syrup (55g)
- 1 can sweetened condensed milk (300mL)(395g)
- 1 ½ teaspoons vanilla extract
- ⅛ teaspoon salt (optional) don't need to add if you will garnish with flaked sea salt
Chocolate Ganache Layer
- 8 oz dark chocolate I used semi-sweet
- ½ cup heavy cream also known as whipping cream
- 2 tablespoons corn syrup (36g)
- 1 teaspoon vanilla extract
Instructions
Tart Shell
- Preheat oven to 350F.
- In a food processor quickly pulse the flour, powdered sugar, baking powder, and salt together.
- Add in the cold butter cubes and keep pulsing until you get a coarse meal texture, about 6 pulses. It's ok if you have a few pea size chunks of butter covered in flour.
- Add in the egg and vanilla extract, pulse until a smooth dough forms.
- Empty dough onto a very lightly floured large piece of parchment paper. Flatten the dough into a disk with your hands.
- Cover the dough disk with another large piece of parchment paper which has the side facing the dough lightly floured.
- Use a rolling pin to roll the dough out between the two pieces of parchment until the dough is ¼" to an ⅛" thick and at least a little over an inch wider than your tart pan on all sides. The floured parchment pieces should not stick too strongly to the dough, you can add more flour if necessary.
- Remove one of the parchment pieces and transfer the dough carefully into a 9" fluted tart pan with the dough touching the pan and the last piece of parchment laying on top. Gently remove this last piece of parchment and gently press the dough into the pan making sure the bottom edge and side edges are pressed in gently.
- Remove the excess dough on the top by rolling the rolling pin over the edges.
- You can use a fork to dock the bottom of the tart shell all over if you want which helps to prevent the centre from rising during baking.
- Scrunch up a piece of parchment paper then unscrunch it and place in the tart shell. Fill the tart with pie weights or dry rice, or dry beans (see note 1). Place in the oven and bake for 20 minutes, remove beads and bake another 5-10 minutes until lightly browned.
- Remove from the oven and allow to cool on a cooling rack
Caramel Filling
- Turn oven down to 325 F
- In a medium sized saucepan add the butter, brown sugar, and corn syrup. Gently stir over medium heat allowing the butter to melt and the sugar to dissolve (about 2.5-3minutes). Once it starts to bubble around the edges pour in the condensed milk. Stir constantly as you do not want the sugars to burn. Continue stirring and cooking for 2-4 minutes, until the mixture begins to bubble again. Remove from the heat.
- Stir in the vanilla, and salt if using. See Note 2.
- Pour into the cooled tart shell. Place in the oven and bake for 12 minutes.
- Remove from oven and allow to cool to room temperature on a cooling rack about 1.5 hours. See Note 3.
Chocolate Ganache
- Place chopped chocolate, heavy cream, and corn syrup into a heatproof bowl and place in the microwave. Heat for 30 seconds and then stir. Heat for another 30 seconds and stir stir stir. Often the warmth from the cream is enough at this point to melt the remaining chocolate chunks if you just keep stirring, but if necessary, continue heating and stirring in 15 second increments. See Note 4.
- Pour on top of the cooled caramel and tilt the tart around to allow the ganache to cover the entire tart. Place in the fridge to set for at least two hours or overnight. The time will depend on how warm your ganache is when you poured it on.
- The tart can be served directly from the fridge. Garnish with flaked sea salt if you like. For clean slices run your knife under warm water and wipe dry before cutting into tart each time. Enjoy!
Notes
- Pie weights prevent the tart shell from puffing up while you bake it. Anything that is relatively heavy and small so it can fit in the nooks and crannies can be used, like dry rice or dry beans.
- If you plan to add flaked sea salt to the top of the tart as a garnish you don't need to add salt to the caramel.
- The caramel will still be a little jiggly when it comes out of the oven but will solidify more as it cools.
- You don't want to overheat your ganache or it can become grainy. Best to go slow and err on the side of caution.
- Best to add the flaked sea salt just before serving. If placed on the warm ganache it starts to dissolve.


Comments
No Comments